Developing on Staxmanade

Browser only MochaJS tests using SystemJS

(Comments)

I've been poking at SystemJS (you may have heard of it through JSPM) and one of the first things I like to setup when playing with a new JS framework is a way to run MochaJS unit tests which allow me to test-drive my prototypes and in this case the best part is we don't have to do any local command line installations or crazy gulp/grunt builds. We can right in the browser start writing plain ES6 and prototype using a library from npm or github.

SystemJS is a very exciting project with it's ability to import modules/code right from your JS code itself. You can write your JS using ES6 import syntax and in many cases SystemJS will magically import code via NPM or GitHub directly.

TL;DR

If you want to skip the details below and just see the plnkr.co go right ahead!

How to run our first Mocha test

First we need to get a simple web page setup. I'm going to use plnkr.co as it allows me to specify multiple files. This will allow me to more easily componentize my code for cleaner extraction into a project, gist or other...

Once you have a basic Plunker setup go ahead and delete everything except index.html of for now.

Now we're ready to start throwing our code in here... But before you do open your browser's developer tools. I'm using Chrome on the Mac so Cmd+Option+j will do it. We need to be able to see the javascript console in case we see any errors with SystemJS loading of modules.

index.html <- paste the below in for you're Plunker index.html.

<!DOCTYPE html>
<html>

<head>
  <script src="https://jspm.io/[email protected]"></script>
  <script type="text/javascript">
    System.import('./testInit.js');
  </script>
</head>

<body>
</body>

</html>

With the above in the index.html you should see some errors printed to the console as SystemJS is trying to load ./testInit.js (but we haven't created it yet).

Before we create the testInit.js file let's first create a couple sample MochaJS test files that we want to test.

Here's our first test file: name it mochaTest1.js

Something cool about this test is once we get mocha wired up correctly, this test shows how seamlessly you can take a dependency on a 3rd party library like chaijs for help with assertions.

import { expect } from 'chai';

describe("This is a describe", function() {
  it("sample test that should pass", function() {
    expect(true).to.equal(true);
  });
  it("sample test that should fail", function() {
    expect(true).to.equal(false);
  });
});

Create another test file mochaTest2.js

import { expect } from 'chai';

describe("This is another describe", function() {
  it("sample test that should pass", function() {
    expect(true).to.equal(true);
  });
  it("sample test that should fail", function() {
    expect(true).to.equal(false);
  });
});

Creating two test files allows this sample to show how you can easily create and test multiple modules.

The meat and potatoes

Now is the juicy part on how to get Mocha to play nicely with this setup and run our tests.

Create a file and call it testInit.js (same as we named in our index.html and referenced it via System.import('./testInit.js')) and paste the below.

Feel free to read through it as I commented it thoroughly.

//
// This tells SystemJS to load the mocha library
// and allows us to interact with the library below.
//
import mocha from 'mocha';

//
// This defines the list of test files we want to load and run tests against.
//
var mochaTestScripts = [
  './mochaTest1.js',
  './mochaTest2.js'
];

//
// If you have a global or two that get exposed from your
// tests that is expected you can include them here
//
var allowedMochaGlobals = [
  'jQuery'
]


//
// Mocha needs a <div id="mocha"></div> for the browser
// test reporter to inject test results in to the U.I.
// Below just injects it at the bottom of the page. (You can get fancy here)
// Maybe you create a button in your website and allow anyone to run tests.
// Check out https://staxmanade.com/2015/03/in-app-unit-tests/ for more on the thought
//
var mochaDiv = document.createElement('div');
mochaDiv.id = "mocha";
document.body.appendChild(mochaDiv);

//
// Importing mocha with JSPM and ES6 doesn't expose the usual mocha globals.
// I found this is one way to manually expose the globals, however if you know of a better way please let me know...
//
mocha.suite.on('pre-require', function(context) {
  var exports = window;

  exports.afterEach = context.afterEach || context.teardown;
  exports.after = context.after || context.suiteTeardown;
  exports.beforeEach = context.beforeEach || context.setup;
  exports.before = context.before || context.suiteSetup;
  exports.describe = context.describe || context.suite;
  exports.it = context.it || context.test;
  exports.setup = context.setup || context.beforeEach;
  exports.suiteSetup = context.suiteSetup || context.before;
  exports.suiteTeardown = context.suiteTeardown || context.after;
  exports.suite = context.suite || context.describe;
  exports.teardown = context.teardown || context.afterEach;
  exports.test = context.test || context.it;
  exports.run = context.run;

  // now use SystemJS to load all test files
  Promise
    .all(mochaTestScripts.map(function(testScript) {
      return System.import(testScript);
    })).then(function() {
      mocha.checkLeaks();
      mocha.globals(allowedMochaGlobals);
      mocha.run();
    }, function(err) {
      console.error("Error loading test modules");
      console.error(err);
    });

});

mocha.setup('bdd');

Please let me know if you know of an easier way to get access to the mochas globals using SystemJS. The below works, but is a bit uncomfortable.

MochaJS Tests Right in the Browser...

How awesome is this. Couple bits of bootstrap code, and we can go author whatever we want right in the browser using ES6 (err EcmaScript 2015) and we're off and running.

warning NOT FOR PRODUCTION WORKFLOWS (yet)! warning

This approach is primarily for allowing quick prototyping. Don't implement a complete app like this and then expect any performance. SystemJS can potentially download a large number of dependencies and you should read up on JSPM production workflows.

Happy Browser-Only Testing.
(Comments)

Habit of a Solid Developer - Part 1 - Introduction

(Comments)

I've been thinking about some of the software development related habits that I've practiced and acquired over the years. I thought putting some of these down in posts and sharing would both help me solidify my own thinking on the subjects, but also provide a good place to link other developers or anyone I would like to send a topic when the context justifies it.

For this first post, I'd like to highlight some older posts that fit well into this category:

In future posts I'm going to write down some of the habits that I think have helped me become a better developer over the years. While I get glimpses of (being the old guy) in a room of developers, I know that my learning is never done and my future has more personal growth than I can even imagine. Regardless, I hope you find these posts useful.

Happy Deving!

This article is Part 1 of 11 in a series about Habit of a Solid Developer.

(Comments)

Hello World with TypeScript and JSX

(Comments)

If you're looking for a solid TypeScript JSX tutorial this is a great resource.

Last night I wanted to play with TypeScripts new support for JSX. In this post I'll walk through my process, and what I learned along the way. Hopefully you find this useful.

While it doesn't yet exist in the current version (at the time of this writing TypeScript is at 1.5), you can however grab a copy of the nightly builds from npm.

Get the most recent nightly build.

npm install -g typescript@next

The rest of this post was run against nightly build Version 1.6.0-dev.20150814.

Given this sample React/JSX

var HelloMessage = React.createClass({
  render: function() {
    return <div>Hello {this.props.name}</div>;
  }
});

React.render(<HelloMessage name="John" />, mountNode);

Create a TypeScript version of a JSX file.

Just like how TypeScript doesn't read .js but looks for .ts files (unless you hack it). TypeScript doesn't read .jsx files. It instead looks for .tsx files.

So if you save the above sample as a helloWorld.tsx, we can then run the tsc compiler against our helloWorld.tsx file.

If I run tsc helloWorld.tsx I get the following errors:

> tsc helloWorld.tsx
helloWorld.tsx(1,20): error TS2304: Cannot find name 'React'.
helloWorld.tsx(3,12): error TS17004: Cannot use JSX unless the '--jsx' flag is provided.
helloWorld.tsx(7,1): error TS2304: Cannot find name 'React'.
helloWorld.tsx(7,14): error TS17004: Cannot use JSX unless the '--jsx' flag is provided.
helloWorld.tsx(7,44): error TS2304: Cannot find name 'mountNode'.

Working through the errors...

I could just show you the final output that compiles, but want to include my learning process (stumbling) as I fumble through and figure out the new command.

Fixing error TS2304: Cannot find name 'React'.

If you've been using TypeScript for any amount of time, the first error should be easy to see. The compiler knows nothing about this thing called React. And I haven't used React with TypeScript before. I don't want to go write a bunch of TypeScript type definitions for react and can easily pull down ones created already by using tsd to install the Definitely Typed definitions for React.

What is tsd?

If you haven't seen TSD before it's a great package manger utility for TypeScript Type Definitions.

It can be easily installed with npm install -g tsd.

Installing React Type Definitions

UPDATE: Originally below I used tsd to install react but if you check out the comments react-global works out better and you can avoid some of the hacks I put in place to compile React below.

tsd install react which tsd will download from Definitely Typed the react.d.ts and place it in ./typings/react/react.d.ts.

I then reference the file in our helloWorld.tsx which gives me the following:

/// <reference path="./typings/react/react.d.ts" />

var HelloMessage = React.createClass({
  render: function() {
    return <div>Hello {this.props.name}</div>;
  }
});

React.render(<HelloMessage name="John" />, mountNode);

When I re-run tsc helloWorld.tsx hoping to get rid of the first error: hmmm

> tsc helloWorld.tsx
helloWorld.tsx(3,20): error TS2304: Cannot find name 'React'.
helloWorld.tsx(5,12): error TS17004: Cannot use JSX unless the '--jsx' flag is provided.
helloWorld.tsx(9,1): error TS2304: Cannot find name 'React'.
helloWorld.tsx(9,14): error TS17004: Cannot use JSX unless the '--jsx' flag is provided.
helloWorld.tsx(9,44): error TS2304: Cannot find name 'mountNode'.

Well, that didn't get rid of our error TS2304: Cannot find name 'React'.. This threw me for a bit but eventually figured out that you need set it up by adding import React = __React;.

So that gives us this:

/// <reference path="./typings/react/react.d.ts" />
import React = __React;

var HelloMessage = React.createClass({
  render: function() {
    return <div>Hello {this.props.name}</div>;
  }
});

React.render(<HelloMessage name="John" />, mountNode);

Now we should see some errors going away. And we do...

> tsc helloWorld.tsx
helloWorld.tsx(6,12): error TS17004: Cannot use JSX unless the '--jsx' flag is provided.
helloWorld.tsx(10,14): error TS2607: JSX element class does not support attributes because it does not have a 'props' property
helloWorld.tsx(10,14): error TS17004: Cannot use JSX unless the '--jsx' flag is provided.
helloWorld.tsx(10,44): error TS2304: Cannot find name 'mountNode'.

Fixing error TS17004: Cannot use JSX unless the '--jsx' flag is provided.

The next error is new to me, but it makes some sense, so I add the --jsx flag to tsc and try tsc --jsx helloWorld.tsx, but looks like I missed a parameter to --jsx.

> tsc --jsx helloWorld.tsx
message TS6081: Argument for '--jsx' must be 'preserve' or 'react'.

In the current iteration of TypeScript 1.6 appears to have two options for --jsx, both preserve or react.

  • preserve will keep the jsx in the output. I presume this is so you can use tools like JSX to actually provide the translation.
  • react will remove the jsx syntax and turn it in to plain javascript so <div></div> in the TSX file would become React.createElement("div", null).

By passing the react option, here's where we end up:

> tsc --jsx react helloWorld.tsx
helloWorld.tsx(11,14): error TS2607: JSX element class does not support attributes because it does not have a 'props' property
helloWorld.tsx(11,44): error TS2304: Cannot find name 'mountNode'.

I'm going to tackle the last error next, as initially I didn't understand the JSX error above.

Fixing error TS2304: Cannot find name 'mountNode'.

This one I'll just make the compiler happy and presume we defined mountNode as an html element probably a <div id="mountNode"></div> somewhere in the global scope to keep this example short.

I place declare var mountNode: any; near the top of my helloWorld.tsx file and we're left with one last error:

> tsc --jsx react helloWorld.tsx
helloWorld.tsx(10,14): error TS2607: JSX element class does not support attributes because it does not have a 'props' property

Fixing error TS2607: JSX element class does not support attributes because it does not have a 'props' property

This last error is actually the one that had me stumped, and mostly why I'm writing this lengthy post so I hope you find it and can work through it a little quicker than it took me.

What's happening here is TypeScript is doing what it was intended to do. It's statically checking our JSX in this case.

If you look at our sample above where we call React.createClass(...) and compare that to the type definition we see: function createClass<P, S>(spec: ComponentSpec<P, S>): ClassicComponentClass<P>; you may notice P and S generic parameters to createClass<P, S> which I didn't supply earlier.

The naming here wasn't immediately obvious, but some snooping around in the type definitions and I eventually found out P is referring to the type we pass in defining the structure of the react props and S defines the state.

So in this Hello World example when we placed name="John" attribute inside the <HelloMessage name="John" /> element and since we didn't give a P or S to the React.createClass<P,S>(...), TypeScript was providing static type checking against an unknown type for P & S. In this case saying that we can't apply the attributes to the element because we did not provide a generic type P to define what props are allowed to be included.

To fix this I create a type by using an interface like below:

interface HelloWorldProps {
  name: string;
}

When I call React.createClass I pass in the HelloWorldProps interface for the props (P) and an any for the state (S) like so: React.createClass<HelloWorldProps, any>(...)

YAY IT COMPILES!!!

Compiling the below by using tsc --jsx react helloWorld.tsx

/// <reference path="./typings/react/react.d.ts" />
import React = __React;
declare var mountNode: any;

interface HelloWorldProps {
  name: string;
}

var HelloMessage = React.createClass<HelloWorldProps, any>({
  render: function() {
    return <div>Hello {this.props.name}</div>;
  }
});

React.render(<HelloMessage name="John" />, mountNode);

We get the following output in helloWorld.js

/// <reference path="./typings/react/react.d.ts" />
var React = __React;
var HelloMessage = React.createClass({
    render: function () {
        return React.createElement("div", null, "Hello ", this.props.name, React.createElement("div", null));
    }
});
React.render(React.createElement(HelloMessage, {"name": "John"}), mountNode);

Let's improve it now...

Since we started with a plain JavaScript version of our sample and we're now using TypeScript we get to take advantage of some of what TypeScript brings to the table.

But before we do this, let's first break our code (from a compiler) perspective to see what the above gave us...

Let's break our example on purpose to see how TypeScript responds?

I changed one character in two places in the working helloWorld.tsx file and when I run the compiler I get the following two errors. Can you spot what changed?

/// <reference path="./typings/react/react.d.ts" />
import React = __React;
declare var mountNode: any;

interface HelloWorldProps {
  Name: string;
}

var HelloMessage = React.createClass<HelloWorldProps, any>({
  render: function() {
    return <div>Hello {this.props.mane} <div></div></div>;
  }
});

React.render(<HelloMessage name="John" />, mountNode);

Output:

> tsc --jsx react helloWorld.tsx
helloWorld.tsx(15,14): error TS2324: Property 'Name' is missing in type 'HelloWorldProps'.
helloWorld.tsx(15,28): error TS2339: Property 'name' does not exist on type 'HelloWorldProps'.

Did you spot the change made? If you did, amazing. If you didn't, don't feel bad - it's a very simple and easy error to make when writing plain javascript. One that can't be found without actually executing plain JS, debugging, running unit tests or other checkers before even finding the error.

If you didn't spot the change by looking directly at the code, can you spot the change by reading the compiler error output?

Ok, give up? - I changed the name to Name in the HelloWorldProps interface definition AND in the JSX this.props.mane I spelled the props name mane wrong (should be Name according to our interface definition). So then why did we only get the error on line 15 (that's the React.render(...) line).

TypeScript in this case is using the HelloWorldProps interface and it's definition to type-check the attributes used in the JSX <HelloMessage />.

This is great, the compiler found the error right in the JSX before we even tried to execute the code.

Why didn't it detect the mane mis-spelled variable?

I'm going to just take a guess on this one but I'm not a React guy yet, so it may have something to do with react internals (that I'm not feeling like digging into at the moment).

If you look at the react.d.ts you'll see that React.createClass<P,S>() returns a type of ClassicComponentClass<P>.

Thanks to a tip from Ryan (ya, the famous Ryan from the TypeScript team) has a great write up about TypeScript and JSX we should be avoiding all of the above use of React.createClass(...) and instead using the ES6 extends functionality which we can leverage in TypeScript.

Let's re-write...

Turning the HelloMessage variable into an ES6 class we now also get type checking inside the component on this.props options. YAY!!!:

/// <reference path="./typings/react/react.d.ts" />
import React = __React;
declare var mountNode: any;

interface HelloWorldProps extends React.Props<any> {
  Name: string;
}

class HelloMessage extends React.Component<HelloWorldProps, {}> {
  render() {
    return <div>Hello {this.props.mane}</div>;
  }
}

React.render(<HelloMessage name="John" />, mountNode);

The above gives us the following errors:

> tsc --jsx react helloWorld.tsx
helloWorld.tsx(11,35): error TS2339: Property 'mane' does not exist on type 'HelloWorldProps'.
helloWorld.tsx(15,14): error TS2324: Property 'Name' is missing in type 'HelloWorldProps'.
helloWorld.tsx(15,28): error TS2339: Property 'name' does not exist on type 'HelloWorldProps'.

Final Answer

So, a bit long winded, but below is the final sample HelloWorld React TypeScript JSX prototype.

/// <reference path="./typings/react/react.d.ts" />
import React = __React;
declare var mountNode: any;

interface HelloWorldProps extends React.Props<any> {
  name: string;
}

class HelloMessage extends React.Component<HelloWorldProps, {}> {
  render() {
    return <div>Hello {this.props.name}</div>;
  }
}

React.render(<HelloMessage name="John" />, mountNode);

Wrap-up

While it seemed a bit challenging getting started with TypeScript and JSX I could really see the benefit of the compiler helping out with React components going forward, and look forward to the future of this part of the project.

Thanks to the TypeScript team and community that helped bring all of this support together!

Happy TSXing!

(Comments)

Debugging iOS AutoLayout Issues

(Comments)

This tip may not be news to you, but it was to me so I'll put this up here to help you, but more to help myself when I get stuck down the road and forget how to do this.

Background

I just stumbled upon a way to help when debugging and diagnosing issues around ambiguous auto layout constraints (you know the kind where iOS just picks the one it feels like to remove?).

Today I was researching why I was receiving the following output in my debugger console:

Unable to simultaneously satisfy constraints.
	Probably at least one of the constraints in the following list is one you don't want. Try this: (1) look at each constraint and try to figure out which you don't expect; (2) find the code that added the unwanted constraint or constraints and fix it. (Note: If you're seeing NSAutoresizingMaskLayoutConstraints that you don't understand, refer to the documentation for the UIView property translatesAutoresizingMaskIntoConstraints)
(
    "<NSLayoutConstraint:0x7fc82d3e18a0 H:[UIView:0x7fc82aba1210(768)]>",
    "<NSLayoutConstraint:0x7fc82d6369e0 H:[UIView:0x7fc82aba1210]-(0)-|   (Names: '|':UIView:0x7fc82d6b9f80 )>",
    "<NSLayoutConstraint:0x7fc82d636a30 H:|-(0)-[UIView:0x7fc82aba1210]   (Names: '|':UIView:0x7fc82d6b9f80 )>",
    "<NSLayoutConstraint:0x7fc82d3e7fd0 'UIView-Encapsulated-Layout-Width' H:[UIView:0x7fc82d6b9f80(50)]>"
)

Will attempt to recover by breaking constraint
<NSLayoutConstraint:0x7fc82d3e18a0 H:[UIView:0x7fc82aba1210(768)]>

Make a symbolic breakpoint at UIViewAlertForUnsatisfiableConstraints to catch this in the debugger.
The methods in the UIConstraintBasedLayoutDebugging category on UIView listed in <UIKit/UIView.h> may also be helpful.

Now, I can tell from the above that theres an issue with the height constraint(s), but looking at this, I have no idea what view is being referenced which makes it quite difficult to jump to XCode and inspect the view's constraints.

But I worked through it, and learned the following along the way. Hope this helps you.

How to set auto layout breakpoint in Xcode debugger

Using this text Make a symbolic breakpoint at UIViewAlertForUnsatisfiableConstraints to catch this in the debugger. I found this great post on stack overflow on How to trap on UIViewAlertForUnsatisfiableConstraints but have copied below for reference.

You'll want to add a Symbolic Breakpoint. Apple provides an excellent guide on how to do this.

  1. Open the Breakpoint Navigator cmd+7
  2. Click the Add button in the lower left
  3. Select Add Symbolic Breakpoint...
  4. Where it says Symbol just type in UIViewAlertForUnsatisfiableConstraints

You can also treat it like any other breakpoint, turning it on and off, adding actions, or log messages.

But that's only the first step. Once you've run the app and hit the breakpoint, you're left staring at assembly code and memory addresses, for example:

UIKit`UIViewAlertForUnsatisfiableConstraints:
->  0x1131cc4a2 <+0>:   pushq  %rbp
    0x1131cc4a3 <+1>:   movq   %rsp, %rbp
    0x1131cc4a6 <+4>:   pushq  %r15
    0x1131cc4a8 <+6>:   pushq  %r14
    0x1131cc4aa <+8>:   pushq  %rbx
    0x1131cc4ab <+9>:   pushq  %rax
    0x1131cc4ac <+10>:  movq   %rsi, %r14
    0x1131cc4af <+13>:  movq   %rdi, %r15
    0x1131cc4b2 <+16>:  cmpq   $-0x1, 0x778796(%rip)     ; _UIConstraintBasedLayoutPlaySoundOnUnsatisfiable.result + 7
    0x1131cc4ba <+24>:  jne    0x1131cc529               ; <+135>
    0x1131cc4bc <+26>:  cmpb   $0x0, 0x778785(%rip)      ; _UIConstraintBasedLayoutPlaySoundWhenEngaged.__once + 7
    0x1131cc4c3 <+33>:  je     0x1131cc4ed               ; <+75>
    0x1131cc4c5 <+35>:  movq   0x73cd8c(%rip), %rdi      ; (void *)0x0000000113925248: UIDevice
    0x1131cc4cc <+42>:  movq   0x7108e5(%rip), %rsi      ; "currentDevice"
    0x1131cc4d3 <+49>:  movq   0x4d7aee(%rip), %rbx      ; (void *)0x0000000114598000: objc_msgSend
    0x1131cc4da <+56>:  callq  *%rbx
    0x1131cc4dc <+58>:  movq   0x71e375(%rip), %rsi      ; "_playSystemSound:"
    0x1131cc4e3 <+65>:  movl   $0x3ee, %edx
    0x1131cc4e8 <+70>:  movq   %rax, %rdi
    0x1131cc4eb <+73>:  callq  *%rbx
    0x1131cc4ed <+75>:  cmpq   $-0x1, 0x77877b(%rip)     ; _UIConstraintBasedLayoutLogUnsatisfiable.result + 7
    0x1131cc4f5 <+83>:  jne    0x1131cc541               ; <+159>
    0x1131cc4f7 <+85>:  cmpb   $0x0, 0x77876a(%rip)      ; _UIConstraintBasedLayoutVisualizeMutuallyExclusiveConstraints.__once + 7
    0x1131cc4fe <+92>:  je     0x1131cc51e               ; <+124>
    0x1131cc500 <+94>:  leaq   0x53ba89(%rip), %rdi      ; @"Unable to simultaneously satisfy constraints.\n\tProbably at least one of the constraints in the following list is one you don't want. Try this: (1) look at each constraint and try to figure out which you don't expect; (2) find the code that added the unwanted constraint or constraints and fix it. (Note: If you're seeing NSAutoresizingMaskLayoutConstraints that you don't understand, refer to the documentation for the UIView property translatesAutoresizingMaskIntoConstraints) \n%@\n\nWill attempt to recover by breaking constraint \n%@\n\nMake a symbolic breakpoint at UIViewAlertForUnsatisfiableConstraints to catch this in the debugger.\nThe methods in the UIConstraintBasedLayoutDebugging category on UIView listed in <UIKit/UIView.h> may also be helpful."
    0x1131cc507 <+101>: xorl   %eax, %eax
    0x1131cc509 <+103>: movq   %r14, %rsi
    0x1131cc50c <+106>: movq   %r15, %rdx
    0x1131cc50f <+109>: addq   $0x8, %rsp
    0x1131cc513 <+113>: popq   %rbx
    0x1131cc514 <+114>: popq   %r14
    0x1131cc516 <+116>: popq   %r15
    0x1131cc518 <+118>: popq   %rbp
    0x1131cc519 <+119>: jmp    0x11331930c               ; symbol stub for: NSLog
    0x1131cc51e <+124>: addq   $0x8, %rsp
    0x1131cc522 <+128>: popq   %rbx
    0x1131cc523 <+129>: popq   %r14
    0x1131cc525 <+131>: popq   %r15
    0x1131cc527 <+133>: popq   %rbp
    0x1131cc528 <+134>: retq
    0x1131cc529 <+135>: leaq   0x778720(%rip), %rdi      ; _UIConstraintBasedLayoutPlaySoundOnUnsatisfiable.__once
    0x1131cc530 <+142>: leaq   0x4fdb59(%rip), %rsi      ; __block_literal_global68
    0x1131cc537 <+149>: callq  0x11331a2a8               ; symbol stub for: dispatch_once
    0x1131cc53c <+154>: jmp    0x1131cc4bc               ; <+26>
    0x1131cc541 <+159>: leaq   0x778728(%rip), %rdi      ; _UIConstraintBasedLayoutLogUnsatisfiable.__once
    0x1131cc548 <+166>: leaq   0x4fdbc1(%rip), %rsi      ; __block_literal_global76
    0x1131cc54f <+173>: callq  0x11331a2a8               ; symbol stub for: dispatch_once
    0x1131cc554 <+178>: jmp    0x1131cc4f7               ; <+85>

What next?

We can use the Xcode debug console output to gather more information than we see it initially provides.

In the above example I'm going to take the following output:

Will attempt to recover by breaking constraint <NSLayoutConstraint:0x7fc82d3e18a0 H:[UIView:0x7fc82aba1210(768)]>

Pull out the UIView's memory address 0x7fd8fe59a440 and use the XCode console to dig deeper and try to get a better understanding.

Printing views from memory addresses

The memory address 0x7fd8fe59a440 is a pointer to a UIView. Since we know that a UIView has other selectors we can query, we can begin to use these to dig deeper into the object and get a better understanding of which part of our view have auto layout constraints that are not playing nicely.

First we try to look at just the UIView and see if that helps us get a grasp as to which view is causing our troubles.

po 0x7fc82aba1210

If this doesn't provide enough info as the below sample output shows (not very helpful).

(lldb) po 0x7fc82aba1210
<UIView: 0x7fc82aba1210; frame = (0 0; 768 359); autoresize = RM+BM; layer = <CALayer: 0x7fc82d338960>>

Maybe printing it's recursiveDescription will help out and in my case gives me a better idea of which component I'm actually trying to look at.

(lldb) po [0x7fc82aba1210 recursiveDescription]
<UIView: 0x7fc82aba1210; frame = (0 0; 768 359); autoresize = RM+BM; layer = <CALayer: 0x7fc82d338960>>
   | <MYAPPButton: 0x7fc82d61c800; baseClass = UIButton; frame = (0 0; 768 359); opaque = NO; autoresize = RM+BM; layer = <CALayer: 0x7fc82ab96570>>
   |    | <UIImageView: 0x7fc82d3f7b10; frame = (0 0; 0 0); clipsToBounds = YES; opaque = NO; userInteractionEnabled = NO; layer = <CALayer: 0x7fc82d6e7020>>
   | <UIImageView: 0x7fc82d54a1c0; frame = (314 110; 140 140); autoresize = RM+BM; userInteractionEnabled = NO; layer = <CALayer: 0x7fc82d52def0>>

Or if that's not enough context, then we can look at the view's superview and potentially even walk up the view's tree, printing out a different levels trying to understand which component is having trouble with auto layout.

po [[0x7fc82aba1210 superview] recursiveDescription]

Once you've narrowed down which view inside which component is causing you trouble, now it's up to digging and finding the problematic constraint...

Fix it

This part I can't add much color to help you, except to start by looking in your storyboard, xib or code wherever the constraints are being added to the particular view we diagnosed above.

Hopefully this walk-through helps at least a little in diagnosing your auto layout constraint issues.

Happy debugging!

(Comments)

Running in-app mocha tests within WinJS

(Comments)

I described a while back a scenario about running in-app unit tests. So if you'd like some background on the subject have a look there before reading here.

This post is going to give some specifics about how to run MochaJS tests within a Microsoft Windows JavaScript application (WinJS).

Prerequisites

These steps assume you already have a WinJS application, possibly using the universal template or other. In the end it doesn't matter. As long as you have a project that probably has a default.html file and the ability to add js & css files to.

Get Mocha

You can acquire the mocha library however you want, Bower, Npm, or download it manually from the site (mochajs.org).

Reference Mocha Within Project & App

However you get the mocha source, you need to both add references to the mocha js and css files into your project file either in a *.jsproj file or if using a universal shared app, in the shared project.

Then you need to include a reference to the code in your default.html file.

In my example below you can see I used bower to download the MochaJS library.

The mocha.setup('bdd') tells mocha to use the BDD style of tests which defines the describe(...), it(...), etc functions.

<!DOCTYPE html>
<html>
<head>
    <meta charset="utf-8" />
    <title>MyApp.Windows</title>

    <!-- WinJS references -->
    <link href="/js/bower_components/winjs/css/ui-light.css" rel="stylesheet" />
    <script src="/js/bower_components/winjs/js/base.js"></script>
    <script src="/js/bower_components/winjs/js/ui.js"></script>

    <!-- TESTS-->
    <link href="/js/bower_components/mocha/mocha.css" rel="stylesheet" />
    <script src="/js/bower_components/mocha/mocha.js"></script>
    <script>
        mocha.setup('bdd');
    </script>

    <!-- My Project js/css files below... -->

...Rest of default.html file excluded

Create a WinJS Control for hosting Mocha reporting.

Below is a sample WinJS control that can be used to host the mocha html report.

<!DOCTYPE html>
<html>
<head>
    <style>
        #mocha {
            height: 800px;
            width: 600px;
            overflow: scroll;
        }
    </style>
</head>
<body>
    <div class="fragment section1page">
        <section aria-label="Main content" role="main">

            <!-- define a button that we can use to manually run or re-run tests -->
            <button id="mochaTestsRun">Run Tests</button>

            <!-- define a checkbox that allow us to toggle auto-run
                 of the tests when we start up the app -->
            Auto start <input type="checkbox" id="mochaTestsRunOnStart" />


            <!-- this is a blank div we use to inject U.I. related tests -->
            <div id="testElementContainer"></div>

            <!-- mocha throws the html output in the below div -->
            <div id="mocha"></div>
        </section>
    </div>
</body>
</html>
(function () {
    "use strict";

    var runMochaTests = function() {
        // clear any current test results since mocha just appends.
        element.querySelector('#mocha').innerHTML = "";

        // If you want your tests to verify nothing is leaked globally...
        mocha.checkLeaks();

        // specify any globals that you are OK with your tests leaking
        mocha.globals([
            'someGlobalIAmExpecting'
        ]);

        // start the test run
        mocha.run();
    }

    var ControlConstructor = WinJS.UI.Pages.define("/js/tests/tests.html", {
        // This function is called after the page control contents
        // have been loaded, controls have been activated, and
        // the resulting elements have been parented to the DOM.
        ready: function (element, options) {
            options = options || {};

            // get our possibly already cached value of whether to run the tests on startup.
            var runOnStart = (JSON.parse(localStorage.getItem("mochaTestsRunOnStart") || "true"));

            // checkbox to manage auto-run state
            var runOnStartCheckbox = element.querySelector('#mochaTestsRunOnStart');
            runOnStartCheckbox.addEventListener('change', function () {
                localStorage.setItem("mochaTestsRunOnStart", runOnStartCheckbox.checked);
            });

            // button to manually trigger a test run
            var mochaTestsRunButton = element.querySelector('#mochaTestsRun');
            mochaTestsRunButton.addEventListener('click', function(){
                runMochaTests();
            })
            runOnStartCheckbox.checked = runOnStart;

            if (runOnStart && !window.hasRunMochaTestsAtLeastOnce) {
                // this value is used to avoid extra test runs as we navigation around the app.
                // EX: if the test control is on a home pivot - we nav away and come back home
                // we probably don't want to auto-run the tests again. (use the menu button
                // instead if you want another test run)
                window.hasRunMochaTestsAtLeastOnce = true;
                runMochaTests();
            }

        },
    });

    // The following lines expose this control constructor as a global.
    // This lets you use the control as a declarative control inside the
    // data-win-control attribute.

    WinJS.Namespace.define("MyApp.Testing.Controls", {
        TestsControl: ControlConstructor
    });
})();

Handle global exceptions

If you write any async code (difficult not to these days) an exception or assertion failure will not be trapped by the internal try/catch mechanism's of Mocha in a Windows WinJS environment.

We have to give Mocha a hint on how to hook into global exceptions.

Mocha tries to attach to the browser's global window.onerror method, and since a WinJS app doesn't use this same handler, we have to forward the exceptions and to mocha's attached window.onerror handler.

In your default.js or wherever you configure the app you can attach to the WinJS.Application.onerror and after some exception massaging we can hand the exceptions to mocha so when a test fails it can be reported correctly.

    WinJS.Application.onerror = function (ex) {

        var errorMessage, errorLine, errorUrl;
        if (ex.detail.errorMessage) {
            errorMessage = ex.detail.errorMessage;
            errorLine = ex.detail.errorLine;
            errorUrl = ex.detail.errorUrl;
        } else if (ex &&
            ex.detail &&
            ex.detail.exception &&
            ex.detail.exception.stack) {
            errorMessage = ex.detail.exception.stack;
            errorLine = null;
            errorUrl = null;
        }

        // if window.onerror exists, assume mochajs is here and call it's error handler
        // This may be a poor assumption because 3rd party libraries could also attach
        // their handlers, but it's working for me so far...
        if (window.onerror && errorMessage) {
            window.onerror(errorMessage, errorLine, errorUrl);

            // return true signalling that the error's been
            // handled (keeping the whole app from crashing)
            return true;
        }

        // if we get here, assuming mochajs isn't running
        // let's log out the errors...
        try {
            var exMessage = JSON.stringify(ex, null, '  ');
            console.error(exMessage);
        } catch (e) {
            // can't JSON serialize exception object here (probably circular reference)
            // log what we can...
            console.error(ex);
            console.error(e);
        }

        // I like to be stopped while debugging to possibly
        // poke around and do further inspection
        debugger;
    }

Reference the test control.

While developing out the application, I like to throw it front and center in the first hub of my apps home page hub control.

Here's an example of how to reference the above control:

<head>
    <meta charset="utf-8" />
    <title>hubPage</title>

    <link href="/pages/hub/hub.css" rel="stylesheet" />
    <script src="/js/tests/tests.js"></script>
</head>

...page details trimmed for brevity...

            <div class="hub" data-win-control="WinJS.UI.Hub">

                <div class="sectionTests"
                     data-win-control="WinJS.UI.HubSection"
                     data-win-options="{ isHeaderStatic: true }"
                     data-win-res="{ winControl: {'header': 'TestSection'} }">
                    <div id="sectionTestscontenthost" data-win-control="MyApp.Testing.TestsControl"></div>
                </div>
            </div>

...rest of page details trimmed for brevity...

If you manage to get everything wired up correctly above, when you run the app (F5) your mocha tests should be all set and run automatically. Oh wait, let's not forget to add a mocha test :)...

describe('Mocha test spike', function(){

    it("should report a passing test", function(){
      // doing nothing should be a passing test
    });

    it("should fail on a synchronous exception", function(){
        throw new Error("Some test error to make sure mocha reports a test failure")
    });

    it("should fail on an asynchronous exception", function(done){
        setTimeout(function(){
            throw new Error("Some test error to make sure mocha reports an async test failure")
            done();
        }, 100);
        throw new Error("Some test error to make sure mocha reports a test failure")
    });

});

Save the above as your first test file, include it so it runs on startup and verify your tests run and report correctly within the test control.

Happy testing!

(Comments)

Look at where DefinitelyTyped is Now

(Comments)

A Little Wondering

I installed Visual Studio 2015 the other night and was just poking around and stumbled upon the Cordova Project Template that is provided. This not necessarily that new, but is new to me as I spend most of my time these days working on a Mac doing iOS, Docker (for server-side stuff) and other projects. Though, I miss and still enjoy the benefits of Visual Studio for some projects.

While looking over the project template, I was surprised to see a familiar folder structure typings/cordova/* in the project.

Why is this folder structure familiar?

Because I created it almost 2 years ago when I threw together a PowerShell script that chucks DefinitelyTyped TypeScript definitions up onto NuGet.

Another example of the folder structure, while I can't say for certain, but I can only guess that when the winjs started converting over to TypeScript that they chose to put their type definitions into the same structure. I won't claim to have inspired it, but would be cool to say I did.

It was a bit surprising and humbling to discover Microsoft had in one of their default templates a reference to some TypeScript type definitions that (while I didn't have anything to do with the creation of the definitions, nor DefinitelyTyped) I did created the simple little utility that runs continuously up on TeamCity.CodeBetter.com and tirelessly updates NuGet packages as they change over on DefinitelyTyped.

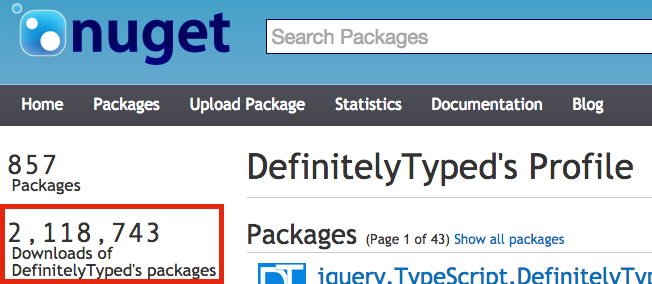
This reminded me, that I hadn't checked up on the NuGet user account for DefinitelyTyped in quite a while so I decided to head over to the NuGet.org, take a glance at the account and check out how many downloads there had been?

DefinitelyTyped NuGet account

** HOLY Typings **, there've been over 2 million DT type definitions?

This little ditty was neat to find. I haven't done a ton with TypeScript in a while, but it's quite amazing to see the traction it is starting to gain.

This means that the TeamCity over at CodeBetter has pretty much been cranking out new and updated DefinitelyTyped TypeScript definitions for almost the last two years, but it's time to re-visit...

Thanks TeamCity @ CodeBetter

Before all of the new, cool, and hip online continuous integration systems came to be, one of the only free options for open source was an instance of JetBrains TeamCity over at CodeBetter and I'd like to throw out a big thank you for those at CodeBetter who put the time and effort into hosting this service for many of the .Net OSS projects out there.

Hello AppVeyor

I recently ported this job to an AppVeyor build for the DT project and after a quick round of using their wonderful support to work through a hurdle, I completed a new build at AppVeyor that replicated the one originally hosted on the TeamCity server.

So a HUGE thanks to AppVeyor for creating such great product, and offering free builds to the OSS community.

I'll keep an eye on the new build for a while (before I forget about it) and hopefully it'll run for another long time to come.

Happy TypeScripting!

(Comments)

Starting to build an Xbox One Podcast Player

(Comments)

I'm writing this email to announce an early sneak peek into a project I've recently started to put some of my free time towards. Here's a preview from a small landing page I've recently put together.

If you, like myself, felt like the Xbox One platform was missing an essential Podcast player app, then you have come to the right place.

Have any interest in following along with me in this journey?

At the bottom of this page is a form, if you share your name and email, you'll get early access and an insider's view of the process of building an Xbox One application.

Learn More here...

(Comments)

In-App Unit Tests

(Comments)

How often do you run your unit tests? Do you even have a test project? Is running your test suite automatic or does it only run when you choose to run them? If the latter is true, then how often do you run them?

For most, running tests is a simple command line tool like gulp test or rake test or a builtin function in your IDE. You may even have your system covered by a Continuous Integration server, or if you want to catch issues earlier possibly even a git pre-commit hook.

One thing we all probably know is the more difficult it is to run your tests, the less often they get run.

What if you're building in an environment that does not allow for easy test automation? What if there are no current command line task runners for the environment you're developing in?

You could spend way too much of your free time/life building a tool that can get the job done for you (cough - long live StatLight/Silverlight - cough). I would not necessarily recommend this approach unless you have the spare cycles to contribute a project like this to the broader community.

So, given that there are no external tools to rely on, and you don't want to spend however long it will take to create one for the development environment you are in, how about finding a way to integrate some sort of test run within your existing application?

I have always wanted to setup some unit tests that could run inside of an existing application. If you developed an app that had to ship on lots of devices (thinking android or iOS) and you could ask your users out in the wild to go to the settings page of your app and press a "run tests" button, how awesome would it be if this test run could collect data and send the test results back to you?

This is not a new idea, nor terribly unique, but I've pondered this for quite some time and until recently have not had a project were I was forced to execute on it, until now...

I'm playing with an app that is currently living inside a WinJS (Windows 8) (Metro - err do they call it that anymore?) environment and there are not any CLI tools out there that can be used to automate tests. However, it was easy enough to get Mocha running within the app.

With MochaJS in place, I proceeded to setup a WinJS Hub in my hub-based application, after make this testing hub the first hub in my project I now have test that run after every F5 (run) of the application.

This will eventually have to be something I move out of the main landing U.I. when I get closer to shipping my app, but I'm liking the idea of being able to toggle my test U.I. and have them run right within my application, instantly on startup.

A few benefits of this approach:

  • It allows me to actually write tests in an application that doesn't natively support a testing runner.
  • Fewer test gotch-ya's because of environmental reasons
  • Instant feedback on each run
  • It's an easy reminder to keep using and driving my development through tests, because the workflow is enabling it (and encouraging it).
  • (this could be considered a down side but...) since the tests are living within the actual application, I have to be careful to construct my components no to depend too heavily on the environment or configuration as we wouldn't want unit tests to mess up the running application. While it could be seen as a bit of a pain, I'm really liking how this is forcing me to write loosely coupled, highly compossable components that can be easy to swap in/out.

Will I Actually Ship In-App Tests?

This one is up in the air, but so far I'm of the mind-set that I'll hide the unit-test run from the main hub, place a button deep in some about or setting page and modify the reporter to send send any failed test results, along with some metadata about the environment or system it's running on, like versions, screen size, or whatever is needed...

Happy Testing!

(Comments)

Build Command with Auditory Feedback

(Comments)

Here's a short and fun little ditty I'm going to throw up here so I can find it later... (because why would I try to memorize something so simple when I can put it here and share with you all?).

My Builds Are Speaking to Me

Running this command from my Mac command line window gives a nice audio feedback when builds are complete.

(gulp && say 'super!') || say "what the what?" -v Albert

Some Context

While doing some project work on my Mac lately I'm in the situation where I am constantly running gulp at the command line. This workflow could apply to any CLI build tool like gulp, rake, make, etc and ya I know I need to spend the time getting gulp watch to work but let's not worry about that for now...

The build is not slow, but it's not fast (taking about 6) seconds. That's just enough time for me to see a squirrel and by the time I realize the build is done, I've forgotten if I actually recently kicked off the build or if the most recent run is out of date from the latest code I've worked on...

So I searched for a quick way to get some auditory feedback when my build was done so I could more efficiently continue the development flow...

I first stumbled upon this gist which has a NodeJS implementation console.log("\007");, but this produces the same beep I get when my unit tests fail - which I don't want when everything's good to go.

Then I found someone mention the mac say command which is WAY better for my needs and I settled on the following little command.

(gulp && say 'super!') || say "what the what?" -v Albert

Whats cool about this pattern is I can replace gulp with any other build tool on other projects like rake, grunt, make, etc...

(Comments)

Mac Equivalent of the Windows Registry - ish

(Comments)

If you're a long time Windows power user and are recently switching over to the Mac, you may have wondered if there was something analogous to the Windows Registry .

However, if you've always been more of a Mac user, don't run away just yet as you may learn something.

In case you don't know what the Windows Registry is, here is a short definition from our good ol' friend Wikipedia.

Windows Registry is a hierarchical database that stores configuration settings and options on Microsoft Windows operating systems. It contains settings for low-level operating system components and for applications running on the platform that have opted to use the Registry.

You have probably already figured that since it's called the Windows Registry that there is likely not a Mac Registry that looks/operates the same way.

You are correct; however, where do all of the system and applications settings get stored if there is no registry?

If the Windows Registry is a place where system and application settings are stored, then the Mac equivalent of the Windows Registry would be a series of .plist files in several preferences folder on the Mac.

While researching how to automate bootstrapping my Mac development computer, I stumbled upon large number of .plist files in several folders that correlate to the installed applications and system settings. And BOOM just like that I discovered the holy grail of my Mac's system and application settings - kind of like the first time lift up the curtain and discover the Windows Registry.

What are .plist files?

A .plist file is a configuration file that contains a list of properties in either plain text or binary format. I'll go into more later about how to read and update values in these files later in the post.

For more info on plist files, check out the Wikipedia page...

Where can I find plist files?

I know of at least 2 locations that host the common system and application .plist files.

The first one is user specific and is in the following location:

~/Library/Preferences/

In my case (since my user name is jason)

/Users/jason/Library/Preferences/

The second location one is at the root of the system:

/Library/Preferences/

If you look into these folders you'll see a large number of plist files that follow reverse domain name convention (like com.apple.sample).

Here are some (not all) examples of system configuration plist files:

com.apple.ActivityMonitor.plist
com.apple.AddressBook.plist
com.apple.finder.plist
com.apple.preference.general.plist
com.apple.TextEdit.plist
com.apple.Safari.plist

In the same folder as the sample configuration files listed above are where you can find plist files that are associated to applications installed on the system.

com.apple.dt.Xcode.plist
com.google.Chrome.plist
org.herf.Flux.plist
com.skype.skype.plist

Now that we can find system and application configuration plist files, if you try to open them in a text editor you may notice that many of them are in a binary format which would be challenging to read and understand, let alone edit.

How do I read these files?

The Mac comes with a command line utility called defaults for reading and writing to these .plist files.

If you take an example from the above list of plist files, you can, at the command prompt type the following:

defaults read com.apple.fin<tab> (where <tab> is the tab key that allows tab completion of the rest of the property list format) and be sure to exclude the .plist of the end so:

defaults read com.apple.finder

will print out all of the properties to the console so you can inspect what's there.

You can pipe this output to grep and filter for a setting name when doing searches. Once you've found a property name you want to look at you can pass it into the defaults read command to get the value of that specific property.

Example reading a single property:

defaults read com.apple.finder AppleShowAllExtensions

How to change property list settings?

warning WARNING warning

Just like modifying the Windows Registry can mess up your system, you need to take care modifying system or application plist settings.

warning WARNING warning

Most of these settings can be changed by navigating to the application or system's respective preferences U.I. and just changing settings manually. However, the whole reason I ran down this path was to learn how to automate these setting changes.

When I first tried to change the settings I tried manually modifying the plist files with a GUI tool built into the Xcode developer tools.

However, and I have yet to understand the internals of this, after I made the changes to the plist file they would automatically get overwritten after a few seconds. So it seems that there is some official source of these values somewhere that for some reason overwrite the ones in these folder. I probably have that all wrong - but was an observation I had.

So if my understanding above is somewhat correct, how did I update the source?

Similar to reading property list values you can use the defaults command line tool to write changes back to the .plist files.

As an example, here's how I update Finder to show file extensions.

defaults write com.apple.finder AppleShowAllExtensions -boolean true

The configuration options are now endless.

In summary:

Using my new knowledge that app and system settings can be found in both /Library/Preferences and ~/Library/Preferences and I can use the command line tool defaults to read/write to understand and update settings.

I can now create a simple .sh script that allows me to pre-configure a new development machine with all of the settings I would like.

Now, each time I catch myself trying to use an application's preferences U.I. I stop myself and try to find that setting in a plist file and create a CLI command that I can save into my development setup script.

Happy Mac Settings Hacking!

(Comments)