Developing on Staxmanade

Integrate WinJS.Navigation with the Browser's History

(Comments)

I've been playing with WinJS a bit lately, specifically the React-WinJS and wanted the native WinJS Navigation to play a little nicer with a web browser. The original/default environment for WinJS app is within a WinRT/Metro application where there is no "url/address" bar to be seen.

My uneducated guess is that the WinJS team decided not to worry about how WinJS.Navigation would integrate with a normal browser's history as there doesn't appear to be native integration or documentation about how to do it so far.

I asked the team if they had plans to work on any integration options, but only asked that last night so don't expect to hear back from over the weekend.

UPDATE: I got tired of updating this blog post with my bug fixes/iterations of the idea - so I've moved it over to GitHub: github.com/staxmanade/WinJSBrowserHistory.

So I spent a moment and prototyped one possible solution which works for this simple test using the browser's history api since I'm not looking to support browsers older than IE 10.

Ideally we could leverage WinJS controls without worrying about how to "integrate" the WinJS.Navigation with anything, but sadly some of the WinJS controls take a dependency on WinJS.Navigation (like the BackButton) so finding a way to play nice with this can be challenging.

If you want to get this prototype running yourself, you can:

  1. save both files below to a folder
  2. start up a simple web server. (I like to use nws)

This prototype is 2 files:

  • index.html <-- basic JSPM bootstrapping and configuration
  • app.jsx <-- my whole navigation app in here...

index.html

Couple mentions on this bootstrapping code:

  1. I set the background style to black (since in app.jsx I'm using the WinJS dark css) - this avoids a flash from white to black when the page loads
  2. This is using SystemJS which makes it really easy to prototype and bootstrap dependencies like WinJS and React. Please don't deploy something like this to production - follow proper JSPM production workflow procedures...
  3. The map section in the System.config defines a pointer to a fork of react-winjs I have that supports React 0.14 (so if you find this in the future and need it, try to use the native react-winjs if they've merged in my pull request instead.)
<!DOCTYPE html>
<html>
  <head>
    <style media="screen"> body{ background-color: black; } </style>
  	<script src="https://jspm.io/[email protected]"></script>
    <script type="text/javascript">
      System.config({
        transpiler: 'babel',
        packages: {
          './': {
            defaultExtension: false
          }
        },
        map: {
          'react': 'npm:[email protected]',
          'react-winjs': 'github:staxmanade/[email protected]',
        }
      });

      System.import('./app.jsx');

    </script>
  </head>
  <body>
    <div id="main"></div>
  </body>
</html>

app.jsx

import React from 'react';
import ReactDOM from 'react-dom';
import WinJS from 'npm:winjs';
import 'npm:winjs/css/ui-dark.css!';
import { BackButton } from 'react-winjs';


class WinJSBrowserHistory {
    isNavigationBeingHandled;
    isWinJSNavigationBackBeingHandled;
    isNavigationTriggeredByPopStateEvent;

    constructor(onApplyNavigaitonChange) {

        if(typeof onApplyNavigaitonChange !== "function") {
          throw new Error("Expecting first argumet to be a function that can take 2 parametes (location, state) => {}");
        }

        this.onApplyNavigaitonChange = onApplyNavigaitonChange;

        WinJS.Navigation.addEventListener("beforenavigate", this.handleBeforeNavigate.bind(this));
        WinJS.Navigation.addEventListener("navigating", this.handleNavigating.bind(this));
        WinJS.Navigation.addEventListener("navigated", this.handleNavigated.bind(this));

        window.addEventListener('popstate', (eventObject) => {
            console.log('popstate', this.isNavigationBeingHandled, eventObject);

            if(!this.isNavigationBeingHandled && !this.isWinJSNavigationBackBeingHandled) {
              this.handlePopState(eventObject);
            }
            this.isWinJSNavigationBackBeingHandled = false;
        })
    }

    cleanup() {
      WinJS.Navigation.removeEventListener("navigated", this.handleNavigated);
    }


    handlePopState(eventObject) {
      console.log("handlePopState", eventObject, location.hash);

      this.isNavigationTriggeredByPopStateEvent = true;

      WinJS.Navigation.navigate(location.hash, location.state);
    }

    handleBeforeNavigate(eventObject) {
        this.isNavigationBeingHandled = true;
        console.log("handleBeforeNavigate:", eventObject);
    }

    handleNavigating(eventObject) {
        console.log("handleNavigating:", eventObject);
        console.log("handleNavigating delta:", eventObject.detail.delta);

        var location = eventObject.detail.location;
        var state = eventObject.detail.state;
        var delta = eventObject.detail.delta;

        this.onApplyNavigaitonChange(location, state);

        if(delta < 0) {
            this.isWinJSNavigationBackBeingHandled = true;
            window.history.go(delta);
        } else {
            //router.setRoute(location);
            window.history.pushState(state, "", "#" + location);
        }
    }

    handleNavigated(eventObject) {
        this.isNavigationBeingHandled = false;
        this.isNavigationTriggeredByPopStateEvent = false;

        console.log("handleNavigated", eventObject);
    }

}


export default class App extends React.Component {

    constructor(props) {
        super(props);

        this.winJSBrowserHistory = new WinJSBrowserHistory(this.onApplyNavigaitonChange.bind(this));

        this.state = {
            nav: {
                state: WinJS.Navigation.state,
                location: WinJS.Navigation.location
            }
        }
    }

    componentWillMount () {
        console.log("componentWillMount");
        WinJS.Navigation.navigate(this.state.nav.location, this.state.nav.state);
    }

    componentWillUnmount () {
        console.log("componentWillUnmount");
    }

    onApplyNavigaitonChange(location, state) {
        this.setState({
            nav: {
                location: location,
                state: state
            }
        });
    }

    gotoPage1Nested() {
        WinJS.Navigation.navigate("/page1/nested");
    }

    gotoPage1() {
        WinJS.Navigation.navigate("/page1");
    }

    render() {

        console.log("render() location:", this.state.nav.location);

        var componentWithBackButton = component => {
            return (
                <div>
                    <BackButton />
                    <div>
                        {component}
                    </div>
                </div>
            );
        };

        var page;

        switch(this.state.nav.location) {
            case "/page1":
                page = componentWithBackButton(<div>page 1<br/> <button type="button" onClick={this.gotoPage1Nested.bind(this)}>Goto Page 1 Nested</button></div>);
            break;

            case "/page1/nested":
                page = componentWithBackButton(<div>page 1 nested</div>);
            break;

            case "/page2":
                page = componentWithBackButton(<div>page 1</div>);
            break;

            default:
                page = (
                    <div>
                      <button type="button" onClick={this.gotoPage1.bind(this)}>Goto Page 1</button>
                    </div>
                );
        }

        return page;
    }
}

ReactDOM.render(<App />, document.getElementById('main'));

Next I'd like to see if I could leverage something like flatiron/director for routing and get it to play nice with WinJS.Navigation and if I do, I'll post it as well...

Hope this helps.

(Comments)

Habit of a Solid Developer - Part 6 - Dig a Little Deeper

(Comments)

This article is Part 6 of 11 in a series about Habit of a Solid Developer.

The number of things you can learn in this field is mind blowing. The rate at which change happens, frameworks come and go and the various levels of abstraction can be daunting at times.

Regardless of how much or little you know, there is always a new level of abstraction you can dive into and get a better understanding of what's going on. I love the example Scott Hanselman uses about this topic in Please Learn to Think about Abstractions.

It is amazing how much you can accomplish without having a clue about what is going under your abstractions. But if you were to take a moment now and then to try to understand what those abstractions are hiding from you, it will likely open your eyes to a level of understanding and insight as to how to use the abstraction that you may likely not understand how you made it work without that deeper insight. The understanding may help you get just needed bit of performance improvement, or fault tolerance in your projects, or how to set things up to be more maintainable.

An example of this for me recently is while working at Vertigo I have helped to ship a number of streaming video based products without having to know anything about some of the specifics of say HLS. On this recent project we were having issues with a live stream and it just so happened we could peek through an HTTP Debugger proxy at the raw streaming manifest. This was previously a scary place for me to dig in an try to understand. However, taking the time to understand various parts of the HLS Spec have not only made me appreciate what it takes to put together one of these live streams, but I have now become just that much stronger as a team member on a video related projects.

As the famous philosopher Dory once said:

Dory saying just keep digging, just keep digging, digging, digging

Happy Digging!

(Comments)

Red - Possibly the Most Important Step in Red, Green, Refactor

(Comments)

If you do any sort of test driven development, you've likely heard of the following steps

  • Red: In this case means you write a test first and see the red (meaning failing test).
  • Green: This is where you actually write a tiny bit of production code to see the red test from above go green and pass.
  • Refactor: Now that you have a passing test (or suite of tests) you can presumably safely refactor and apply any common code cleanup practices to the code.

The importance of the Red step.

I don't want to go in to each of these steps in detail today, but I did want to drill into the Red step by giving you a short little example that happened to me today.

If you are interested in a little more detail on the subject check out:

If you're new to any sort of TDD/BDD/anything-DD you may not quite get how important this first step is, but hopefully the rest of this post helps...

Make sure it fails

The Red step is one of the most important, but one that a new practitioner may skip out of laziness. It takes discipline to write the failing test, run it and verify that it fails. It is so easy to write the test code AND the production code together, run it and see it pass that skipping the red step is something even seasoned veterans in the field can fall prey to.

However, if you don't see the test fail, how do you know it will ever fail?

I can tell you on numerous occasions in the past where I have written both production code and test code together, run it see it pass, just in case - comment out the production code and STILL see the test pass. Wait what?

If you are not careful you may have created a bad test and if you run this Red step first and you don't see it turn Red, you likely have a problem.

It could be a problem with the test itself, or possibly something you put in the test that is triggering something deeper in the system. It doesn't matter what the problem is, you first need to get the test to turn red before you write any production code to make it turn green.

Make sure it fails FOR THE RIGHT REASON

While it's easy to see a red bar and move on, it's also good to review the exact reason it failed. Did you get a FileNotFoundException exception when you were expecting a NullReferenceException? Or did you get an integer value of 10 when you were thinking at that moment it would have failed because it returned a string?

If you're writing proper tests, your red step will include a true failure case that not only just fails, but fails for the reason you would expect it to fail - at least until you go to write the production code that satisfies the tests intent.

Now a little example.

In the example below I was behaving myself and I DID run the red step first. I am using plain-ish JavaScript (I say ish here because I'm using ES6 with babel compiler).

It's much easier to make the type of mistake I'm going to highlight below with plain JavaScript than if you were using a statically typed language. You can try something like TypeScript for flow as these compilers provide a static type checker over your JavaScript. Compilers are a great first test...

Alas, I'm not doing that at the moment.

So here is what I did...

First I wrote a test:

import FeedData from '../app/feed.js';

describe("feed cache", function() {

  var feedCache;

  before(function() {
    feedCache = FeedData.loadCache();
  });

  it("Feed Cache should have two items", function() {
    expect(feedCache.length).to.equal(2);
  });

});

When I tried to run it I got the error saying that TypeError: FeedData.loadCache is not a function. This was great and made total sense because I haven't written this loadCache() function yet.

Next I opened up my FeedData.js file and added the loadCache() function.

export default class FeedData {
  loadCache() {

  }
}

I left the implementation blank for now and re-ran my tests. Same error TypeError: FeedData.loadCache is not a function as above.

That was odd, because I know I added the function but apparently it didn't think I had... some scratching... looking... hmm... Ahh ha - I had imported from feed.js not feedData.js.

It's subtle, but in my app feedData and feed are different things. So I moved the function to the correct ES6 class and re-ran the tests. I was certain this time that it may fail but at least fail for the right reason (not a missing function).

ARGGG....

Again I got the same error TypeError: FeedData.loadCache is not a function. Ok, that was weird. Now I'm wondering if I have a caching problem in my browser, but before I try to debug Chrome's caching (kidding there, if I ever have to go that far I'm really having a rough day) I better have another look at my code.

It didn't take long in this case to realize where my issue was. FeedData is an ES6 class and I'm calling what I thought was a static function on the class from within the test, however it wasn't declared as static in the implementation.

Adding the static keyword below turned this function into what my test was originally expecting.

export default class FeedData {
  static loadCache() {

  }
}

Now, all this work just to get the first part of my red test. What a journey it's been for something as silly as declaring a function.

It was a good reminder just how important the red step in red, green, refactor is.

Happy Testing!

(Comments)

In App Unit test example with JSPM, React, WinJS and Mocha

(Comments)

A while back I wrote about In App Unit Tests and have been having too much fun creating little starter plunks on Plunker. So...

As a simple demonstration on in-app unit tests I've thrown together a little plunk that shows in-app tests within the a WinJS Pivot. And add to the layers of abstraction I'm using react-winjs which I'm LOVING over normal WinJS development.

Link to: JSPM/React/WinJS/Mocha Plunk

If you like this starter, I have it and a few more linked here: for re-use

I'd like to highlight this particular starter at bit more in this post, not only because there are a few more concepts to this basic plunk, but also because I'm fairly happy with the MochaJS React component that I've now copied around and re-used a few times in some small projects where use In App Unit Tests.

Plunker file overview

  • index.html - The index file is a very basic JSPM bootstrap page that loads the app.jsx react component.
  • app.jsx - Defines a WinJS Pivot control where we render the in-app MochaTests.jsx React component. This also defines the test file(s) and using MochaJS's global detection we can tell the react MochaTests component what test files to load and run as well as what globals are allowed to exist.
  • config.js - This is JSPM's config that defines what version of React we're using and to use babel for transpilation.
  • tests.js - is our Mocha set of unit tests. We can have multiple test files if we want, just have to define what files to load in app.jsx.

Lastly the MochaTests.jsx which I'll include the full component below:

easier to copy-paste inherit for myself in the future

import mocha from 'mocha';
import React from 'react';

export default class MochaTests extends React.Component {

    static get propTypes() {
        return {
            testScripts: React.PropTypes.array.isRequired,
            allowedGlobals: React.PropTypes.array
        };
    }

    constructor(props) {
        super(props);
    }

    componentDidMount() {

        var testScripts = this.props.testScripts;
        var runTests = this.runTests.bind(this);

        // for some reason importing mocha with JSPM and ES6 doesn't
        // place the mocha globals on the window object. The below
        // handles that for us - as well as setting up the rest of the
        // test scripts for the first run
        mocha.suite.on('pre-require', context => {
            var exports = window;

            exports.afterEach = context.afterEach || context.teardown;
            exports.after = context.after || context.suiteTeardown;
            exports.beforeEach = context.beforeEach || context.setup;
            exports.before = context.before || context.suiteSetup;
            exports.describe = context.describe || context.suite;
            exports.it = context.it || context.test;
            exports.setup = context.setup || context.beforeEach;
            exports.suiteSetup = context.suiteSetup || context.before;
            exports.suiteTeardown = context.suiteTeardown || context.after;
            exports.suite = context.suite || context.describe;
            exports.teardown = context.teardown || context.afterEach;
            exports.test = context.test || context.it;
            exports.run = context.run;

            // now use SystemJS to load all test files
            Promise
            .all(testScripts.map(function(testScript) {
                console.log("Adding Mocha Test File: ", testScript);
                return System.import(testScript);
            })).then(runTests, function(err) {
                console.error("Error loading test modules");
                console.error(err);
            });

        });
        mocha.setup('bdd');
    }

    runTests() {
        var allowedGlobals = this.props.allowedGlobals || [];

        this.refs.mocha.getDOMNode().innerHTML = "";

        mocha.checkLeaks();
        mocha.globals(allowedGlobals);
        mocha.run();

    }

    render() {
        return (
            <div>
                <style>{"\
                  #mocha-stats em { \
                      color: inherit; \
                  } \
                  #mocha-stats { \
                    position: inherit; \
                  }\
                  #mocha .test.fail pre { \
                      color: red; \
                  } \
                "}</style>

                <button onClick={this.runTests.bind(this)}>Rerun Tests</button>

                <div id="mocha" ref="mocha"></div>
            </div>
        );
    }
}

Usage example of this React MochaTests component.

// Define what test files get loaded by the MochaTests component
var testScripts = [
  './tests.js'
];


var allowedTestGlobals = [
  // Declare what globals are allowed to be created during any test runs.
];


// Usage of MochaTests in a react render() method.
<MochaTests testScripts={testScripts} allowedGlobals={allowedTestGlobals} />

I'm not expecting to see a large up-tick in WinJS apps out there with in-app unit tests that run in the browser, however hopefully the MochaTests.jsx React Component is of value to you and can be utilized outside of WinJS within almost any React app.

Please drop a line if you end up using it or if it can be adapted. If there's value in the component, maybe

Known Issue

If the number of tests starts to go beyond the height of the pivot in this sample, it has an issue where the WinJS Pivot cuts off at the bottom not allowing you to scroll and see the rest of the test output. I haven't dug into it yet because I've been clicking the failures: X link and it filters the U.I. to just the erroring tests.

If you happen to come up with a good solution, drop me a note - I'd love it. Thanks in advance!

Happy Testing!

(Comments)

Habit of a Solid Developer - Part 5 - Update or Add Documentation while Reading Code

(Comments)

This article is Part 5 of 11 in a series about Habit of a Solid Developer.

While I generally sit on the side of the fence that your code should read clearly enough that comments should not be necessary. I concede that there are (often) times when a comment can really help to make the job of understanding the code much easier than just how a variable or method is named or organized.

One example of such case is when you've gotten lost in the code and don't understand how a piece of it works.

The second you figure or re-discover it's intent, try to add or update some comments in the code that may help you or the next person understand it more clearly in the future.

You can argue that a comment should have been added initially, but life happens and we don't always save little nuances like we should or we're given a codebase that is not as clean as we would like. So if you catch yourself digging through some code and a bit confused in an area, take the time to document it (once you figure out what you didn't understand).

This is especially true when you are the original writer of sed un-clear code. I know I've gone through code I've written and been like, "hmm, no idea what I was thinking here..." or "well, there was a reason I did this stupid thing, but now I don't remember what that was. Wish I would have commented a little more to my future self".

Sometimes it may be a simple variable rename or refactor that would clean it up. But don't just figure it out and not leave a breadcrumb for the next person (or yourself) to more easily grok the code.

Add clarity to un-clear code.

// When I wrote this, only God and I understood what I was doing
// Now, God only knows
//
// http://stackoverflow.com/a/316233/1402137

Now go read these comments and enjoy!

Happy Understanding!

(Comments)

Habit of a Solid Developer - Part 4 - Git Dance

(Comments)

This article is Part 4 of 11 in a series about Habit of a Solid Developer.

When it comes to solid dev habits, source control should be on the top of your list as a given. So much so that I'm not going to talk about the pro's and pro's (see what I did there?) of source control. I did however, want to walk through something I call my git dance which is mostly just the rhythmic steps I take while pulling in changes from a remote repository while working on a project.

For a little context, this workflow is what I usually do while working on an internal project using git with a team where we may or may not be using pull requests, but the goal of this dance is to bring in any remote changes and layer my changes in on the master branch (or whatever branch we're developing on).

My favorite thing about git is there is no "right way" to do things and when you get good enough at it the 'rules' people place on using git can mostly be wiped away. However, the below steps, while not always followed, are generally what I use to stay happy and healthy when dealing with others changes.

Fetch remote changes (don't pull)

So if we know or don't know that there are changes remotely

git fetch

or sometimes (if I have multiple remotes)

git fetch --all

Why use fetch when I could be using pull?

I prefer to fetch any changes as this gives me the opportunity to review a visual of the commit graph before any action is taken. This allows me to take different paths depending on what the before commit graph looks like vs what I want the after to look like. Git pull is essentially a short-cut for both fetching and mergeing the code and I often don't want to just merge a remote change.

After I have any remote changes pulled (err fetched) locally I like to get a mental model of the recent commits.

Review remote changes

gitk --all

Now the gitk U.I. is horrible to look at (and I'm sure you have your favorite git visualizer), but it provides enough info to review changes between the current HEAD of my local branch and any remote changes that have come in with the git fetch step above. The --all is important in gitk, as it will show you all branches (including remote branches) that were fetched.

I use this overview to not only code review changes, but to help determine whether I want to merge or rebase with the remote changes.

Merge or Rebase

Once my review is complete, I've taken a look at the overall changes, and I have a mental model of what the current commit graph looks like. I generate a mental visual of what I want the commit graph to look like when I'm done. I will decide to either:

Merge

git merge [origin/master | otherBranch]

Or

Rebase

git rebase [origin/master | otherBranch]

Once my changes have been synced up with the remote changes, I push them up.

Ship changes up to the origin

git push origin master

or

git push origin <branchName>

Now it's not a complicated workflow and it can get a bit trickier, but the key here is doing the fetch, review, integrate workflow over automatically pulling in remote changes. This allows me the space to potentially interactive rebase or muck with my commits locally before pushing anything public.

Happy gitting!

(Comments)

tvOS Simulator Remote - Keyboard Shortcuts/Replacement

(Comments)

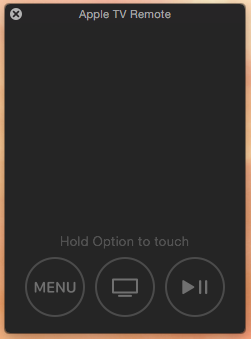
I've begun some baby steps on my journey to learn the new Apple TV development tools and platform and we just discovered that the cumbersome tvOS Simulator Remote can almost be ignored because we can use our development keyboards in it's place.

Playing around with the new Apple tvOS development kit you may have noticed that using the simulator remote is quite annoying. Not only does it force you to take you hand off the keyboard (to move to the mouse), but's just plain awkward to have to hold down Option while you use the Mouse and Swipe Up/Down/Left/Right when you may be trying to do is navigate the U.I.

Luckily a coworker stumbled upon the arrow key commands and we quickly figured out a mapping of tvOS Remote Buttons <--> Keyboard Keys that can help any developer navigate and test their tvOS app just a little faster within the simulator.

Mac Simulator Remote Developer Keyboard Alias Notes
Touch Surface (←, ↑, →, ↓) Keyboard Arrow Keys (←, ↑, →, ↓)  
Touch Surface (click/select) <Enter> Also <Enter> on the number pad does NOT appear to work.
Menu Tap <ESC>  
Home Long-Press <ESC>  
Siri Unknown (so far) Not sure if this is supported in the simulator, but if you figure it out, let me know and I'll update the post
Play/Pause <SpaceBar>`  
Volume Up/Down Unknown (so far)  

If you discover what the two Unknown values above map to, leave a comment below and I'll update this post with the complete list.

Screenshot of Simulator Apple TV Remote

Screenshot of Simulator Apple TV Remote

Diagram of actual Apple TV Remote

Diagram of tvOS buttons

Happy tvOS building!

(Comments)

Habit of a Solid Developer - Part 3 - Self Prescribed Code Reviews

(Comments)

This article is Part 3 of 11 in a series about Habit of a Solid Developer.

One technique I use regularly when working with a team or even by myself is lots of individual code reviews.

This is not a formal (sit down with someone) code review.

This is a personal practice I found extremely useful.

Granted, I'm not talking about reviewing every commit in a repository the size of Facebooks. Most of the projects I have participated in are on small enough teams (between 1-10 people) that reviewing code changes either as they come in or in some block during the day is completely feasible.

Depending on the project, how many developers, time zones of committers, I shift how often or how thorough I review the changes but I try to review each and every commit (or at least the branch merge). This is one reason why segregating your code commits into tiny topical changes is important.

If you're working with a source control that doesn't have an easy way to do pull requests. Or some other code review functionality, you can still use the source control system to manually review changes or diffs between branches. Way back when I was forced to use TFS source control this was a much more manual process. I would open up Visual Studio, browse our TFS server and begin reviewing. These days, the power of a pull request is generally suffecient for this purpose.

What happens in this review?

One approach I've taken in the past is to block some time, possibly while warming up with a cup of coffee to begin reviewing the previous day's commits. I would use this time to not only review other developer's changes, but I would also re-review my own commits. This helped remind me what I worked on and possibly what I was struggling through the previous day. Reviewing code the next day provided time for my mental perspective to have shifted. I was probably thinking about things a little more clearly after a nights rest. Maybe I'd learned something that could be applied to the problem being worked on and provide better setup for changes needing to be made that day.

Some other benefits the morning review process provided include:

  • It was a bit of a meditative process in the early morning that put my brain on a code thinking track for the day.
  • I could take notes on changes other's had made that were not clear. (Note: this is generally done in an environment that didn't perscribe peer-reviewing code changes). So I essentially took the job on personally to review other's changes. Provide feedback, or ask question to get more understanding of their changes.
  • Easily catch when the project conventions were not being followed, when the convention was not automated.
  • Potentially spot bugs being introduced.
  • Suggest potentially better approaches.

However, the most important thing I gained by doing this was:

  • Gain a better understanding of the entire project.
  • Learn from others. I'd like to think I'm a pretty good develoepr, but there is so much to know and learn that reading other's code provides a great way to learn something new (or possibly what not to do).

I once had a fellow developer say to me that they were blown away at how quick I could spin up on a brownfield project and get an architectural understanding that I could apply that knowledge and not only contribute quickly, but spot the places where we could improve general architectural patterns or jump in and become productive on a problem set.

I believe that reviewing the changes going into a code base each day allowed me to keep a strong perspective on what is shifting within the project and be able to talk intelligibly when others start to get stuck on their work.

Formal Code Reviews

If your team practices some form of code review workflow, this is great for those participating in the review process. However, it leaves the rest of the developers out of that specific review.

This should not stop those not in the review room (or pull request) from participating and learning from the changes.

Many of the places I've worked don't have a formal review process in place, so by putting this little ritual in place for myself I can not only come up to speed on a project but can be helpful to all aspects of the project. Reviewing changes every day allows me to more easily understand what people were working on when they announce it during the morning standup.

Just Review Everything

If you project is small enough and you can - spend a moment each day and review everything going on in the project. You and your team will likely be better off.

Happy Reviewing!

(Comments)

Habit of a Solid Developer - Part 2 - Automatically Enforce Project Conventions

(Comments)

This article is Part 2 of 11 in a series about Habit of a Solid Developer.

Every project generates it's own constraints. These may come from an Architect's idea of "best practice" or it may come from the domain the software is written in. It may even be derived because of the programming language you're using. For example, in JavaScript we have linters that encourage rules like triple equals === vs double equals ==.

Whatever the convention or rule is, one of the best steps you can take is to find a way to automatically enforce the convention once it can be established.

The class of conventions can encompass a wide array of rules; anything from the formatting of the code, naming conventions, to obscure ways of doing X with component Y that if not done in that way will cause problems.

Finding a way to automatically check and enforce conventions will help to not only keep the project on track if a newer developer is onboard and isn't aware of the convention to even catching the most senior developer when they forget the convention all together (It's happened to me - forget).

An example of a project convention

In the past, I worked on a mutual fund and stock trading engine. This entire system depended heavily on time in various places like billing, trading, etc. Deep down in the core of the application we built in an abstraction over the core Date implementation. This abstraction allowed us to do things like roll the date back for testing or debugging purposes or simulate billing over time rages.

However, if someone ever used a new Date() in the code, this would break the convention by not using our abstraction and not allow us to roll time properly. This could lead to serious or hard to find bugs.

Detecting the miss-use of Date in this application was a great place for automated enforcement.

The above can be caught by running code reviews. However, we baked this convention into the system and automated the enforcement of it so that the issue could be caught much earlier in the development lifecycle. With a well-placed a unit/integration test that searched through the code base for uses of new Date() and raised an error message explaining why, we were able to be sure the projects convention was held and avoid potential bugs in the future.

Fail with a solid path forward

In the automated convention enforcement described above, the convention would not just fail a test with a generic do not use new Date()... message.

This is a good place to document or share a story about why new Date() was not allowed. We failed the test with a long error message that described both why not to use new Date() and we included a sample snippet of what to use in its place.

You want to include the why as well as the what here to make adoption of the conventions easier going forward for those new to the team or project.

Allow special exclusions

Most conventions are generalizations that may not ALWAYS be necessary or ideal. There often exceptions to the rule in software development, so allowing the test code to be extended to enable exclusions to this rule is a good thing.

In the example above we had a place in the unit test that allowed us to say "In component M method Y we allowed the use of a single case of new Date()". The first exercise of the exclusion was built in to the original abstraction over time. But there were a couple other places we allowed it as I recall.

Some automation approaches

Depending on the convention, the approach to automation can vary. Sometimes it's as easy as adding a simple unit test. Other times it requires you jump out to a command line utility that searches the entire codebase.

Whatever the convention, try to come up with a simple approach that can automatically be run through a continuous integration environment and can freely be there to watch over you and your team's conventions.

Tools to help enforce conventions

I've started to compile a small list of tools that you may consider to help enforce conventions on your team. Please feel free to suggest others by submitting a pull-request.

Happy Automating!

(Comments)

JSMP/SystemJS Starter Plunker

(Comments)

I'm writing this post more for myself as a quick way to get going with JSPM, but if you find it useful please feel free.

Since I've recently been playing with JSPM, I've found it useful to kick-start my prototyping with a plunk. I've created a number of starter plunks below (and continue to add to the list.

Full list of JSPM starter plunks

JSPM Starter

JSPM, React

JSPM, MochaJS

JSPM, React, MochaJS

JSPM, React, MochaJS, (Sample jsx Component test)

JSPM, React, WinJS

JSPM, React, WinJS, MochaJS


How to use:

  1. Click one of the links above
  2. Review the various files. Open and edit the app.js file
  3. Start writing code!

Be sure to open your developer tools and monitor any console output for errors...

If you want to take more of a test driven approach to your prototype take a look at MochaJS with JSPM or go directly to the JSPM/MochaJS Plunk

Happy Prototyping!

(Comments)