Developing on Staxmanade

Slightly modified “CD” Command for Powershell: Even better dot.dot.dot.dot...

(Comments)

There's this little "CD" utility that I iterate on every once in while but has become one of my favorite PowerShell tools on Windows.

Not because it's really that great, but more because there are some navigation habits I acquire over on a Mac in a ZSH terminal that become challenging to not have on a Windows PowerShell terminal and each time I iterate on it, it synchronizes my workflows on both Mac and Windows environments.

In my previous update I added support for typing cd ...N where cd .. will go up 1 directory, so cd .... will go up 3 directories.

Well today I found out that I can declare a function in powershell with a name .. - WHO KNEW?

For example if you pasted the following into your PowerShell terminal: function ..() { echo "HELLO"; }; ..

This would define the function .. as well as run it and print out HELLO.

This was a fantastic stumbling on my part because on my Mac I often go up 1-n directories by typing .. at the terminal or ..... <-- however many I want to go up.

So today I updated the Change-Directory.ps1 with the following shortcuts:

function ..() { cd .. }
function ...() { cd ... }
function ....() { cd .... }
function .....() { cd ..... }
function ......() { cd ...... }
function .......() { cd ....... }
function ........() { cd ........ }

If you're interested in the evolution of this CD tool:

SUPER SWEET!

Happy CD'ing!

Slightly modified “CD” Command for Powershell: Now with dot.dot.dot.dot...

(Comments)

A while back I wrote about a replacement for the cd command on powershell that I wrote which provides some fun features such as history tracking, support cd'ing to a folder when a file path is given, etc... It's been a while since I've touched this helpful little tool which sometimes I even forget I wrote it because it's something that's used practically every day and "it just works".

For more information, check out the older posts about it here Slightly modified “CD” Command for Powershell and here: More than slightly modified “CD” command for PowerShell.

It now supports cd ...

Well, today I threw a quick feature into this utility that I've become accustomed to using in zsh on my Mac.

On many *nix command prompts you can type something like cd ..... This command translates indo cd ..; cd ..; cd .. (but executed as one command). The first .. counts as one directory and then each ane every . after that counts as another directory up the tree.

So now within PowerShell when I cd down into a deep folder structure, I can now use cd ....... to go back up N folders.

NOICE!

Happy CD'ing!

Introducing CommandAllThings

(Comments)

I'd like to introduce a simple little tool/(set of scripts) I threw together last weekend called CommandAllThings.

Some background

Do you use any command line build tools like GulpJS, GruntJS, Rake, etc?

I leverage these tools in many projects, both at work and on my own projects. I recently noticed that the muscle memory I've developed was slowing me down as I switch between projects and inadvertently use the wrong tool in the wrong project.

When working on one project all day and typing rake test throughout the day, then switching to another project not using rake I found myself still typing rake test even though I needed to type gulp test, or grunt build. This really messes with my flow. All I wanted to do was test or build the current project.

So I created CommandAllThings.

What is it?

In short, it's a very simple abstraction on top of your usual task runners like GulpJS, GruntJS, rake, etc that allows you to accidentally type the wrong tool and still accomplish the desired task with the right tool.

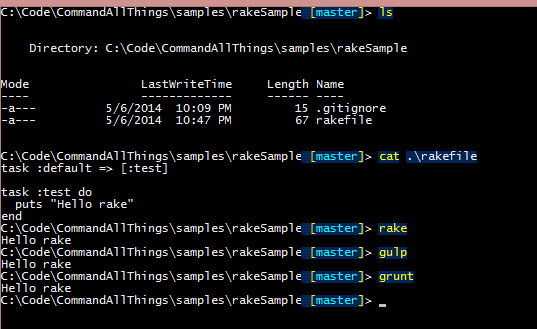
By using aliases in either PowerShell or Bash we can route, rake, gulp, grunt, etc to CommandAllThings which will inspect the current directory, determine the correct tool and execute your task(s) with the correct tool.

This is great. Now when I type in the wrong command rake test in a gulp project, I don't get slapped in the face with an error saying "cannot find a rakefile." Instead I continue on my way like I knew what I was doing.

example screenshot of commandAllThings

Does it only work on Windows or on the Mac?

At the moment it works on both.

  • For Windows I have an implementation in Powershell.
  • For the Mac you can alias to a Bash script.

Download at GitHub!

Check it out!

What's next?

I'd like to look at adding other tools to the list. You can check out the project for other task runners I know about. And if you have any thoughts on how to detect the other types, drop me a note in the issues (or consider sending over a pull request).

I'd also love to get some feedback on how to best or more easily get this into peoples's development environment. For now it's pretty manual and since it's all about your profile, a bit personal, so probably a good thing that it's not automatically installed.

Happy Commanding!

Easily set Visual Studio keyboard bindings with the Nuget Package Manager Console

After a fresh install of Visual Studio, I often re-configure some options and setup keyboard bindings. This tends to be a bit of a pain as each and every time I have to remember what setting is in what U.I. configuration pane and how do I find/configure that again? I also will often forget about certain settings until the point I need them and it really breaks my coding rhythm down to go hunt for and reconfigure these options.

I recently found a simple solution to get my VS just the way I want it.

P.S. Some of you may want to tell me all about the VS import/export settings, and you may be right, but I just haven’t spent the time to use/understand/easily find a way to integrate it into my ‘flow’.

So I present to you “MY happy path” to Visual Studio Environment configuration.

1. Install the NuGet Package Manager Extension

You’re going to probably install this extension anyway, so go-ahead and install it now if you don’t already have it… We need this so you can get access to the NuGet Package Manager Console

image

2. Execute Function Set-VisualStudioEnvironmentConfiguration

Wait! What is “Set-VisualStudioEnvironmentConfiguration”?

This is a little function that I have in My PowerShell $Profile which gets setup on all development environment.

So what’s in this PowerShell script?

As of writing this, I only have two specific setup commands, but thought I’d share as an example of what you can do:

  1. Set a keyboard binding to a specific command.
    # Map Ctrl+W to close a tab
    $DTE.Commands.Item("File.Close").Bindings = "Global::Ctrl+W";


  2. ShowLineNumbers for all language files.
    # Turn on line numbers for ALL language types
    ($DTE.Properties("TextEditor", "AllLanguages") | where {$_.Name -eq "ShowLineNumbers" } ).Value = $true


  3. Turn on whitespace?
    # This doesn't work and I wish it did... 
    $DTE.ExecuteCommand("Edit.ViewWhiteSpace")
    # Fails with: "Command "Edit.ViewWhiteSpace" is not available."
    # Maybe one of you can help me out?


      How can I find and setup the settings I like?


    I’m no VS expert and only know as much about the $DTE object as what I’ve written about here, but I’ll give you some tips and you can go from there…


  • Google/Bing are your friends. Type “DTE Visual Studio {TheThingYouWantToAccomplish}”


  • After your search, most examples you find will be VB macros and as it turns out VB (in this case) translates nicely to PowerShell (EX: 
      VB Macro:  DTE.Commands.Item("File.Close").Bindings = "Global::Ctrl+W"

    PowerShell: $DTE.Commands.Item("File.Close").Bindings = "Global::Ctrl+W"


    See the difference? (yep just the ‘$’ at the beginning of the PowerShell one) Nifty eh?


  • Don’t be afraid to use PowerShell to search/filter things in the $DTE. Try this:

    PM>  $DTE.Commands | where { $_.Name –match ‘Close’ } | select { $_.Name }


    Happy VS Environment setting-uppers!

More than slightly modified “CD” command for PowerShell

A while back I wrote about a Slightly modified “CD” Command for PowerShell.
Since that point, I’ve made a number of updates and would like to share them.
The first change I made was to move the “CD” script in that post to a new location. I’ve greatly extended how I setup my development environment and how my PowerShell environment is initialized.
If you’re interested in how I setup my PS profile, take a look at the readme. Combine the setup with some Chocolatey and some BoxStarter and you’re on your way to an amazingly automated development environment setup.
Now on to the features I’ve added to the CD command.
  • I often would do something like “CD $Profile” (which is a no-go because that is a file not a directory, but my intent was to get into the directory where the $Profile file lived).

    So I updated it so if you try to CD to a file, it will just take you to the directory where the file resides.
  • If you try to CD into a folder that doesn’t exist, it now prompts you to create it. You could bypass the prompt with a -force|-f flag.image
  • Lastly I fixed an issue reported by a commenter in the previous post about trying to CD into a folder with the same name as a history index. If you had a folder named “4” and you typed “CD 4” it previously wouldn’t take you the 4 directory, but instead lookup item 4 in your CD history and take you there. Now if you specify a number and that number lives in the current directory it will take precedence over your history value. (To be fair, I only added this feature, and even since I originally wrote about the CD command I have yet to run into a need for this case. Probably because I don’t name my directories with numbers).
Something I had only recently noticed is this script appears to work with other PowerShell drive providers. I only did a cursory test but can CD into the HKLM:\Software\MyTestFolderThatShouldntExist and it will prompt to create the ‘folder’. If I say yes, I end up with a new registry folder. Smile Not sure how useful that is, but with the abstraction layer PowerShell drives give us it’s interesting.

If you’d like to grab just the CD script you can download it here.
https://github.com/staxmanade/DevMachineSetup/blob/master/GlobalScripts/Change-Directory.ps1

Happy system navigation with PowerShell.

Chocolatey - The free and open source windows app store.

If you haven’t heard of it, you’re about to be delighted. Every developer (at least those on Windows) should know about this project, if for nothing more than to make life setting up your dev machine a piece of cake.

What is Chocolatey?

Straight from the Chocolatey.org site:

Chocolatey NuGet is a Machine Package Manager, somewhat like apt-get, but built with windows in mind.

If you’ve not ever used a linux machine or understand what the power of an “apt-get” like tool is, well It’s basically the simplest possible way to install an application to your machine.

What could be simpler than finding the app’s website, download the app, and next, next, next through the the installer? How about just typing “chocolaty install notepadplusplus” at a powershell command prompt? That simple little command will download and install Notepad++ right on your machine with virtually no need to interact with the installer. AWESOME!!!

Disclaimer!

I know there are other installer applications out there that aggregate and install different  programs; however, to be honest, I don’t use any of them. I am also going to assume that most of them aren’t catered to the windows developer (maybe I’m wrong). Either way I like this project and I’m just trying to share it with the community. So There…

Ok, my above salesmanship is a little loud mouthy, but maybe your interest is peaked enough to give it a try.

How do I install Chocolatey?

It’s about as simple to install Chocolatey as it is to use Chocolatey to install other applications. One single powershell command. Just paste the below command in your powershell prompt and let er rip.

First, make sure you have your powershell environment set to “Unrestricted”.image

Run the Chocolatey install.

  iex ((new-object net.webclient).DownloadString("http://bit.ly/psChocInstall"))

Packages!

Now that you have chocolatey installed, head over to the Chocolatey.org website and browse the packages you can now install.

EX:

C:\Code>chocolatey install notepadplusplus

How can I know when new packages are added to the Chocolatey.org feed?

You can get more background on this approach by following my previous post What’s happening on the NuGet feed (leveraging OData in an RSS reader)

The direct RSS link I have is as follows:

http://chocolatey.org/api/feeds/Packages()?$filter=Id%20ne%20'SymbolSource.TestPackage'&$orderby=Published%20desc

Plug that into your RSS reader and you should be notified when new packages are added to the Chocolatey.org feed.

Happy Setting up your Dev Machine!

Powershell Text-To-Speech and fun with a 4yr old.

I’m not so sure this fits in the “elegant code” theme, but it’s a “fun with code” topic that someone might enjoy. Especially if you have a little one.

My 4yr old is learning how to spell small and simple words like her name, “Mom”, “Dad”, etc, and continuing her exploration with letters on the keyboard. She’s been banging on a keyboard since her early years on babysmash. In fact I came home one day to find my monitor turned 90 degrees and about every possible admin window open in the background because of certain key combinations were not trapped by babysmash. But I digress…

For a while she was typing some text into notepad and asking me what it spelled.

“ajlkjwelsl” –> What’s that spell daddy?

I then thought it would be fun if the computer could give instant feedback about what she typed and in a matter of a minute or so I whipped up this little “game” which we had fun playing for a bit.

You can view the gist here - https://gist.github.com/1180060

Just paste the function above as shown below and run it. Type some text (make sure your computer’s sound is on) and press enter to hear it.

image

I typed some of the usual things we say around the house and my 4yr old wouldn’t stop laughing…

Give it a try with your little ones (or big ones). Even let your non-techie significant other have a go – he/she may have some fun with it.

Slightly modified “CD” Command for Powershell

Background

In my previous job, I spent all my development time in a Linux environment. Was rather impressed at how much could get done at the command line, and how efficient some of those tasks became. My next job was based on Windows and mostly the Microsoft stack of development tools. This  meant I pretty much left the command line behind. That was, until, I started using git. And since I wanted to learn PowerShell, I used PowerShell to execute my git commands.
One thing that has bugged me for a while is simply moving between directories. Even with tab completion, all that typing is a still quite annoying. Especially if you jump between a set of similar directories. One feature from the Linux CD command that I missed was “CD -". This command in Linux can be used to jump to the previous directory (and then back again). One limitation of this command is it only could jump back to the previous directory, and it did not retain a memory of recent directories. There may be something better in Linux that I don’t know of, but I’m basing this on a limited experience a number of years ago.
So I threw a question out on twitter.
image_thumb6
After several tweets back and forth, @cwprogram threw an interesting spike at me.
image_thumb9[4]  http://pastebin.com/xwtkn0am
Although this wasn’t exactly what I was looking for, it contained enough of what I needed to spark my curiosity to write a version of my own.
And so a little script was born that I’m now using to replace the “CD” command in my PowerShell runtime.

What does this do?

After you get it installed (see install steps below), when you type “CD” with no parameters at the command prompt. It will list up to 10 of the most recent distinct paths you’ve been to recently. This list also gives an index lookup number that you can use as a shortcut to jump to that path.
Example:
C:\code> cd
     1) C:\Users\jasonj
     2) D:\temp
C:\code> cd 2
D:\temp>
You can continue to use the “CD” command to do your usual changing directories. Now you can quickly get a history of where you’ve been, and quickly jump to any of those previous histories without typing the entire paths again.
It defaults to only showing you the last 10 distinct items, but if you find yourself needing to go back farther than that, you can use the following command to list more than 10 items.
D:\temp> cd -ShowCount 100

How to Install

  1. Download the file and save it to a location you can reference later.
    https://github.com/staxmanade/DevMachineSetup/blob/master/GlobalScripts/Change-Directory.ps1
  2. Open your $PROFILE (What is that?)
  3. Type the following two commands into your profile to replace the existing “CD” command with the new one.

    Remove-Item alias:cd
    Set-Alias cd {Your_Saved_Directory}\Change-Directory.ps1
  4. Exit your PowerShell console and start a new one up.

Happy Commanding!

Comments

Jason.Jarrett
Thanks for the tip.
Bartek Bielawski
If you want some more *nix features, including cd - you may want to look at pscx.codeplex.com - I made mistake of ignoring what it has to offer and also re-invented cd- in my module. ;) IMO pscx should be added to win build by default. ;)

PowerShell url checker (Check if a list of url’s is valid)

Every once in a while I run across a list of url’s that for whatever reason I want to make sure are valid. I have not yet found a good way to do this in PowerShell and finally hit the case where I decided to just write what I needed.

You can download the script here.

https://github.com/staxmanade/DevMachineSetup/blob/master/GlobalScripts/Check-Url.ps1

Below is an example of how you can use it:

C:\PS>@('http://www.google.com', 'http://www.asd----fDSAWQSDF-GZz.com') | .\Check-Url.ps1


Which generates the following output:


 IsValid Url                            HttpStatus Error
------- --- ---------- -----
True http://www.google.com OK
False http://www.asd----fDSAWQSD... System.Net.WebException: T...


Hopefully someone else finds this useful. And if there are other/better ways of accomplishing this I’d love to hear about it.

Silverlight Profiling PowerShell helper.

I was playing around with some Silverlight profiling the other night to see if I could find any obvious issues with my open source project StatLight and wound up writing a little script in PowerShell I hoped someone might find helpful.

But I didn’t know you could profile a Silverlight app.

I didn’t until I started doing some digging online. Now, the Silverlight profiling story (at least from what I’ve seen/tried) is not near the easy of say Redgate ANTS Performance Profiler. However, it’s do-able. (And with this helper script – hopefully a little simpler?)

How can I profile a Silverlight Application?

I would recommend you read the following blog, which explains one way of doing it very well.

http://blogs.msdn.com/profiler/archive/2010/04/26/vs2010-silverlight-4-profiling.aspx

So… what’s this script for?

If you read the blog above, or have done this before, then you probably noticed that there was quite a series of commands you had to execute before you could wind up with a performance report.

I threw together a quick little PowerShell script in an attempt to automate smooth out the process.

Hot do I use it?

  1. Download the script & save it somewhere. http://github.com/staxmanade/Scripts/blob/master/SilverlightProfiler.ps1
  2. Open the PowerShell console. cd to the directory your xap/assemblies are stored.
    (EX: {myProject}\Bin\Debug\ )
  3. Execute:
    {pathToScript}\SilverlightProfiler.ps1 -urlPath "{myProject}\Bin\Debug\TestPage.html"
  4. When your done profiling press enter to signal that your done.

    Once complete, it will print the location your profiling report was saved. You can then open it with Visual Studio.
Couple of disclaimers.
  • Some paths are hard-coded to my x86 machine.
  • I had troubles running the built in visual studio .bat files (from powershell) that are supposed to set the environment variables. So I extracted out what vars I could find to make it work.
  • I’m not a profiling expert – just hacked this together to get it to work for me.

I hope this is useful, and if you know of a better way, I’m always interested in hearing your feedback.

PowerShell – background task that speaks to me

Today I was testing a long running task where my basic scenario was to execute at the PowerShell prompt.

C:\dev> LongRunningTask.exe > Test1.txt

C:\dev> LongRunningTask.exe > Test2.txt

C:\dev> LongRunningTask.exe > Test3.txt

Change some code and do it all over again.

C:\dev> LongRunningTask.exe > Test4.txt

C:\dev> LongRunningTask.exe > Test5.txt

C:\dev> LongRunningTask.exe > Test6.txt

Although seemingly simple and really not that tough. It became really inefficient because I didn’t like sitting there waiting for it to finish. I was off reading blogs, responding to email, investigating other coding issues and generally forgetting about the long running tasks in the background. On top of that, when I came back to it I couldn’t remember what the last run was (was that test 2 or 3 or 5?) without querying disk to see what it was.

Sine I had all this time to kill in between test runs, I wrote a quick PowerShell script that would fully automate test 1,2,3 and stop. This was great and the first time I ran it was much more efficient as I didn’t have to keep checking back to see when to start it up again.

However, I not only had time to kill, but now I had 3 times that time to kill. I decided to elaborate on the script. I searched the tubes for a way to play a sound when a task was done, so I could be notified as to it’s progress, and completion.

I stumbled upon this blog, which was great for showing me how to play sounds within PowerShell.

http://scriptolog.blogspot.com/2007/09/playing-sounds-in-powershell.html

I implemented the sounds and was off and running on another batch of testing, all tuned in to the sounds of progress.

Her we go again, more time to think about how to improve the process (that I’m not even trying to improve).

What if the script talked back to me? Some more googlefoo and I found this great example blog.

http://huddledmasses.org/powershell-speaks/

Basically using the built in Microsoft speech api’s you can get PowerShell to talk to you. This was just too much fun for the day.

At the end of the day the script below is basically what I was using. Don’t have too much fun, as you might not get any real work done…

The content of this blog isn’t necessarily top notch, but I just had to blog about it, as I was very impressed as to how easy it was to work with the speech api’s. Never knew it could be so easy to make a script verbally interactive.

$Voice = new-object -com SAPI.SpVoice

function speak([string] $msg)
{
$Voice.Speak( $msg, 1 )
}

function execScriptWithNotify([string] $completionMessage, [scriptblock] $scriptToExecute)
{
. $scriptToExecute
speak $completionMessage
}

function execLongRunningTask([scriptblock] $scriptToExecute)
{
. $scriptToExecute

Write-Host "Long running task complete!"
speak "All tasks are done!"
}


# Start the long running task
execLongRunningTask {

#***************************************************************
#***************** How many times to run task? *****************
#***************************************************************
$iterationCount = 3

for ($i=1; $i -le $iterationCount; $i++)
{
execScriptWithNotify "Task $i Complete" {

#***************************************************************
#***************** Long Running Task Goes Here *****************
#***************************************************************
Write-Host "begin long running task # $i"
[System.Threading.Thread]::Sleep(3000);
Write-Host "end long running task # $i"
#***************************************************************
#***************************************************************
#***************************************************************
}
}

}

Integration Test Brought to you by Powershell & NUnit – with a Little Specification Syntax for Flavoring

One of the tools I’ve used the last half of a year and really enjoyed is the C# specification extension methods when writing unit test assertions. If you’re looking for a little more background on the topic, I wrote about Fluent Specification Extensions in a past blog.

Recently I wanted to execute a PowerShell script to do some automated functional testing. I wanted to execute an application and apply some assertions on the output of the software(basically running a console app, parse the xml output and assert on values in the output).

FYI: I’m very new to PowerShell, so any suggestions on how I implemented the below are welcome…

I’ve seen a couple examples of writing test assertions in PowerShell out there. One example is PSUnit; however, this seemed a little heavy for my needs and not quite the syntactic sugar I was looking for.

Besides the syntax flavor I was desiring, another thing I wanted to do was leverage the power of NUnit.Framework’s assertion capabilities. I like the error messages generated when strings and other objects fail the assertion.

Examples of end result ShouldLookLike()…

$true.ShouldBeTrue()
$false.ShouldBeFalse()
"a".ShouldEqual("a")
"a".ShouldNotEqual("b")

Step 1: Figure out how to write a C# style extension method in PowerShell.

I found a great blog post describing how to extend any PowerShell object to add extension methods.

Extension Methods in Windows PowerShell

In short, to extend types in PowerShell leveraging the Extended Type System, you need to define them in an xml file and import the method definitions into the PowerShell runtime instance.

Below is PowerShell XML definition for my NUnit Specification Extensions.

<?xml version="1.0" encoding="utf-16"?>
<Types>
<Type>
<Name>System.Object</Name>
<Members>
<ScriptMethod>
<Name>ShouldBeFalse</Name>
<Script>
[NUnit.Framework.Assert]::IsFalse($this)
</Script>
</ScriptMethod>
<ScriptMethod>
<Name>ShouldBeTrue</Name>
<Script>
[NUnit.Framework.Assert]::IsTrue($this)
</Script>
</ScriptMethod>
<ScriptMethod>
<Name>ShouldEqual</Name>
<Script>
[NUnit.Framework.Assert]::AreEqual($args[0], $this)
</Script>
</ScriptMethod>
<ScriptMethod>
<Name>ShouldNotEqual</Name>
<Script>
[NUnit.Framework.Assert]::AreNotEqual($args[0], $this)
</Script>
</ScriptMethod>
</Members>
</Type>
</Types>


Take the above XML and save it to a file…


NOTE: the file HAS to be saved with the extension .ps1xml


Ex: NunitSpecificationPowerShellExtensions.ps1xml


Step 2: Load the extended type definition into the PowerShell runtime.


Once you’ve saved the XML extended types to a file, you need to load it into the PowerShell runtime by executing the command below.


Update-TypeData -PrependPath NunitSpecificationPowerShellExtensions.ps1xml


Before executing the above statement…Let’s quickly look at a System.String’s members and properties – just to show you what the extension methods look like when applied inside of the runtime.image


After executing the Update-TypeData command you’ll notice there are a number of “ScriptMethod” MemberTypes added to the object.


image


Now if you try to execute one of those newly added extension methods, you may get the following error…


PS C:\> $testVar.ShouldEqual("hello world")


Exception calling "ShouldEqual" with "1" argument(s): "Unable to find type [NUnit.Framework.Assert]: make sure that the

assembly containing this type is loaded.
"


At line:1 char:21


+ $testVar.ShouldEqual <<<< ("hello world")


    + CategoryInfo          : NotSpecified: (:) [], MethodInvocationException


    + FullyQualifiedErrorId : ScriptMethodRuntimeException


This is because we need to load the NUnit.Framework assembly into the runtime before we can leverage the extension methods.


[System.Reflection.Assembly]::LoadFrom("C:\Program Files\NUnit 2.5.2\bin\net-2.0\framework\nunit.framework.dll") | Out-Null


Now that the extension methods have been defined and loaded into the runtime, NUnit.Framework is loaded, we can now use the methods on any object that inherits from System.Object (which, as far as I know, is everything in PowerShell).


And now, everything you need in one script (if you have the xml extended type file saved somewhere…)


# 
# Update-TypeData -prependPath C:\Code\NunitSpecificationPowerShellExtensions.ps1xml
#

[System.Reflection.Assembly]::LoadFrom("C:\Program Files\NUnit 2.5.2\bin\net-2.0\framework\nunit.framework.dll") | Out-Null

$true.ShouldBeTrue()

$false.ShouldBeFalse()

"a".ShouldEqual("a")

"a".ShouldNotEqual("b")
PowerShell – Compiling with csc.exe – more of a headache that it should have been. It is possible…

I was attempting to use PowerShell to compile a group of *.cs source files – needing the flexibility of programmatically swapping out dependent assembly references at compile time depending on certain build conditions… Don’t want to get too much in to why I needed it, just that it is doable – (more painful than initially expected), but still possible.

First let’s get a csc command we want to compile.

Second let me state that this was more of an exercise in wanting to learn PowerShell and there probably other ways of accomplishing what I needed, just seemed like a good time to start down the painful learning curve. Also note, I’m not a CSC compiler pro – I haven’t analyzed each of the “options” and weather it’s right/wrong/best practice – it just works… (thanks to Visual Studio & MSBuild for hiding how we actually should use the compiler)

Ok take a simple csc compile command – (In Visual Studio – File –> New Project -> ClassLibrary1 as a good starting point). Compile the project & check the build output window. You’ll get an output similar to the below.

C:\Windows\Microsoft.NET\Framework\v3.5\Csc.exe /noconfig /nowarn:1701,1702 /errorreport:prompt /warn:4 /define:DEBUG;TRACE /reference:"C:\Program Files\Reference Assemblies\Microsoft\Framework\v3.5\System.Core.dll" /reference:"C:\Program Files\Reference Assemblies\Microsoft\Framework\v3.5\System.Data.DataSetExtensions.dll" /reference:C:\Windows\Microsoft.NET\Framework\v2.0.50727\System.Data.dll /reference:C:\Windows\Microsoft.NET\Framework\v2.0.50727\System.dll /reference:C:\Windows\Microsoft.NET\Framework\v2.0.50727\System.Xml.dll /reference:"C:\Program Files\Reference Assemblies\Microsoft\Framework\v3.5\System.Xml.Linq.dll" /debug+ /debug:full /filealign:512 /optimize- /out:obj\Debug\PowershellCscCompileSample.dll /target:library Class1.cs Properties\AssemblyInfo.cs

Next figure how the heck to execute this in PowerShell.

& $csc $params --- NOPE
exec $csc $params – NOPE

I must have tried tens if not hundreds of methods to get the simple thing above to compile… needless to say I pinged a co-worker for some help. http://obsidience.blogspot.com/

His pointer – when trying to get big string command to execute in powershell do the following.

  1. Open up “Windows PowerShell ISE”  (on Windows 7)
  2. Paste the command prompt window (with an “&” at the beginning)
  3. look for any coloration changes like…
     image
  4. Next place PowerShell escape character [`] in front of any character where the coloration changes (They’re very subtle so look long and hard)
     image

We should now have a PowerShell string that compiles our project.

After I got that far – I cleaned up the compiler syntax for a little re-use. (You can download the project blow to check it out)

If you don’t want to see the entire csc compile in the project download above, below is the general usage…


################## Build Configuration ##################
$project_name = 'PowershellCscCompileSample'
$build_configuration = 'Debug'
#########################################################

$core_assemblies_path = 'C:\Program Files\Reference Assemblies\Microsoft\Framework\v3.5'
$framework_assemblies_path = 'C:\Windows\Microsoft.NET\Framework\v2.0.50727'

function global:Build-Csc-Command {
param([array]$options, [array]$sourceFiles, [array]$references, [array]$resources)

$csc = 'C:\Windows\Microsoft.NET\Framework\v3.5\csc.exe'

# can't say I'm doing delimeters correctly, but seems to work ???
$delim = [string]""""

$opts = $options

if($references.Count -gt 0)
{
$opts += '/reference:' + $delim + [string]::Join($delim + ' /reference:' + $delim, $references) + $delim
}

if($resources.Count -gt 0)
{
$opts += '/resource:' + $delim + [string]::Join($delim + ' /resource:' + $delim, $resources) + $delim
}

if($sourceFiles.Count -gt 0)
{
$opts += [string]::Join(' ', $sourceFiles)
}

$cmd = [string]::Join(" ", $options)
$cmd = $csc + " " + $opts
$cmd;
}

function global:Execute-Command-String {
param([string]$cmd)

# this drove me crazy... all I wanted to do was execute
# something like this (excluding the [])
#
# [& $csc $opts] OR [& $cmd]
#
# however couldn't figure out the correct powershell syntax...
# But I was able to execute it if I wrote the string out to a
# file and executed it from there... would be nice to not
# have to do that.

$tempFileGuid = ([System.Guid]::NewGuid())
$scriptFile = ".\temp_build_csc_command-$tempFileGuid.ps1"
Remove-If-Exist $scriptFile

Write-Host ''
Write-Host '*********** Executing Command ***********'
Write-Host $cmd
Write-Host '*****************************************'
Write-Host ''
Write-Host ''

$cmd >> $scriptFile
& $scriptFile
Remove-If-Exist $scriptFile
}

function global:Remove-If-Exist {
param($file)
if(Test-Path $file)
{
Remove-Item $file -Force -ErrorAction SilentlyContinue
}
}

$resources = @(
#""
)

$references = @(
"$core_assemblies_path\System.Core.dll",
"$framework_assemblies_path\System.dll"
)

$sourceFiles = @(
#""
)

$sourceFiles += Get-ChildItem '.' -recurse `
| where{$_.Extension -like "*.cs"} `
| foreach {$_.FullName} `

$debug = if($build_configuration.Equals("Release")){ '/debug-'} else{ "/debug+" }

$options = @(
'/noconfig',
'/nowarn:1701`,1702', # Note: the escape [`] character before the comma
'/nostdlib-',
'/errorreport:prompt',
'/warn:4',
$debug,
"/define:$build_configuration``;TRACE", # Note: the escape [`] character before the comma
'/optimize+',
"/out:$project_name\bin\$build_configuration\ClassLibrary.dll",
'/target:library'
)

$cmd = Build-Csc-Command -options $options -sourceFiles $sourceFiles -references $references -resources $resources

Execute-Command-String $cmd