Developing on Staxmanade

Fail Fast With iOS Images

(Comments)

Problem: iOS app has unwieldy, unorganized and poorly named images

I've been working on a team that took over a good sized legacy iOS project where it's usage of images became a little unwieldy. Between the various app clones (targets), shared images, and images that aren't even used we'd like to reorganize, rename and just clean up the app in general.

But, one thing that makes me nervous is how easy it is to rename an image, forget or miss a magic-string that tries to load that image and now we've introduced a bug that may be difficult to diagnose or even discover that we introduced it.

Let's fail fast?

Failing fast in this context means, how can we, during development and testing time quickly fail when running the app to determine where an image attempting to be loaded does not.

Ideally we wouldn't even have these magic-strings to deal with. Using some tool to automatically generate a compile-time safe construct that we can use to load images. However until both A) I find the darn tool that I once-upon stumbled across that does this (please leave a comment to remind me if you find it before I do...) and B) we get sed tool integrated, I threw this little helper to quickly fail fast and help us find broken image references within our iOS applications.

How does it work?

It's a simple little Category that overrides the imageNamed: selector of UIImage and if the original cannot load an image (returns nil) then it will fail with a helpful assertion message.

This utility allowed us to quickly find images that were missing while doing our big clean sweep.

How to integrate?

It should be as simple as adding the .h & .m files to your project and their respective targets and you should be off to the races.

For DEBUG mode only...

If you look closely you'll notice #if DEBUG wraps the implementation so when we ship to the app store we don't end up causing a crash in production if a missing image sneaks by.

Happy Missing Image Bashing!

(Comments)

How to Diff Two Xcode Targets

(Comments)

If you've ever used different Xcode targets to manage different version or clones of a similar app and then had to debug why one target builds while another doesn't, finding a way to diff two targets was always challenging.

Sometimes it's because you forgot to check a box including a new class in multiple targets, or maybe you've integrated a new framework with targetA but forgot to include the framework reference in the Build Phases for targetB.

I'm actually hoping that I just haven't learned the obvious way to resolve these problems and you (dear reader) will leave a comment telling me how simple it is to do with the built in tools. Until then, here's something that I hope will help others that are trying to see what two Xcode targets have different between them.

How about a little CLI tool: diffXcodeTargets

diffXcodeTargets is a command line utility I threw together that allows you to visualize the differences between two Xcode project targets using a diff tool.

Install it with npm

npm install -g diffxcodetargets

How to use it?

You can first call it by passing in the path to your project file and no targets and it will print out what targets are available.

> diffXcodeTargets ./myProject.xcodeproj/project.pbxproj

Could not find TargetA ''. Possible targets are:
  - targetA
  - targetB

Now you know your available targets and you can call it with the two targets you want to diff:

diffXcodeTargets ./myProject.xcodeproj/project.pbxproj targetA targetB

How does it work?

If you're curious how this tool does it's job it is actually quite simple and would love to hear any feedback...

diffXcodeTargets uses the xcode npm module to read/parse xcode projects and then approvals to show a difftool with two different files.

What's missing?

I threw this together quickly to help diagnose some issues with a project I was working on. It does not yet support all of the various scenarios that may be needed when diffing two Xcode targets, but if you have any suggestions or ideas feel free to leave a github issue.

Happy Diffing!

(Comments)

How to Remove Files in Git that Should Have Been Ignored

(Comments)

I sometimes come upon existing applications that use Git where files were added to the repository that should have originally been ignored. Sometimes this is because the .gitignore file is missing, or because certain rules were not include that probably should have been from the start.

There are ways in git to completely rewrite history to remove all traces of the file, however most of the time, it's good to leave a commit saying removed files that should have originally been ignored as a good starting point (depending on the project/repo).

Here is a small workflow I've found to be pretty effective in helping to clean up a repository, or at least let you know what files would have originally been ignored had you setup a .gitignore file with some project standards...

Create a well meaning .gitignore file

You can go to gitignore.io and type some words like xcode, node, osx, or whatever platform/IDE you use for development and generate a pretty good .gitignore base file.

Create or Update local .gitignore

Once you've update your local .gitignore file with the rules you'd like to use, you can use the below to commit your changes;

git add .gitignore
git commit -m 'updating .gitignore'

Remove the files that should have originally been ignored.

Now we want to figure out what files may have been added originally that shouldn't be there. You can run the following two commands to see which files to find this out.

git rm --cached -r .
git add .

Now if you git status you can see what files should probably be deleted from the git repo and using the newly updated .gitignore file will now be ignored going forward.

Go ahead an commit these changes (assuming you're happy with what is being deleted and ignored).

Happy Gitting!

(Comments)

Approval Tests - Command Line Tool (CLI)

(Comments)

In my previous post I introduced Approval Tests using the Approvals.NodeJS variant of the tool.

In this post I'd like to go over how you can use the command line version of Approvals.NodeJS for several different scenarios.

First thing first (How to Install)

Globally install approvals via npm.

npm install -g approvals

Now that you have it installed, let's go over some scenarios that you can use the approvals tool.

Scenario 1: Compare JSON files downloaded from a web server.

Let's say you want to see a quick file diff between two api requests.

You can use curl to download the file and pipe (|) it to the approvals CLI tool. We give it a name parameter which is used to generate the file name used to save to.

So if you were to run:

curl https://api.github.com/orgs/approvals | approvals githubOrg

This would generate two files:

githubOrg.received.txt which at the time of this writing would look like:

{
  "login": "approvals",
  "id": 36907,
  "url": "https://api.github.com/orgs/approvals",
  "repos_url": "https://api.github.com/orgs/approvals/repos",
  "events_url": "https://api.github.com/orgs/approvals/events",
  "members_url": "https://api.github.com/orgs/approvals/members{/member}",
  "public_members_url": "https://api.github.com/orgs/approvals/public_members{/member}",
  "avatar_url": "https://avatars.githubusercontent.com/u/36907?v=3",
  "description": null,
  "name": null,
  "company": null,
  "blog": "http://approvaltests.com",
  "location": null,
  "email": null,
  "public_repos": 13,
  "public_gists": 0,
  "followers": 0,
  "following": 0,
  "html_url": "https://github.com/approvals",
  "created_at": "2008-11-27T06:03:58Z",
  "updated_at": "2014-12-28T03:02:33Z",
  "type": "Organization"
}

and an empty githubOrg.approved.txt file.

Note when you first run this command you are prompted with the received file compared to the empty approved files; however, on an initial run, you can use the --forceapproveall argument to avoid the diff step and force all the contents of the received file into the approved file.

Now if the remote file were to change on you and you run the below command again:

curl https://api.github.com/orgs/approvals | approvals githubOrg

You would get a diff between the the originally approved file and the newly downloaded file.

Scenario 2:

Ok, well I actually have another great scenario for using the approvals CLI, but I believe it deserves it's own post as I'm going to introduce some nifty configuration on a Mac that I've used to setup my own development servers automatically.

Until next time...

(Comments)

Approval Tests - Overview

(Comments)

I first started using the .Net version of Approval Tests and found so much value in it, I created a port of the tool that I can use in Node.JS. This post is intended as a rough overview of Approval Tests, and will be using the NodeJS port in my examples below.

There is support for other programming languages, so head over to the Approval Tests site at ApprovalTests.com and check them out.

What are Approval Tests?

At it's core, Approval Tests are a very different way to execute the assertion step of a unit test.

Think of this as another tool in the bag and not a replacement for the good old fashion assert.equal(...) or your favorite assertion tool. But for certain types of tests, it IS the best tool to grab.

Typically, when we create assertions in our unit tests, we assert on very specific things. This property equals that value.

With Approval Tests, you can take whatever output you're wanting to Assert against, turn it into either a string representation or an image (say screenshot of app), and use our favorite diff tool to compare it with the previously approved version.

The diff tool is a great way to visualize change between failing/approved data which can help to raise the level of abstraction of your test. Instead of comparing a single value in an assertion, we can serialize an entire object graph to a string and use the diff tool to review any changes to the diff of the previously approved version.

The work to find and start up your favorite diff tool comparing previously "approved" files is where the libraries provided by Approval Tests come in handy.

Let's walk through an example

If you've done any testing before, by now you have probably heard of the AAA (Arrange, Act, Assert) style of tests. Below I've contrive a sample test using the AAA style in JavaScript.

var assert = require('assert');
describe("when testing something", function(){
    it("should do something special", function(){

        // Arrange
        // setup the initial state for the test
        var obj = { valueA: "test", valueB: 1234 };

        // Act - Do some business logic on the object
        obj.valueC = true;

        // Assert - verify the state of the item under test
        assert.equal(obj.valueA, "test")
        assert.equal(obj.valueB, 1234);
        assert.equal(obj.valueC, true);
    });
});

At a high level, if you are writing tests with an object, and have a way to translate that object's state into a text or image representation, wouldn't it be great if you could save that state into a file, essentially locking down the state of the test?

This would allow future runs of the test to easily detect a change by comparing the previous state with the new state (strings of course) - but using the power of our diff tools to quickly highlight what is different.

Let's turn our AAA test above into an Approval Test

var approvals = require('approvals');
describe("when testing something", function(){
    it("should do something special", function(){

        // Arrange
        // setup the initial state for the test
        var obj = { valueA: "test", valueB: 1234 };

        // Act - Do some business logic on the object
        obj.valueC = true;

        // Assert - verify the state of the item under test
-        assert.equal(obj.valueA, "test")
-        assert.equal(obj.valueB, 1234);
-        assert.equal(obj.valueC, true);
+        approvals.verifyAsJSON(__dirname, "sampleTest", obj);
    });
});

Notice how the 3 assert's turned into 1 approvals.verifyAsJSON?

How Approval Tests Work

Approval Tests works by taking the object or value you're trying to verify, serializing it to a text file (or image) and saving it to a file labeled with the name of your test and *.received.txt. It will then try to compare this *.received.txt file with a *.approved.txt file. If the file doesn't exist, then we will see a diff tool present with our received file on the left and an empty approved file on the right.

At this point we have to choose between a number of options:

  • We could take the received output and copy/save it to the approved file. Essentially approving the test.
  • We may only want parts of the received file, and copy over just the parts of what we want to the approved file.
  • Or we do nothing as we want to start over...

Now we run our test again and if the test passes - then we know that we've finished as what was re-generated in the received file matches the approved file. But if we see our diff tool appear, we can analyze the differences in the diff tool and determine if we need to either adjust the approved file or adjust our code that generates the received file.

If the above explanation still isn't clear, I'd recommend watching @LlewellynFalco's video's on the topic that can be found at approvaltests.com. He does a good job describing the concepts.

Next Steps!

Browse the github org, watch videos or read documentation on approvaltests.com.

Happy Approving!

(Comments)

Setting Jenkins up to run XCTool and Xcode Simulator Tests

(Comments)

We recently migrated an older Jenkins C.I. server over to a newer one, and struggled to get XCTool or xcodebuild to run unit tests where the simulator was needed.

There are quite a number of blog posts out there that describe how to setup a C.I. Jenkins server on a Mac, but many of them don't include the last bit (that worked for me), so I hope this helps you...

Why Can't I run the Xcode Simulator on a Jenkins server?

Some Error Messages I Encountered Along the Way:

Tried to install the test host app 'com.myapp.test' but failed.

Preparing test environment failed.

-[TEST_BUNDLE FAILED_TO_START]

There was a problem starting the test bundle: Simulator 'iPhone 6' was not prepared: Failed for unknown reason.

Test did not run: Simulator 'iPhone 6' was not prepared: Failed for unknown reason.

2015-01-21 12:02:19.296 xcodebuild[35135:875297]  iPhoneSimulator: Timed out waiting 120 seconds for simulator to boot, current state is 1.

Testing failed:
Test target MyProjectTests encountered an error (Timed out waiting 120 seconds for simulator to boot, current state is 1. If you believe this error represents a bug, please attach the log file at /var/folders/yf/49df70js2xn524f9c3835zx0000087/T/com.apple.dt.XCTest-status/Session-2015-01-21_12:00:19-sXA35e.log)
** TEST FAILED **

Need to run a GUI user.

The Simulator needs to run in the context of an actual user where it can get a window handle and render it's U.I...

Below is a great resource to get you most of the way there.

iOS CI with Jenkins

Once you've followed the instructions in the above post and you still can't get the Jenkins CI server to run your simulator tests, then check this last item which got it working for me.

Open up your Jenkins plist file in the LaunchAgents folder. (If you don't have one in LaunchAgents, then go back to the linked blog post and follow that first).

The key for me to get it working was to remove the CreateSession key from the plist.

-       <key>SessionCreate</key>
-       <true />

Once I removed this key, restarted the server, everything started building/working correctly.

In summary:

  1. Auto-login with a jenkins user
  2. Get your plist moved over to the LaunchAgents folder (see post linked above)
  3. Remove the SessionCreate key
(Comments)

How to Migrate a Jenkins Job to New Jenkins Server

(Comments)

We recently setup a new Jenkins build server for some iOS applications and I wanted to find a quick way to copy a couple Jobs from the old server to the new one.

Below are a few small options I found while working on the task.

Option 1: Copy jobs directory

One option (and seems to be the recommended one) is to just copy the jobs directory from the old server to the new one.

From the documentation Moving/copying/renaming jobs:

You can:

  1. Move a job from one installation of Jenkins to another by simply copying the corresponding job directory.
  2. Make a copy of an existing job by making a clone of a job directory by a different name.
  3. Rename an existing job by renaming a directory. Note that the if you change a job name you will need to change any other job that tries to call the renamed job.

Those operations can be done even when Jenkins is running. For changes like these to take effect, you have to click "reload config" to force Jenkins to reload configuration from the disk.

For me, I skipped this option because I was having a hard time finding where the jobs directory was on the old server. (Or just too lazy to find it, and I only had a couple jobs to copy over)

Option 2: Try one of the plugins out there

There are some Jenkins plugins out there that provide some job export options. Here are a couple...

Option 3: Use Jenkins CLI

This is what I used, which worked nicely for only the few jobs we had. If you have a large number of Jenkins jobs, you may consider the first aproach above.

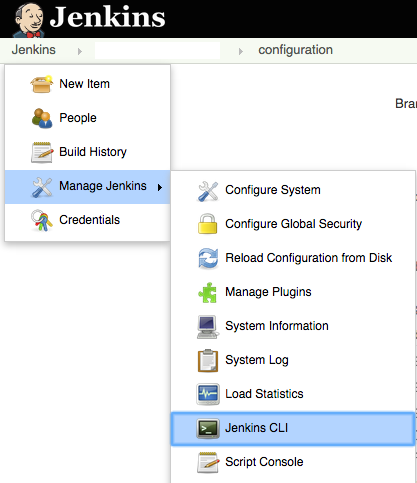
  1. First download the Jenkins CLI jar.
  • You can do this from your jenkin's CLI page within your installed Jenkins instance.

jenkins CLI menu

  1. Next we can use the following command (pointing to the old server) to list the jobs.

java -jar jenkins-cli.jar -s http://<YourBuildServer>:<YourBuildServerPort>/ list-jobs

  1. Using one job from the list above, let's copy the xml of a job to the clipboard. (I'm using a Mac which is were pbcopy & pbpaste come from below)

java -jar jenkins-cli.jar -s http://<YourBuildServer>:<YourBuildServerPort>/ get-job "NAME_OF_JOB" | pbcopy

This uses the cli get-job "NAME_OF_JOB" command to print the job's xml to stdout, which we pipe to pbcopy on the Mac to load the configuration into the clipboard. You could of course pipe the output to a file like ... > job.xml

  1. If the above command placed a job's XML into the clipboard, you can use the below command to add it to the new server.

pbpaste | java -jar jenkins-cli.jar -s http://<YourBuildServer>:<YourBuildServerPort> create-job "NAME_OF_JOB"

This uses pbpaste to take what is in the clipboard, send it to stdin and pipe it to the Jenkins cli's create-job "NAME_OF_JOB" command.

Hope this helps...

(Comments)

Resgrid is a BizSpark Featured Startup

(Comments)

Today Microsoft published an article on their BizSpark Featured Startups blog about Resgrid!

What is Resgrid?

Resgrid is a software as a service product hosted on Microsoft Azure that provides logistics, management and communication tools to first responder organizations such as volunteer fire, career fire, EMS, search and rescue, public safety, disaster relief organizations, etc.

My partner Shawn Jackson and I created Resgrid a few years ago and the buzz is exciting to see.

If you have any interest in following some technical aspects of this little startup. Shawn often posts interesting articles both technical and startup/business related on his site.

(Comments)

How to install clang-format and formatting Objective-C files

(Comments)

Formatting your code so it follows whatever conventions your team/company/self define is important. As developers who have to read code on a regular basis, you have to train ourselves to mentally parse code and spot where bugs may be lurking.

However, if your code is not formatted in a consistent fashion, the cognitive load placed on your brain increases dramatically. Not only do you have to read, parse, and conceptualize the code you're reviewing, your brain is now having to decide if anomalies in the formatting of your project's source code are because of a problem in the code, or merely a difference in the code formatting or styling.

Easy and automatic code formatting tools were something I really missed when I started using Xcode because Visual Studio's built-in formatting of a file is as simple as CTRL+k+d.

This has definitely improved in recent years with the introduction of Alcatraz and ClangFormat-Xcode and I'd highly recommend you check them out.

But, what if you just acquired a legacy project, that was hacked on by quite a number of different developers, with different styles, that's a total mess (from a style consistency perspective)? Or what if you wanted to have an easy rake task that automatically formatted the necessary code files?

This is where a great little tool from the LLVM project clang-format comes in handy.

Unfortunately it's not as easy to install as brew install clang-format (It's now as easy to install as brew install clang-format), but I'll show you not only how to get it installed manually, but a command to easily format your code.

How to install clang-format manually

Thanks to this post for describing how to get (an older version of the tool), I put together the following steps that I hope you find useful.

  1. Go to the LLVM Download page
  2. In chrome dev tools (On my mac, ⌘+⌥+J aka CMD+Option+J, make sure theElementstab is selected, andCMD+Fwithin the html source formacosx-apple-darwin`.
  3. Copy that URL and place it into the following set of commands.

From a command prompt, navigate to a folder where you'd like to save or store the clang tools.

  1. Remove the older version if there was one, and create a folder to work in rm -rf ./clang-format/ && mkdir -p ./clang-format
  2. Take the previously discovered link from above and use the following to download it into our working folder. curl 'http://llvm.org/releases/3.5.0/clang+llvm-3.5.0-macosx-apple-darwin.tar.xz' -o './clang-format/clang-format.tar.xz'
  3. Extract the tar file tar xvfJ clang-format/clang-format.tar.xz -C ./clang-format
  4. Remove any previously sym-linked linked version you have rm -f ~/bin/clang-format
  5. Link the downloaded clang-format command into our ~/bin folder ln -s $(pwd)/$(find clang-format | grep bin/clang-format$) ~/bin/clang-format
  6. Test the command works clang-format --help

Here are all of the steps above as a script:

rm -rf ./clang-format/ && mkdir -p ./clang-format
curl 'http://llvm.org/releases/3.5.0/clang+llvm-3.5.0-macosx-apple-darwin.tar.xz' -o './clang-format/clang-format.tar.xz'
tar xvfJ clang-format/clang-format.tar.xz -C ./clang-format
rm -f ~/bin/clang-format
ln -s $(pwd)/$(find clang-format | grep bin/clang-format$) ~/bin/clang-format
clang-format --help

How to setup your project style guide

Now that you have the command line clang-format tool installed, you can walk through how to use it to format our Objective-C code files. Let's walk through some steps I used to apply a standard code format to the project.

But, before you use the command line tool to rip through our project, let's first set the standards you'd like clang-format to adhere to when formatting our code.

At the root of your project (probably where your .git folder is), create a file called .clang-format

The .clang-format file contains the formatting rules for a project. Its structure is YAML and is what the clang-format CLI can read to format your project's Objective-C files.

For details about the .clang-format file, you can check out the docs to get a list of all of the options possible in this file.

Here is one I have used before.

BasedOnStyle: Chromium

AlignTrailingComments: true
AllowShortIfStatementsOnASingleLine: false
BreakBeforeBraces: Attach
ColumnLimit: 0
IndentWidth: 4
KeepEmptyLinesAtTheStartOfBlocks: true
Language: Cpp
MaxEmptyLinesToKeep: 4
ObjCSpaceAfterProperty: true
ObjCSpaceBeforeProtocolList: false
PointerBindsToType: false
SpacesBeforeTrailingComments: 1
TabWidth: 4
UseTab: Never

If you want to ignore a folder from being touched, you can place a .clang-format in that folder with the following option set:

BasedOnStyle: None

Format all our files at once

Now that you have a .clang-format file which helps to define our project's styling conventions, you can begin our initial formatting sweep.

First let's create a command that gives us all the files you want to process.

Here's my initial example (executed in a zsh shell):

ls MyProject/*.[hm]

Tweak this however you need so that you get a list of files to format from your project. You may want to be careful to exclude a CocoaPods folder, or other third party libraries and once you are happy with it, you can then pipe its output to clang-format.

ls MyProject/*.[hm] | xargs clang-format -i -style=file

You can use the xargs command to execute the clang-format command for each file in the output ls.

clang-format options

In the above example you use the following clang-format options:

  • -i tells it to do an in-place edit of the file
  • style=file this tells clang-format to use our .clang-format style rules when formatting.

Did you have your project under source control before doing this?

I sure hope you have the project in source control. You should now be able to git diff or whatever you do to view your source changes and see the files that have been modified by the clang-format command.

I hope this post was helpful in showing you how to install clang-format and use it to format your existing Objective-C project.
(Comments)

Custom Static Blog Generator - No Longer Using Octopress

(Comments)

TL;DR

In summary I left my Octopress blog behind quite a while ago, and this site has been statically generated with a custom tooling build up around gulpjs and node.

Some of the details...

After I migrated from Blogspot to Octopress I started running into workflow issues and other issues that turned me off from Octopress/Jekyll (at least for my own site).

It was also right around the time that GulpJS came out and I needed a project to play around with...

So I did what every developer does. I wrote my own.

Using Approvals.NodeJS to capture previous renderings of the Octopress generated version of staxmanade.com, I was surprised at how quickly I ported my Octopress generated site to a new custom static site generator.

I'm not writing this to convince you to leave Octopress for anything (especially my home-grown tool), but felt compelled to get a blog post out describing some of the cool little features I've implemented.

Personal struggles with Octopress:

  • Octopress site generation was too SLOW for me. There's even a helper rake task that moves your posts to a temporary folder to exclude from generation when you want to quickly see the post you're working on generate fast, but this just bothered me from a fundamental level.
  • I'm not a Ruby developer and don't have the ability or desire to fork/maintain Jekyll or Octopress. I wanted to have something that I pretty much owned. (yea - that comes with a larger maintenance burden, but meh - I'm a developer and its part of the process)
  • Disliked that every time I rake gen_deploy I didn't know the exact code-diff that was changed since the previous version. I'd like to know exactly what files have changed and how they have changed before they get deployed. (again, there's probably a solution here, but didn't really care to dig deeper)
  • There's an issue on Windows where you end up mucking around with the codepage, which made working on things a bit of a headache.

So what did I end up with?

I now have a statically generated site all powered by gulp and a small library/command line tool I've thrown up here: Togglejs.

How is this better ~err~ different?

  • Regenerating my site only takes about 6 seconds (as opposed to the Octopress 30+)
  • I learned gulp, and node.js streams along the way.
  • Built by myself — which was a good for the learning experience.
  • Don't have to set the codepage to 65001 for Windows machines.
  • Series support.
    • I've implemented two different features for supporting a series. One allows me to control through YAML front matter posts and how they tie into a series topic. Another feature allows me to write out a series in a single markdown file, where I can specify a delimiter to split the articles up by. I may blog more about these in the future as they're a feature I've quite liked and was relatively easy to implement using my custom site generator.
  • Easy post tagging for a custom feed that gets cross-posted to elegantcode.com
  • The tog is easy to extend with custom commands and has a number of pre-built commands already ready to go.

Since I've not put a huge amount of time into it - and I haven't exactly developed it to be a competitor to Octopress or other static site generators, it pretty much has just what I need it to have at the moment and not really anything more.

How is this worse?

  • I have to maintain it (this is both a blessing and a curse) - don't get the benefits of bug fixes by hundreds of contributors to Octopress.
  • I haven't yet ditched the Octopress theme, so that change will be coming at some point.
  • I don't have any automated process to deploying changes. So I can't just create a post on my phone, save to my repo and expect it to automatically show up online - but have ideas on how to do that.
  • My gulp watch is not working correctly and it's not yet wired up to livereload which would be a nice next step...

BUT...

This is my site so it's all up to me to make it right...

It's been a pleasure to build this up and just a fun little project to hack on (as if all the other OSS projects I hack on aren't enough).

(Comments)