Developing on Staxmanade

C# 4.0 Optional Parameters – Exploration.

{… Removed big long story about how I ended up writing this post which provides no value to the blog…}

Summary of big long story to at least give a little context as to why (yet another post on optional parameters):

I threw an idea out to the Moq discussion group of how we could use the named/optional parameters in a future version of Moq. (you can read the thread here) In my original feature request I displayed my lack of concrete knowledge in the named/optional parameters support that is eventually coming with .net 4.0.

Once I learned that you could place default values on interfaces it left me with questions… So, what better way to figure them out? Go test it…

Disclaimer: (Shouldn’t every blog have some context enlightening disclaimer?)
I haven’t looked up best practices or lessons learned from people that have had this language feature (VB), so I’m just doing this as an experiment for myself. Hope some of my findings help the other C#’ers wanting to learn a little about the feature.

What are optional parameters?

DimeCasts.Net, Derik Whittaker has a nice intro video # 153 - Exploring .Net 4 Features - Named and Optional Parameters

OR check out - http://tinyurl.com/yz3pc9o


Can an interface define a default value?

Yes!
image


Can I specify a default in the concrete implementation, if the interface has a default also?

Yes!

image

What happens when the concrete implementation has a different default value than the interface’s default?

If the interface has a default value specified, that is different from the concrete implementation, then it depends on what reference you’re using when executing the method.

image

In the case below we are executing the method directly off of the Foo instance and will therefore get the concrete implementation’s default value when executing.

(new Foo()).Bar() – would use the value of ‘1000’.

And in the case below we cast the Foo instance to an IFoo and it will then use the interfaces default value when executing.

((IFoo) new Foo()).Bar() – would use the value of ‘1’.

Below are some examples of the different use cases.

[TestClass]
public class UnitTest1
{
[TestMethod]
public void Should_get_the_concrete_class_default_value()
{
Foo f1 = new Foo();
f1.Bar();
f1.ParamValue.ShouldBeEqualTo(1000);
}

[TestMethod]
public void Should_get_the_interface_default_value()
{
IFoo f = new Foo();
f.Bar();
f.ParamValue.ShouldBeEqualTo(1);
}

[TestMethod]
public void Should_get_the_interface_default_value_because_of_explicit_cast()
{
Foo f = new Foo();
((IFoo)f).Bar();
f.ParamValue.ShouldBeEqualTo(1);
}

[TestMethod]
public void Should_get_the_concrete_class_default_value_because_of_explicit_cast()
{
IFoo f = new Foo();
((Foo)f).Bar();
f.ParamValue.ShouldBeEqualTo(1000);
}
}

interface IFoo
{
int ParamValue { get; }

void Bar(int paramValue = 1);
}

class Foo : IFoo
{
public int ParamValue { get; private set; }
public void Bar(int paramValue = 1000)
{
ParamValue = paramValue;
}
}


The next experiment - Extract Interface.


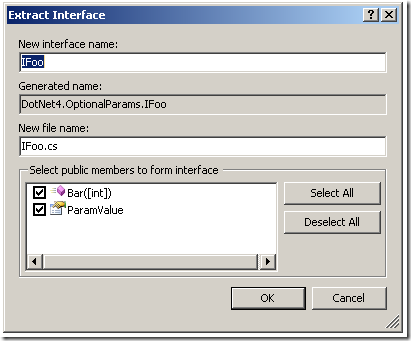
Next I tried removing the IFoo interface that I’d created manually, because I wanted to exercise the “Extract Interface…” functionality, just to see how it dealt with the these defaults.


Luckily, there were no surprises. The interface it created was exactly (less spacing) the same as I originally had.


Although it didn’t display the default constant value in the dialog during creation, there was a hint that the method signature had a default by placing [] around the int resulting in “Bar([int])”.


image


Side Tool Issue: Can’t say I like how it forced me to put the interface in a different file, I guess it’s enforcing “best practice” here, but I prefer to do this later in the dev cycle than immediately (kind of like how R# allows you to place in the file next to the original class). #ToolGettingInWay


Optional Parameter Issue: One issues I see with this solution was the dirty/icky copy/paste feeling I got when extracting the interface – the default was copied from the class to the interface.


Possible solutions to the “dirty/icky copy/paste feeling” the extract interface gives.


(in no particular order of preference)


  • Place all defaults into a constant and reference the constant in both the interface and the concrete implementation(s).


  • Don’t place the defaults in the concrete implementation (only in the interface). As you should probably not be depending on the concrete implementation to begin with, you wouldn’t need it there (and wouldn’t even call it). This would also help in the case that there are multiple concrete implementation and having to sift through the code looking for all instances to updated defaults for could be very error prone.


On the surface named parameters seem like a very simple feature to the C# language. But after delving into the feature a little, I can see there are many complicated scenarios you can get your self caught up into.


As with anything…Use with care!

Networking Brain Fart.

This one was just too funny to not write down. The epitome of a Brain Fart.

There sure seem to be quote a few posts lately talking about the Software (Crafts-Man/Woman/person/whatever); I may have many many more years of Craft practicum to study up on before I can truly consider myself a Craftsman. However, it’s humbling to screw up and remember that we are human. Below is one such story. Luckily there was no software, business value, or puppies hurt in the process.

Setup:

I work from home part time. Where I usually just remote desktop into my 64bit, quad-core, 12 gig of ram, supercomputer desktop at work. (I’m sure I’ll read this post in the future and go what? supercomputer? you have no idea young man.) I choose the RDP network latency over not being able to compile (in under XXX_too_much_time_XXX) on my laptop at home. (It’s part time one day a week and not worth the investment to beef up the home setup. -- yet) Point is: I’m working from home and via remote desktop on my computer at the office.

So I’m working on this project and…let’s just say I somehow got into a position where I thought my best option was to take my solution offline from TFS. (long story I don’t want to overshadow the “Brain Fart” part of this post)

This is where I got into trouble…

How do I take my solution offline from TFS?

I searched for how to take my solution offline and found this great post “Force Visual Studio to think TFS is offline” which outlines several options…

Option 1 – Use the ‘tfpt tweakui’ utility

Option 2 – Yank the network cable before starting Visual Studio

Option 3 – Set a registry key

Option 1: I didn’t think I had TFS Power Tools installed (turns out I did, just didn’t spend the 2 seconds to figure it out - doh).

Option 3: I couldn’t seem to get the registry key version to work (for some reason???) & wasn’t interested in wasting the day to figure it out.

--- So what was left?

Option 2: “Yank the network cable before starting Visual Studio”. I didn’t yank the cord because clearly I’m not at the office so how could I do that????, but tried the next best thing. I disabled my network connection (so I could open the solution and have it NOT find TFS).

If you missed the detail earlier in the post – I said that I was working through RDP.

Huh - Not anymore… Sigh!

Some days it may just be safer to work from home (disconnected from the world).


P.S. thanks to a co-worker for getting me back online :)

Comments

Jason.Jarrett
I know there is (supposed to be this button) but for some reason whenever I'm on a machine with Visual Studio & TFS It's never there... :)
justinmchase
What's even worse is that there's a little button on the top of the Solution Explorer when you have a project that's associated with TFS and you just click it ;)
Obsidience
if you're gonna do it, do it right. next time give me a call and I'll yank the cable for real :-P

Unity/Moq - AutoMocker or AutoMockingContainer

What is an Auto Mocking Container?

This post started to get a little long, so I won't re-explain the concept.

Joshua Flanagan wrote a nice overview at his Los Techies blog: Auto mocking Explained.

My post is mainly here to describe the Unity version of an automocking container I threw together.

In Jan 2009 I blogged about my initial version of the Unity AutoMocker - Why am I blogging about it again?

I originally wrote the AutoMocker for the Unity container a year ago (Jan 2009, in Silverlight), and finally got around to placing the code up in the moq-contrib project in June of 2009.

I'm writing another post today in hopes to:

  1. Get some feedback on how this little snippet of code should continue.
  2. Give a little more how-to/example code
  3. Describe some updates I made since I originally created it.

Where can I get it?

This is one part where I'd appreciate some feedback.

I have two slightly different versions out there (currently).

I have one version at the ElegantCode repository where I was working on it, and the other I threw up at moq-contrib.

The core of the UnityAutoMockContainer is the same in both places, it's how the tests are separated out that differ.

In the ElegantCode repository it's an all in one self contained single file (that you can copy into your own test project(s)). You can then setup a single test in your own testing framework that runs all internal automocker tests (in case you need to modify it yourself, and don't want to break any existing functionality). EX: test

    [Test]
    public void Should_run_all_UnityAutoMockContainer_internal_tests()
    {
        Moq.AutoMocking.SelfTesting.UnityAutoMockContainerFixture.RunAllTests(Console.WriteLine);
    }

I kind of like this format as it makes it easy to port between test libraries. Can't say I like having the tests in the same file as the core, but it certainly is not a large chunk of code (so far) so it's relatively small to maintain and definitely easier to manage as a single .cs file than another assembly (which would have to be version dependent on both Unity and Moq).

The moq-contrib is definitely where I think this helper should end up (and it is there). I just happened to break the tests out into the Silverlight test project and the core is alone in a file.

It's current state isn't as easy to copy to a test library (Silverlight/Desktop/Unity 1.2/Unity 2.0) as the one at ElegantCode. What does anyone think? Should I put them all together in one file?

However it ends up (1. all in one file or two (1 test) (1 core)) it will continue to be maintained on the moq-contrib project.

What is the high level API of the container?

It's pretty simple, (currently) there are four methods on the container.

Two for registering items with the container. Say you want to register an already created instance, or say you want to map an interface to a concrete class and not have the container generate mocks automatically for special cases.

And two for pulling items out of the container. Whether you want a instance of T or a Mock, it gives you ways to retrieve both.

image

How can I setup my own registrations with the container?

Say I don't want to have the container generate mocks for specific items and I want to supply specific configuration to the UnityContainer.

 public UnityAutoMockContainer RegisterInstance<TService>(TService instance)

 public UnityAutoMockContainer Register<TService, TImplementation>() 
     where TImplementation : TService

Note: both of these registration methods return the container itself so you can fluently stack registration. EX:

    AutoMockContainer
        .Register<IServiceA, ServiceA>()
        .Register<IServiceB, ServiceB>();

Let me know: I haven't tested or played around with how this automocking container deals with any container specific xml configuration… So although I don't think you should probably have that in a test assembly (stuff happens). Let me know if there are any issues.

How do I get items out of the container?

First is the Resolve(). It will pull an item T out of the container. (Creating it if not already existing)

public T Resolve<T>()

When T is an interface Resolve (unless you setup registration specifically with the container) should return basically (new Mock()).Object

When T is a concrete Class, the container should return an instance of T and any of it's dependencies will be satisfied by mocks. (Note that T will not be any sort of mocked instance of T, unless you used the GetMock as described below first)

public Mock GetMock() where T : class

When T is an interface GetMock should return basically (new Mock())

When T is a concrete Class, the container should return a new Mock() and any of it's dependencies will be satisfied by mocks.

How do I use the UnityAutoMockContainer?

It's pretty basic, you first create an instance of the UnityAutoMockContainer, and from there you can ask it for mocks of an (Interface, Class, or Abstract Class).

If you request an instance of a concrete class, or abstract class, the UnityAutoMockContainer will stuff mocks in for any constructor dependencies of your concrete class (if it can). You can then request from the container those same dependencies one at a time and either apply mocking setups or verifications.

NOTE: Anything the container creates will live as a singleton instance in the container. So any other requests from the container will always return the originally created instance. Therefore, each distinct scenario in a test suite should have their own instances of the container.

Below his an example of how you can leverage the container in some tests. Given this base fixture class…

public class FixtureBase
{
    private readonly UnityAutoMockContainer _autoMockContainer = new UnityAutoMockContainer();

    protected UnityAutoMockContainer AutoMockContainer
    {
        get { return _autoMockContainer; }
    }

    [TestFixtureSetUp]
    public void SetupContext_ALL()
    {
        Before_all_tests();
        Because();
    }

    [TestFixtureTearDown]
    public void TearDownContext_ALL()
    {
        After_all_tests();
    }

    protected virtual void Before_all_tests()
    {
    }

    protected virtual void Because()
    {
    }

    protected virtual void After_all_tests()
    {
    }
}

If I were given the following system to test.

public interface IServiceA { void RunA(); }
public interface IServiceB { void RunB(); }

public class TestComponent
{
    public TestComponent(IServiceA serviceA, IServiceB serviceB)
    {
        ServiceA = serviceA;
        ServiceB = serviceB;
    }

    public IServiceA ServiceA { get; private set; }
    public IServiceB ServiceB { get; private set; }

    public void RunAll()
    {
        if (!HowDidItGo())
            return;
        ServiceA.RunA();
        ServiceB.RunB();
    }

    public virtual bool HowDidItGo()
    {
        // some really nasty untestable code
        return true;
    }
}

The below example demonstrates simply verifying some behavior on the mocked dependencies of the system under test.

[TestFixture]
public class Example__how_to_pull_items_from_the_UnityAutoMockContainer_when_verifying_behavior_after_an_action_was_taken 
    : FixtureBase
{
    private TestComponent _testComponent;

    protected override void Before_all_tests()
    {
        base.Before_all_tests();
        _testComponent = AutoMockContainer.Resolve<TestComponent>();
    }

    protected override void Because()
    {
        _testComponent.RunAll();
    }

    [Test]
    public void Should_run_ServiceA_RunA()
    {
        AutoMockContainer
            .GetMock<IServiceA>()
            .Verify(v => v.RunA(), Times.Once());
    }

    [Test]
    public void Should_run_ServiceB_RunB()
    {
        AutoMockContainer
            .GetMock<IServiceB>()
            .Verify(v => v.RunB(), Times.Once());
    }
}

Next, you may have noticed that the system under test had a complicated internal method (that may not necessarily be testable). You can use the AutoMocker to create the system under test as a Mock itself, so we can override some of the behavior. Here's how you could quickly do that.

Aside: I'm not saying this is a good practice or aids in good component design, just saying it's possible

[TestFixture]
public class Example__how_to_use_the_UnityAutoMockContainer_to_override_a_method_on_the_SystemUnderTest_to_test_a_certain_behavior
    : FixtureBase
{

    private TestComponent _testComponent;

    protected override void Before_all_tests()
    {
        base.Before_all_tests();
        var mockTestComponent = AutoMockContainer.GetMock<TestComponent>();

        mockTestComponent
            .Setup(s => s.HowDidItGo())
            .Returns(false);

        _testComponent = mockTestComponent.Object;
    }

    protected override void Because()
    {
        _testComponent.RunAll();
    }

    [Test]
    public void Should_run_ServiceA_RunA()
    {
        AutoMockContainer
            .GetMock<IServiceA>()
            .Verify(v => v.RunA(), Times.Never());
    }

    [Test]
    public void Should_run_ServiceB_RunB()
    {
        AutoMockContainer
            .GetMock<IServiceB>()
            .Verify(v => v.RunB(), Times.Never());
    }
}

It's amazing how much redundant test setup code this little helper has saved me in my tests. I hope others can find some use with this as well.

StatLight – Goes Open Source

Although I made a very minor attempt at making StatLight a “for-sale” product, I knew when I started that open-source was most likely going to be my long term path for StatLight.

What is it? (Silverlight Testing Automation Tool)

StatLight is a tool developed for automating the setup, running, and gathering results of Silverlight unit tests. StatLight helps to speed up the feedback cycles while practicing TDD/BDD/(insert your test style here) during Silverlight development.

Where can I get StatLight?

http://StatLight.CodePlex.com


Happy Coding !!!

Go to Definition Tip with the C# ‘var’ keyword

This may be totally obvious to the masses out there, and it isn’t much of a tip, other than to say it works

Did You Know?

F12 (Go To Definition) – works on the C# var keyword?

(That’s all there is to this post – the rest is just rambling)

I hit it on accident the other day (yes I know, F12 isn’t exactly in the usual path of accidental keystrokes, trust me it was on accident). It brought Visual Studio to a screeching halt. That is, while VS was trying to load the object browser, and satellites were linking up in outer space trying get some message sent through the Pony Express about a tweetup with the Add Reference Dialog. (Point being – loading the object browser is REALLY SLOW)

It dawned on me that the F12 (Go To Definition) keyboard shortcut works on the var keyword.

Usually I just use the tool tip window when I don’t have time to decipher why the variable’s naming isn’t clear. (good post on the subject)

image 

FYI: for those R# fans, who noticed after installing it, you lost the code metadata window in C# when F12ing it (Go To Definition). They’ve fixed it in the upcoming version http://www.jetbrains.net/jira/browse/RSRP-35547. So my satellites/pony express/tweetup/add ref dialog comment above won’t be an issue anymore. Yippee!

PDC 2009 – (Talking about Win7 User Experience)

As a #NotAtPDC attendee following along from the outside I just had to post this little bit of irony…

While watching one of the PDC 2009 keynotes live they were talking about how great Windows 7 user experience is.

“so we’re going to show you a demo of how “… bla bla great bla…”our user experience has improved”… And the video cuts to this - here’s my user experience.

image

and we come back to the show (crowds laughing in the background)

I don’t know what he said after rejoining the stream as I started writing this post…

and right after we cut to this.

image

And then we came back with commentary saying “it’s great to see the reaction”. Don’t know what is so secret they couldn’t broadcast online (but can show thousands in the live audience).

I just thought it was ironic, how much emphasis went into a great user experience blah blah, and the image above is all it was for us :)

Oh well (maybe it’s in the PDC keynote you can watch on line now), or maybe, I’m just jealous I didn’t one of the netbooks.

Massive Search & Replace Among Files Checked-in to TFS

This post is a note to myself, as the two outlined below contain code/commands I've done (wished I could have done automatically in the past) that I want to save for reference later.

I spent the last (almost full year) taking baby steps in an effort to make our logic layer a tiny smidgen eency weency bit more testable. Trust me, trying to replace an everything's a Singleton architecture is no easy task. I won't go into my strong dislike for Singletons – take a look at Singletons are Evil. I've slowly worn the team down into an agreement that we will not propagate any more Singletons in the project. They've given me a new saying "Read my lips. NO NEW SINGLETONS!".

PowerShell assisted regular expression search and replace.

In my case, the specific regular expression needed to find

    SomeBusinessLogicClass.Instance.SomeFooMethod(bar);

and replace it with

    Resolve().SomeFooMethod(bar);

Below is the PowerShell script I used.

# define the find and replacement regular expressions.
$regex_find = '([a-zA-Z]+)\\.Instance\\.'
$regex_replace = 'Resolve().'

# get all the C# files we want to search/replace through
$allFiles = Get-ChildItem -Filter *.cs -Recurse

foreach($fileToReplace in $allFiles)
{
    $fileString = $fileToReplace.FullName
    if([String]::Join([Environment]::NewLine, (Get-Content -Path $fileString)) -match $regex_find)
    {
        # make the file writable so we can update it
        $fileToReplace.IsReadOnly = $false;
        Write-Host "applying fix to - $fileString"

        # here's where we load up the file iterate through each line   
        # replace any of the regex matches
        # and save the file back to the original location
        Set-Content $fileString -Value ((Get-Content -Path $fileString) | foreach { if( $_ -match $regex_find) { $_ -replace $regex_find, $regex_replace } else { $_ } } )
    }
}

Caveat:

  • Some of the files "end of file" changed (added an extra end line in some cases)
Team Foundation Server tip to detect the changed files.

The next step requires you install the TFS Power Tools. Once installed, fire up the PowerShell console given in the start menu

image

I then ran the following command to have all edited files automatically detected as modified and can then be set as pending a change in TFS.

tfpt online /adds /diff /recursive .

Integration Test Brought to you by Powershell & NUnit – with a Little Specification Syntax for Flavoring

One of the tools I’ve used the last half of a year and really enjoyed is the C# specification extension methods when writing unit test assertions. If you’re looking for a little more background on the topic, I wrote about Fluent Specification Extensions in a past blog.

Recently I wanted to execute a PowerShell script to do some automated functional testing. I wanted to execute an application and apply some assertions on the output of the software(basically running a console app, parse the xml output and assert on values in the output).

FYI: I’m very new to PowerShell, so any suggestions on how I implemented the below are welcome…

I’ve seen a couple examples of writing test assertions in PowerShell out there. One example is PSUnit; however, this seemed a little heavy for my needs and not quite the syntactic sugar I was looking for.

Besides the syntax flavor I was desiring, another thing I wanted to do was leverage the power of NUnit.Framework’s assertion capabilities. I like the error messages generated when strings and other objects fail the assertion.

Examples of end result ShouldLookLike()…

$true.ShouldBeTrue()
$false.ShouldBeFalse()
"a".ShouldEqual("a")
"a".ShouldNotEqual("b")

Step 1: Figure out how to write a C# style extension method in PowerShell.

I found a great blog post describing how to extend any PowerShell object to add extension methods.

Extension Methods in Windows PowerShell

In short, to extend types in PowerShell leveraging the Extended Type System, you need to define them in an xml file and import the method definitions into the PowerShell runtime instance.

Below is PowerShell XML definition for my NUnit Specification Extensions.

<?xml version="1.0" encoding="utf-16"?>
<Types>
<Type>
<Name>System.Object</Name>
<Members>
<ScriptMethod>
<Name>ShouldBeFalse</Name>
<Script>
[NUnit.Framework.Assert]::IsFalse($this)
</Script>
</ScriptMethod>
<ScriptMethod>
<Name>ShouldBeTrue</Name>
<Script>
[NUnit.Framework.Assert]::IsTrue($this)
</Script>
</ScriptMethod>
<ScriptMethod>
<Name>ShouldEqual</Name>
<Script>
[NUnit.Framework.Assert]::AreEqual($args[0], $this)
</Script>
</ScriptMethod>
<ScriptMethod>
<Name>ShouldNotEqual</Name>
<Script>
[NUnit.Framework.Assert]::AreNotEqual($args[0], $this)
</Script>
</ScriptMethod>
</Members>
</Type>
</Types>


Take the above XML and save it to a file…


NOTE: the file HAS to be saved with the extension .ps1xml


Ex: NunitSpecificationPowerShellExtensions.ps1xml


Step 2: Load the extended type definition into the PowerShell runtime.


Once you’ve saved the XML extended types to a file, you need to load it into the PowerShell runtime by executing the command below.


Update-TypeData -PrependPath NunitSpecificationPowerShellExtensions.ps1xml


Before executing the above statement…Let’s quickly look at a System.String’s members and properties – just to show you what the extension methods look like when applied inside of the runtime.image


After executing the Update-TypeData command you’ll notice there are a number of “ScriptMethod” MemberTypes added to the object.


image


Now if you try to execute one of those newly added extension methods, you may get the following error…


PS C:\> $testVar.ShouldEqual("hello world")


Exception calling "ShouldEqual" with "1" argument(s): "Unable to find type [NUnit.Framework.Assert]: make sure that the

assembly containing this type is loaded.
"


At line:1 char:21


+ $testVar.ShouldEqual <<<< ("hello world")


    + CategoryInfo          : NotSpecified: (:) [], MethodInvocationException


    + FullyQualifiedErrorId : ScriptMethodRuntimeException


This is because we need to load the NUnit.Framework assembly into the runtime before we can leverage the extension methods.


[System.Reflection.Assembly]::LoadFrom("C:\Program Files\NUnit 2.5.2\bin\net-2.0\framework\nunit.framework.dll") | Out-Null


Now that the extension methods have been defined and loaded into the runtime, NUnit.Framework is loaded, we can now use the methods on any object that inherits from System.Object (which, as far as I know, is everything in PowerShell).


And now, everything you need in one script (if you have the xml extended type file saved somewhere…)


# 
# Update-TypeData -prependPath C:\Code\NunitSpecificationPowerShellExtensions.ps1xml
#

[System.Reflection.Assembly]::LoadFrom("C:\Program Files\NUnit 2.5.2\bin\net-2.0\framework\nunit.framework.dll") | Out-Null

$true.ShouldBeTrue()

$false.ShouldBeFalse()

"a".ShouldEqual("a")

"a".ShouldNotEqual("b")