Developing on Staxmanade

How do I undo a bad rebase in Git?

If you use git and leverage the rebase command, you've probably run across a merge issue during the rebase and if you’ve ever felt like, “man, I wish I had a ‘do-over’.

If you’re still in the middle of a rebase it's easy to start over:

git rebase --abort

But let's say you started with this:

image

Did a git rebase and are now looking at:

image

Except you screwed up during a merge conflict and now un-sure how you can get your ‘do-over’.

I was pleasantly surprised at how easy it was. (If you know the key)

Leveraging the git reflog, you can go back in time and check out your branch as though the rebase never happened.

In the following link, I put together a set of steps to create a git repo that puts you into this position (of a bad rebase) and then describes how to get out of it.

https://github.com/staxmanade/GitRebaseReflogFixSample

I'd love to hear any feedback on this repo. Or try submitting a pull request or post a GitHub issue.

Happy Git'ing!

It's Markdown, no, PowerShell. Wait its Markdown formatted PowerShell.

I created an introductory presentation on PowerShell a while back and posted it on my GitHub. I first gave the presentation at the NNSDG and decided to also submit it as a talk to the Boise Code Camp this year. (Looks like I'll be going – track me down @staxmanade if you’d like to say hello)

I’ve become quite a fan of Markdown lately and thought, “what if this not only looked like PowerShell, but looked even better as Markdown…?”

After experimenting a little, I found that it actually works quite well.

For example:

PowerShell (Markdown)

## String Interpolation

### Single quotes `don't` interpolate
'Hello $groupName'

### Double quotes `DO` interpolate
"Hello $groupName"


### Wrap `$(...)` around expression within an string
"groupName variable is of type: $($groupName.GetType().FullName)"
"2 + 1564 = $(2 + 1564)"
"Current DateTime is = $(get-date)"
"Current DateTime is = $([System.DateTime]::Now)"


### Escape characters with the ` (back-tick)
"Escape a quotation `"This is quoted`"."


Formatted Markdown

image


One issue I have is the way GitHub/markdown formats extra whitespace (it doesn’t). So I’ve worked around that so that I can get the vertical whitespace that I need in the Markdown version by placing a link to a spacer image:

![vertical space](http://is.gd/VertSpace)

This isn’t ideal because my PowerShell is littered with this snippet, but something that can easily be search/replaced before using the raw version as a PowerShell script.

I also think that you could potentially do this with many different programming languages. (At least ones that don’t depend on whitespace and have a form of block comments)

Nifty eh?

Happy PowerDowning or MarkShelling!

Testacular cannot find Chrome on windows.

I recently started playing with AngularJS. After downloading the seed project and trying to run the tests with Testacular, I bumped into small issue that was not immediately obvious to resolve.

When I ran the “./scripts/test.bat” I would get the following error(s) in my console:

info: Testacular server started at http://localhost:9876/
info (launcher): Starting browser Chrome
error (launcher): Cannot start Chrome
        CreateProcessW: The system cannot find the path specified.

info (launcher): Trying to start Chrome again.
error (launcher): Cannot start Chrome
        CreateProcessW: The system cannot find the path specified.

info (launcher): Trying to start Chrome again.
error (launcher): Cannot start Chrome
        CreateProcessW: The system cannot find the path specified.

Tracked down link on a Google thread: https://groups.google.com/forum/?fromgroups=#!msg/angular/1li0HKtW56U/lKyT_VId0b0J

It appears that Testacular looks for the chrome browser in a CHROME_BIN environment variable.

To resolve the issue I ran the following PowerShell script and I was able to run the tests.

[System.Environment]::SetEnvironmentVariable("CHROME_BIN", "C:\Program Files (x86)\Google\Chrome\Application\chrome.exe")

Your path to chrome may vary!


Happy Testing!

Easily set Visual Studio keyboard bindings with the Nuget Package Manager Console

After a fresh install of Visual Studio, I often re-configure some options and setup keyboard bindings. This tends to be a bit of a pain as each and every time I have to remember what setting is in what U.I. configuration pane and how do I find/configure that again? I also will often forget about certain settings until the point I need them and it really breaks my coding rhythm down to go hunt for and reconfigure these options.

I recently found a simple solution to get my VS just the way I want it.

P.S. Some of you may want to tell me all about the VS import/export settings, and you may be right, but I just haven’t spent the time to use/understand/easily find a way to integrate it into my ‘flow’.

So I present to you “MY happy path” to Visual Studio Environment configuration.

1. Install the NuGet Package Manager Extension

You’re going to probably install this extension anyway, so go-ahead and install it now if you don’t already have it… We need this so you can get access to the NuGet Package Manager Console

image

2. Execute Function Set-VisualStudioEnvironmentConfiguration

Wait! What is “Set-VisualStudioEnvironmentConfiguration”?

This is a little function that I have in My PowerShell $Profile which gets setup on all development environment.

So what’s in this PowerShell script?

As of writing this, I only have two specific setup commands, but thought I’d share as an example of what you can do:

  1. Set a keyboard binding to a specific command.
    # Map Ctrl+W to close a tab
    $DTE.Commands.Item("File.Close").Bindings = "Global::Ctrl+W";


  2. ShowLineNumbers for all language files.
    # Turn on line numbers for ALL language types
    ($DTE.Properties("TextEditor", "AllLanguages") | where {$_.Name -eq "ShowLineNumbers" } ).Value = $true


  3. Turn on whitespace?
    # This doesn't work and I wish it did... 
    $DTE.ExecuteCommand("Edit.ViewWhiteSpace")
    # Fails with: "Command "Edit.ViewWhiteSpace" is not available."
    # Maybe one of you can help me out?


      How can I find and setup the settings I like?


    I’m no VS expert and only know as much about the $DTE object as what I’ve written about here, but I’ll give you some tips and you can go from there…


  • Google/Bing are your friends. Type “DTE Visual Studio {TheThingYouWantToAccomplish}”


  • After your search, most examples you find will be VB macros and as it turns out VB (in this case) translates nicely to PowerShell (EX: 
      VB Macro:  DTE.Commands.Item("File.Close").Bindings = "Global::Ctrl+W"

    PowerShell: $DTE.Commands.Item("File.Close").Bindings = "Global::Ctrl+W"


    See the difference? (yep just the ‘$’ at the beginning of the PowerShell one) Nifty eh?


  • Don’t be afraid to use PowerShell to search/filter things in the $DTE. Try this:

    PM>  $DTE.Commands | where { $_.Name –match ‘Close’ } | select { $_.Name }


    Happy VS Environment setting-uppers!

More than slightly modified “CD” command for PowerShell

A while back I wrote about a Slightly modified “CD” Command for PowerShell.
Since that point, I’ve made a number of updates and would like to share them.
The first change I made was to move the “CD” script in that post to a new location. I’ve greatly extended how I setup my development environment and how my PowerShell environment is initialized.
If you’re interested in how I setup my PS profile, take a look at the readme. Combine the setup with some Chocolatey and some BoxStarter and you’re on your way to an amazingly automated development environment setup.
Now on to the features I’ve added to the CD command.
  • I often would do something like “CD $Profile” (which is a no-go because that is a file not a directory, but my intent was to get into the directory where the $Profile file lived).

    So I updated it so if you try to CD to a file, it will just take you to the directory where the file resides.
  • If you try to CD into a folder that doesn’t exist, it now prompts you to create it. You could bypass the prompt with a -force|-f flag.image
  • Lastly I fixed an issue reported by a commenter in the previous post about trying to CD into a folder with the same name as a history index. If you had a folder named “4” and you typed “CD 4” it previously wouldn’t take you the 4 directory, but instead lookup item 4 in your CD history and take you there. Now if you specify a number and that number lives in the current directory it will take precedence over your history value. (To be fair, I only added this feature, and even since I originally wrote about the CD command I have yet to run into a need for this case. Probably because I don’t name my directories with numbers).
Something I had only recently noticed is this script appears to work with other PowerShell drive providers. I only did a cursory test but can CD into the HKLM:\Software\MyTestFolderThatShouldntExist and it will prompt to create the ‘folder’. If I say yes, I end up with a new registry folder. Smile Not sure how useful that is, but with the abstraction layer PowerShell drives give us it’s interesting.

If you’d like to grab just the CD script you can download it here.
https://github.com/staxmanade/DevMachineSetup/blob/master/GlobalScripts/Change-Directory.ps1

Happy system navigation with PowerShell.

TFS bisect the manual way (When was that bug introduced?)

I’d like to share a powerful workflow I originally found using git and its powerful git-bisect command and how I’ve leveraged the idea when using TFS.

What is a bisect on your source history?

Git’s bisect command is extremely powerful and I won’t be covering it here. However git describes its feature as a way to:
Find by binary search the change that introduced a bug

Why do I need to look through source code history to find why a bug was introduced?

It’s true, that many bugs are so basic that once you hear about the bug you immediately understand where it is, why it’s broken and how to fix. In that scenario this approach is not something you need.
However, if you know a bug was introduced sometime in the past but are not sure when or how it was introduced, I think we could all agree that doing a binary search through the history of your code’s changes is a pretty good approach to finding the specific change-set that introduced a bug. Once you have a handle on the specific code change that was made, it becomes much easier to understand how it changed and track down the reason a bug was introduced and how to fix it.

High level steps/concept:

  1. First you should have discovered a reproducible bug
  2. Next we have to find a commit in the past where we know the bug does not exist. (Say you know that 3 weeks ago, this bug didn’t exist.)
  3. Now, from that “good” commit we do a binary search through source history to find when the bug was first introduced. Noting at each commit its goodness/badness state and continuing with the search until we’ve found the commit when the bug was introduced.
  4. Analyze the commit until you understand what and how the bug was introduced and fix it.

One manual approach to TFS bisect.

There is not a built-in feature with TFS (that I’m aware of) and leaves us with some manual bookkeeping that we wouldn’t have to do if we were using git.
Side Note: If you’re familiar with git, I’d recommend just using git-TFS or the new git-tf tool and just clone your TFS repro and use git-bisect to accomplish these steps.
Let’s assume you can find a commit in the past that you know doesn’t have the bug.
Load up PowerShell and CD into the root of your project directory. Execute a tf.exe command to pull a string output of your history into the clipboard. We’ll leverage this in our bookkeeping.
I’m using PowerShell and have tf.exe on my %PATH%.
>tf history ./* /recursive /noprompt | clip
Notice the pipe to the ‘clip’ command at the end of the TF call. This places the output of one command into the clipboard.
Let’s say the above command places the following into our clipboard.

Take the output of the command (that is now in your clipboard) and paste it into Excel (or notepad) wherever you want to keep track of your work.
We know that at commit ID #13 the bug did not exist. Let’s mark it as ‘good
image
Now we start our binary search through the different commits to find our bug.
Find a midway commit between this commit (#13) and the most recent commit (#79).
You don’t have to be all mathematical about the binary search, I tend to just eyeball the ‘middle’ and go from there. But you’re more than welcome to execute the binary search perfectly. Smile
Now use your TFS tools to checkout this specific version. In this case we’ll checkout commit #46.
I tend to prefer the command line to check out the specific version as it’s easier to repeat these steps with commands and we already have the command open from earlier.
>tf get ./* /recursive /force /overwrite /version:46
Or you can use the GUI to get a specific version.
image
image
With version #46 checked out, we run our tests and find that the bug exists here. Mark it as ‘bad’ to signify the bug is here.
image
Now we can continue our binary search between commit 13 and 46 until we narrow down the exact commit where the bug first shows up.
image
As you can see by the numbers to the left in the screenshot above, it took us 5 checkouts to find the commit where the bug was introduced.
Now the rest is up to you. I tend to spend time looking at the diff and understanding why the specific commit introduces the bug. If you keep the size of your regular commits small then it tends to be pretty easy to understand why the bug was introduced and how to fix it.
Don’t forget to ‘get latest’ before you try to do much work so you’re not stuck with your source code way back in time.

These steps should be automated.

It’s true the bookkeeping should be done for us by a tool, and in fact I started writing a PowerShell implementation of this, but never finished and didn’t find it worth my time. The manual approach works well, and it’s not something I have to use often. However, I did find someone who’s written a tool that looks promising.
http://gr3dman.name/blorg/posts/2010-12-03-tf-bisect.html

Happy bug hunting.

NuGet Project Uncovered: SpecificationExtensions.[MSTest | NUnit | Xunit]

If you are coming to this series of posts for the first time you might check out my introductory post for a little context.

NOTE: this project is one I created and as it turns out this has now become it’s introductory post.

The SpecificationExtensions.[MSTest | NUnit | Xunit] are a set of NuGet packages that add C# fluent specification extensions to your test project. I first blogged about this in early 2009 and have had a set of these that I take with me for every project I work on.

There are a number of other options out there for specification extensions, but since I first created my original set, I haven’t used anything else (although I should as I might be able to learn a little from each).

image_thumb10_thumb

NuGet Project Uncovered: EventAggregator.Net

If you are coming to this series of posts for the first time you might check out my introductory post for a little context.

NOTE: this project is one I created and as it turns out this has now become it’s introductory post.

EventAggregator.Net is a single C# file that can provide a basis for a simple in memory Pub/Sub event aggregator.

I extracted this out of my StatLight project as I found that I often wanted a similar one and kept finding myself copy/pasting this into projects. I figured a single location for this project would be better and I use StatLight as the first dog bowl when I need to dog food the project.

If you’re familiar with the…

Install-Package Caliburn.Micro.EventAggregator

…then you know probably know what this project is like.

Its history starts a few years ago when I read Jeremey Miller’s Braindump on Event Aggregator Pattern and decided I wanted rip out StatLight’s usage of the Prism event aggregator and replace it with a similar one to the one found in StoryTeller. It’s gone through quite a few revisions inside of StatLight since then and eventually made its way into its own project.

Some thanks have to go out to the great feedback and pull requests from Jake Ginnivan who found this project on his own (before I publicized it).

If you’re interested in using it, I’d recommend checking out the source’s test project and the SampleUsage project. The SampleUsage project demonstrates how you can configure the tool to publish events in an async mode.

One concept introduced in this EventAggregator is taking the IEventAggregator interface and breaking it up into two interfaces (IEventPublisher and IEventSubscriptionManager). This proved extremely useful when trying to diagnose components that did both aggregator subscription management vs ones that only published events. It even helped to easily diagnose components that did not correctly unregister objects.

NuGet Project Uncovered: DumpToText

If you are coming to this series of posts for the first time you might check out my introductory post for a little context.

NOTE: this project is one I created and as it turns out this has now become its introductory post.

DumpToText is a single C# extension I wrote a little while back. The inspiration from this came from the need to view the values of an object graph quickly and easily during a TDD session.

Have you ever been doing TDD and something isn’t working quite as expected? Would it be nice to just dump out the values of an object quickly without having to spin up the debugger?

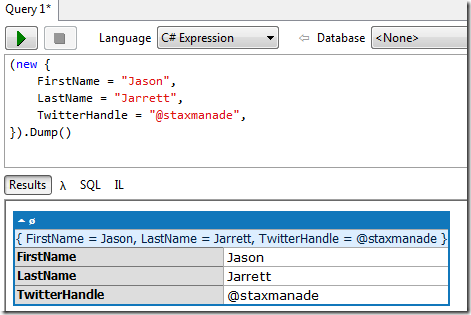
The inspiration for this project came from an amazing feature of LINQPad. If you have ever used LINQPad then you’re aware of the amazing ability for it to take any object and create a view of it’s data. Take the simple anonymous type below.

image_thumb2_thumb

Now wouldn’t it be great to have that “.Dump()” extension method at hand anywhere in your code and during a TDD session?

That’s why I create DumpToText.

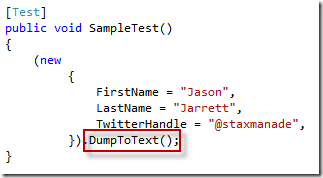
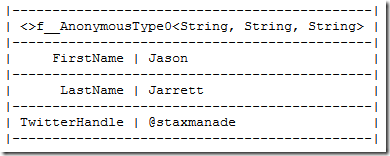
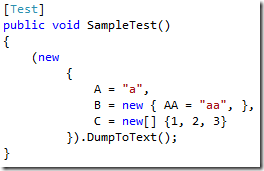
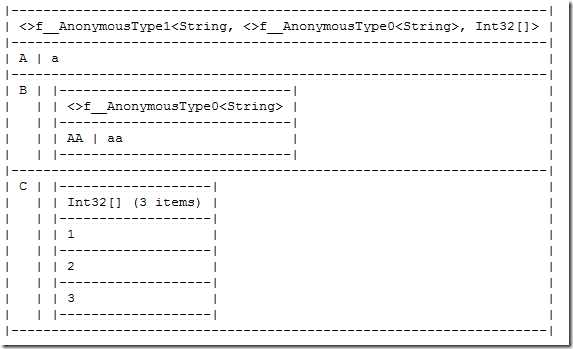
Now if I have a test as follows and want to see it’s data. I can use the ‘.DumpToText()” extension method to have it print out an ASCII based representation of the object graph.

image_thumb4_thumb

image_thumb6_thumb

By default this just uses the System.Diagnostics.Trace(…) to write the output to, but you can override the “write” implementation by giving your own delegate as shown below.

image_thumb8_thumb

The below shows an example of a nested object that also has an array of items.

image_thumb14_thumb

image_thumb13_thumb1

Anyone out there using ApprovalTests? (You can get it on NuGet)

I’ve not taken the chance to use ApprovalTests yet in a project, but I have a strong feeling that my DumpToText helper could be very useful when leveraged in conjunction with ApprovalTests. If anyone out there is using ApprovalTests, I’d love to hear how it’s going, and if you think that DumpToText would be useful there.