From a single Mac if you wanted to access two unique accounts at the same time, I found out through a neat little trick how to accomplish this.
This allows you to log in to a second unique Mac user while already being logged into the first account already. It can be done without having to logout/login to each one individually (one at a time).
Why would I need to do this?
The reasons could vary but here are a couple examples:
- If you use one user for work, and one for personal to keep some separate context, but while at work maybe need to access a file or email from the personal account.
- You'd like to access a separate iMessage account without it getting mixed into yours. Say you want to spy on the kid. (Not saying whether this is ethical or not - depends on your parenting style - just proposing a reason for using this tool).
Disclaimer
To accomplish this we're going to be turning on some services/features that have the potential to open security vulnerabilities so please use with caution and learn/know your risks.
Setup/Configuration
To accomplish this your Mac needs to have the proper permissions and configuration in place to allow this to happen.
First we need to access the system preferences:
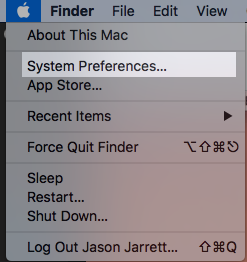
Then open the Sharing preferences:
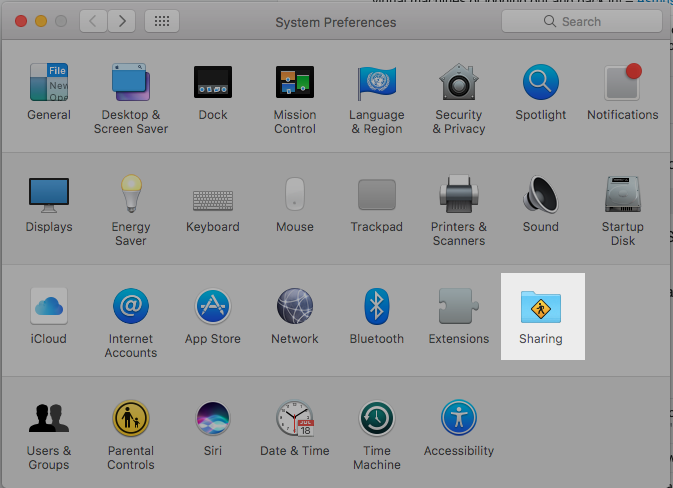
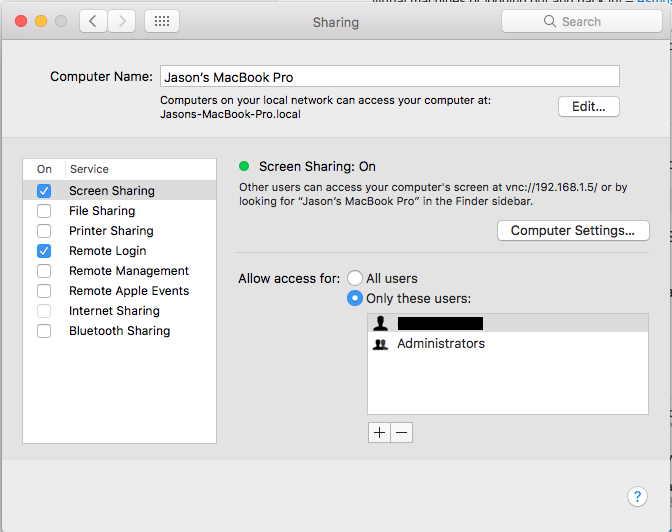
Then enable Screen Sharing and don't forget to add the specific users you want to allow screen to be shared for.
Note: I blocked out this specific user-name - but assume the blacked out user is the Mac account's user that I want to log into using the Screen Sharing application
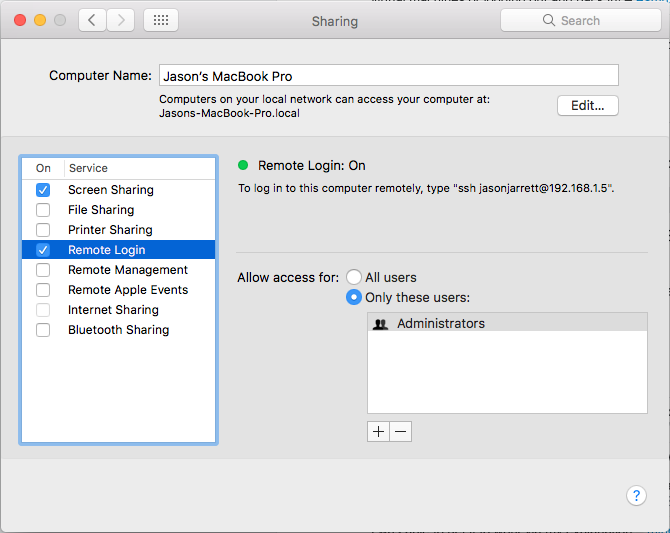
I had to enable enable remote login to allow the up-coming ssh command to run. Here is the configuration I used:
Startup an SSH Session
From the currently logged in session, open a Terminal and run the following command:
ssh -NL 5901:localhost:5900 localhost
The -L has this to say in ssh's man pages
     -L [bind_address:]port:host:hostport
     -L [bind_address:]port:remote_socket
     -L local_socket:host:hostport
     -L local_socket:remote_socket
             Specifies that connections to the given TCP port or Unix socket on the local (client) host are to be forwarded to the
             given host and port, or Unix socket, on the remote side.  This works by allocating a socket to listen to either a TCP port
             on the local side, optionally bound to the specified bind_address, or to a Unix socket.  Whenever a connection is made to
             the local port or socket, the connection is forwarded over the secure channel, and a connection is made to either host
             port hostport, or the Unix socket remote_socket, from the remote machine.

             Port forwardings can also be specified in the configuration file.  Only the superuser can forward privileged ports.  IPv6
             addresses can be specified by enclosing the address in square brackets.

             By default, the local port is bound in accordance with the GatewayPorts setting.  However, an explicit bind_address may be
             used to bind the connection to a specific address.  The bind_address of ``localhost'' indicates that the listening port be
             bound for local use only, while an empty address or `*' indicates that the port should be available from all interfaces.
For -N:
-N Do not execute a remote command. This is useful for just forwarding ports.
Here's what it looks like when I ran it locally:
> ssh -NL 5901:localhost:5900 localhost
The authenticity of host 'localhost (::1)' can't be established.
ECDSA key fingerprint is SHA256:ytfRv5WDPuTjGbBugJjmc8gOhsHga7ozGqNgjOXpdRM.
Are you sure you want to continue connecting (yes/no)? yes
Warning: Permanently added 'localhost' (ECDSA) to the list of known hosts.
Password: <I entered my account/admin password>
Use Screen Sharing to login
Once that ssh command above is up and running, we're now ready to log into the other account using Screen Sharing.
Open the Screen Sharing Mac app located in: /System/Library/CoreServices/Screen Sharing.app. You can also use CMD+<Space> (Spotlight) and type Screen Sharing to open the app.
Then enter localhost:5901 to start the process.
It should look like this:

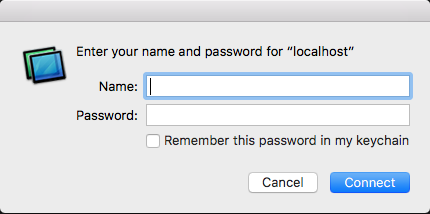
In the below screen entered the username/password that you want to login as. (Not the current account - the other one)
Now select that you want to login as "yourself" where "yourself" is really "other account":
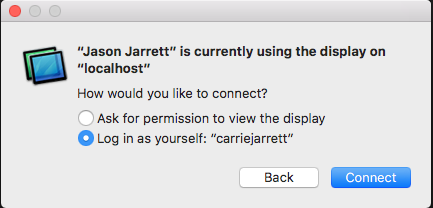
...and boom, you should now able to use two separate accounts on a single Mac session.
Happy Spying (wink wink)!