Developing on Staxmanade

How to Access Two Mac Accounts at the Same Time

(Comments)

From a single Mac if you wanted to access two unique accounts at the same time, I found out through a neat little trick how to accomplish this.

This allows you to log in to a second unique Mac user while already being logged into the first account already. It can be done without having to logout/login to each one individually (one at a time).

Why would I need to do this?

The reasons could vary but here are a couple examples:

  • If you use one user for work, and one for personal to keep some separate context, but while at work maybe need to access a file or email from the personal account.
  • You'd like to access a separate iMessage account without it getting mixed into yours. Say you want to spy on the kid. (Not saying whether this is ethical or not - depends on your parenting style - just proposing a reason for using this tool).

Disclaimer

To accomplish this we're going to be turning on some services/features that have the potential to open security vulnerabilities so please use with caution and learn/know your risks.

Setup/Configuration

To accomplish this your Mac needs to have the proper permissions and configuration in place to allow this to happen.

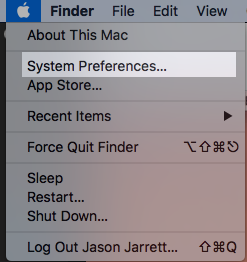
First we need to access the system preferences:

access mac system preferences

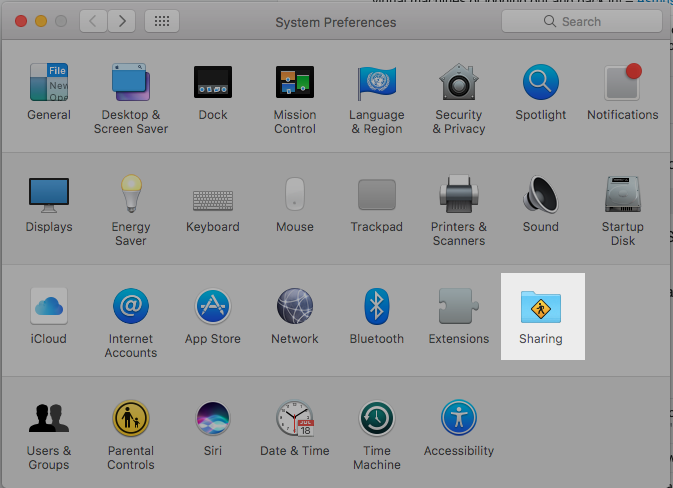
Then open the Sharing preferences:

mac sharing preferences

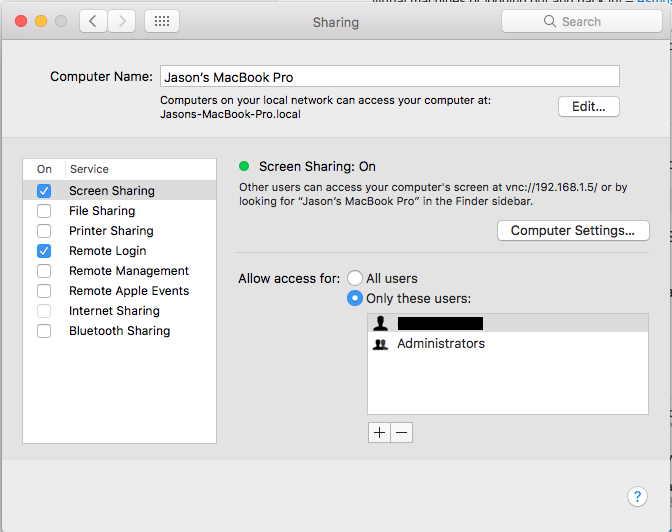
Then enable Screen Sharing and don't forget to add the specific users you want to allow screen to be shared for.

Note: I blocked out this specific user-name - but assume the blacked out user is the Mac account's user that I want to log into using the Screen Sharing application

screen sharing preference

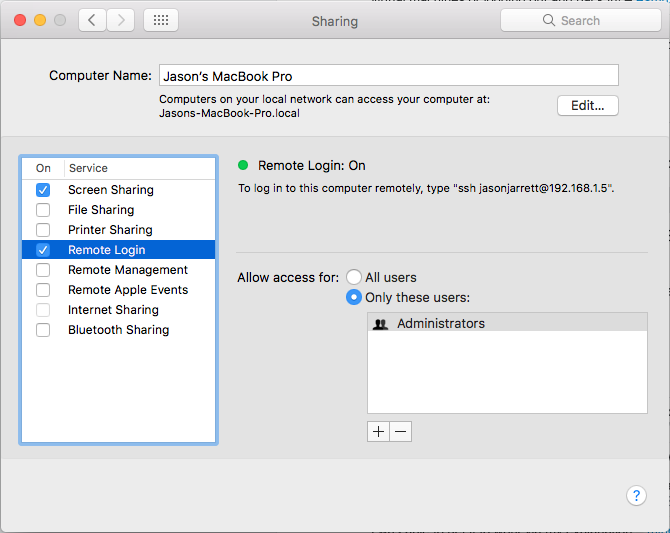
I had to enable enable remote login to allow the up-coming ssh command to run. Here is the configuration I used:

remote login preference

Startup an SSH Session

From the currently logged in session, open a Terminal and run the following command:

ssh -NL 5901:localhost:5900 localhost

The -L has this to say in ssh's man pages

     -L [bind_address:]port:host:hostport
     -L [bind_address:]port:remote_socket
     -L local_socket:host:hostport
     -L local_socket:remote_socket
             Specifies that connections to the given TCP port or Unix socket on the local (client) host are to be forwarded to the
             given host and port, or Unix socket, on the remote side.  This works by allocating a socket to listen to either a TCP port
             on the local side, optionally bound to the specified bind_address, or to a Unix socket.  Whenever a connection is made to
             the local port or socket, the connection is forwarded over the secure channel, and a connection is made to either host
             port hostport, or the Unix socket remote_socket, from the remote machine.

             Port forwardings can also be specified in the configuration file.  Only the superuser can forward privileged ports.  IPv6
             addresses can be specified by enclosing the address in square brackets.

             By default, the local port is bound in accordance with the GatewayPorts setting.  However, an explicit bind_address may be
             used to bind the connection to a specific address.  The bind_address of ``localhost'' indicates that the listening port be
             bound for local use only, while an empty address or `*' indicates that the port should be available from all interfaces.

For -N:

     -N      Do not execute a remote command.  This is useful for just forwarding ports.

Here's what it looks like when I ran it locally:

> ssh -NL 5901:localhost:5900 localhost
The authenticity of host 'localhost (::1)' can't be established.
ECDSA key fingerprint is SHA256:ytfRv5WDPuTjGbBugJjmc8gOhsHga7ozGqNgjOXpdRM.
Are you sure you want to continue connecting (yes/no)? yes
Warning: Permanently added 'localhost' (ECDSA) to the list of known hosts.
Password: <I entered my account/admin password>

Use Screen Sharing to login

Once that ssh command above is up and running, we're now ready to log into the other account using Screen Sharing.

Open the Screen Sharing Mac app located in: /System/Library/CoreServices/Screen Sharing.app. You can also use CMD+<Space> (Spotlight) and type Screen Sharing to open the app.

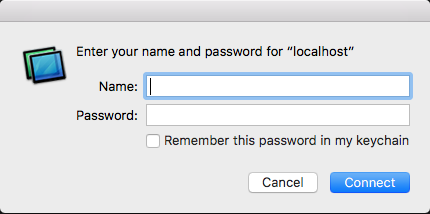
Then enter localhost:5901 to start the process.

It should look like this:

screen sharing app startup view

In the below screen entered the username/password that you want to login as. (Not the current account - the other one)

screen sharing app login view

Now select that you want to login as "yourself" where "yourself" is really "other account":

screen sharing app access user strategy view

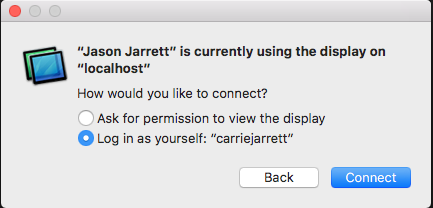
...and boom, you should now able to use two separate accounts on a single Mac session.

Happy Spying (wink wink)!

Build Command with Auditory Feedback

(Comments)

Here's a short and fun little ditty I'm going to throw up here so I can find it later... (because why would I try to memorize something so simple when I can put it here and share with you all?).

My Builds Are Speaking to Me

Running this command from my Mac command line window gives a nice audio feedback when builds are complete.

(gulp && say 'super!') || say "what the what?" -v Albert

Some Context

While doing some project work on my Mac lately I'm in the situation where I am constantly running gulp at the command line. This workflow could apply to any CLI build tool like gulp, rake, make, etc and ya I know I need to spend the time getting gulp watch to work but let's not worry about that for now...

The build is not slow, but it's not fast (taking about 6) seconds. That's just enough time for me to see a squirrel and by the time I realize the build is done, I've forgotten if I actually recently kicked off the build or if the most recent run is out of date from the latest code I've worked on...

So I searched for a quick way to get some auditory feedback when my build was done so I could more efficiently continue the development flow...

I first stumbled upon this gist which has a NodeJS implementation console.log("\007");, but this produces the same beep I get when my unit tests fail - which I don't want when everything's good to go.

Then I found someone mention the mac say command which is WAY better for my needs and I settled on the following little command.

(gulp && say 'super!') || say "what the what?" -v Albert

Whats cool about this pattern is I can replace gulp with any other build tool on other projects like rake, grunt, make, etc...

Mac Equivalent of the Windows Registry - ish

(Comments)

If you're a long time Windows power user and are recently switching over to the Mac, you may have wondered if there was something analogous to the Windows Registry .

However, if you've always been more of a Mac user, don't run away just yet as you may learn something.

In case you don't know what the Windows Registry is, here is a short definition from our good ol' friend Wikipedia.

Windows Registry is a hierarchical database that stores configuration settings and options on Microsoft Windows operating systems. It contains settings for low-level operating system components and for applications running on the platform that have opted to use the Registry.

You have probably already figured that since it's called the Windows Registry that there is likely not a Mac Registry that looks/operates the same way.

You are correct; however, where do all of the system and applications settings get stored if there is no registry?

If the Windows Registry is a place where system and application settings are stored, then the Mac equivalent of the Windows Registry would be a series of .plist files in several preferences folder on the Mac.

While researching how to automate bootstrapping my Mac development computer, I stumbled upon large number of .plist files in several folders that correlate to the installed applications and system settings. And BOOM just like that I discovered the holy grail of my Mac's system and application settings - kind of like the first time lift up the curtain and discover the Windows Registry.

What are .plist files?

A .plist file is a configuration file that contains a list of properties in either plain text or binary format. I'll go into more later about how to read and update values in these files later in the post.

For more info on plist files, check out the Wikipedia page...

Where can I find plist files?

I know of at least 2 locations that host the common system and application .plist files.

The first one is user specific and is in the following location:

~/Library/Preferences/

In my case (since my user name is jason)

/Users/jason/Library/Preferences/

The second location one is at the root of the system:

/Library/Preferences/

If you look into these folders you'll see a large number of plist files that follow reverse domain name convention (like com.apple.sample).

Here are some (not all) examples of system configuration plist files:

com.apple.ActivityMonitor.plist
com.apple.AddressBook.plist
com.apple.finder.plist
com.apple.preference.general.plist
com.apple.TextEdit.plist
com.apple.Safari.plist

In the same folder as the sample configuration files listed above are where you can find plist files that are associated to applications installed on the system.

com.apple.dt.Xcode.plist
com.google.Chrome.plist
org.herf.Flux.plist
com.skype.skype.plist

Now that we can find system and application configuration plist files, if you try to open them in a text editor you may notice that many of them are in a binary format which would be challenging to read and understand, let alone edit.

How do I read these files?

The Mac comes with a command line utility called defaults for reading and writing to these .plist files.

If you take an example from the above list of plist files, you can, at the command prompt type the following:

defaults read com.apple.fin<tab> (where <tab> is the tab key that allows tab completion of the rest of the property list format) and be sure to exclude the .plist of the end so:

defaults read com.apple.finder

will print out all of the properties to the console so you can inspect what's there.

You can pipe this output to grep and filter for a setting name when doing searches. Once you've found a property name you want to look at you can pass it into the defaults read command to get the value of that specific property.

Example reading a single property:

defaults read com.apple.finder AppleShowAllExtensions

How to change property list settings?

warning WARNING warning

Just like modifying the Windows Registry can mess up your system, you need to take care modifying system or application plist settings.

warning WARNING warning

Most of these settings can be changed by navigating to the application or system's respective preferences U.I. and just changing settings manually. However, the whole reason I ran down this path was to learn how to automate these setting changes.

When I first tried to change the settings I tried manually modifying the plist files with a GUI tool built into the Xcode developer tools.

However, and I have yet to understand the internals of this, after I made the changes to the plist file they would automatically get overwritten after a few seconds. So it seems that there is some official source of these values somewhere that for some reason overwrite the ones in these folder. I probably have that all wrong - but was an observation I had.

So if my understanding above is somewhat correct, how did I update the source?

Similar to reading property list values you can use the defaults command line tool to write changes back to the .plist files.

As an example, here's how I update Finder to show file extensions.

defaults write com.apple.finder AppleShowAllExtensions -boolean true

The configuration options are now endless.

In summary:

Using my new knowledge that app and system settings can be found in both /Library/Preferences and ~/Library/Preferences and I can use the command line tool defaults to read/write to understand and update settings.

I can now create a simple .sh script that allows me to pre-configure a new development machine with all of the settings I would like.

Now, each time I catch myself trying to use an application's preferences U.I. I stop myself and try to find that setting in a plist file and create a CLI command that I can save into my development setup script.

Happy Mac Settings Hacking!