Developing on Staxmanade

How NOT to Start Asynchronous Communication

(Comments)


Hey!


Don't you hate it when...

...someone is using a beautifully designed asynchronous tool to communicate with you but instead they try to pretend it is synchronous?

Please!!! If you ever have to communicate with someone through an asynchronous-able tool like a text message, instant messaging, or email don't just say Hey! and wait for a response.

Try saying Hey! I wonder if you could... or some alternative where the single message can contain both a polite introduction Hey along with some actionable context about why the polite introduction has taken place. If you can't begin to privde the initial context and are waiting for the other person to respond with Hey, you've both wasted their time and yours.

Often times a single chat message can distract someone who is concentrating hard on a subject. If a hollow Hey! is provided, you've likely pulled whoever you wanted to talk to out of that concetration as well as not provide them enough context to be abel to respond or help you. Instead they're possibly sitting there waiting for you to say something next, or maybe you're waiting for them to say Hey back (which you may never get)...

Asynchronous communication can be an amazing productivity tool if used efficiently.

Happy Chatting!

(Comments)

Easily Convert CSS to React Inline Styles

(Comments)

TL;DR

Click the logo to jump the tool...

The More Info Stuff

So you're working on a React app. It's up and running in your favorite browser but you notice an issue with some layout. You think, ok, this should be easy to fix. You open up the developer tools, hack on some CSS within the browser till you get it looking just the way you want it to. Maybe it's several CSS properties you added or tweaked so you copy each of them into the clipboard so you can transfer them back to your application.

Then you realize, these styles aren't coming from a CSS style sheet, they're in-line styles right in your React component.

Now you're like, FINE, I'll manually translate this to React-style-inline-CSS. This is no biggie if you do it once in a while. Except that time when you missed removing a dash or mis-cased a letter or maybe you forgot a JSON comma, or left a CSS semicolon. Never happened to you? Oh, you are so amazing if only I was as super cool as you. For myself and probably another 1 or 2 of you out there these problems do come up, but don't have to.

I hacked together a little tool that automates this translation. Allows you to paste your CSS into a textarea, it translates to React inline style JSON CSS and you can copy it out while avoiding translation bugs.

You can see the project here: CssToReact If you have a suggestion or want to pull-request it your self you can check it out here: Source to Project

Aside: This should really be a plugin to my text editor where we can right click and say "Paste as React Style" instead, but for now it's a single simple little web page that will automate the translation for you. (I haven't looked for the plugin - if it exists or ever is created let me know in the comments...)

Happy CSS Conversions!

(Comments)

Slightly modified “CD” Command for Powershell: Now with dot.dot.dot.dot...

(Comments)

A while back I wrote about a replacement for the cd command on powershell that I wrote which provides some fun features such as history tracking, support cd'ing to a folder when a file path is given, etc... It's been a while since I've touched this helpful little tool which sometimes I even forget I wrote it because it's something that's used practically every day and "it just works".

For more information, check out the older posts about it here Slightly modified “CD” Command for Powershell and here: More than slightly modified “CD” command for PowerShell.

It now supports cd ...

Well, today I threw a quick feature into this utility that I've become accustomed to using in zsh on my Mac.

On many *nix command prompts you can type something like cd ..... This command translates indo cd ..; cd ..; cd .. (but executed as one command). The first .. counts as one directory and then each ane every . after that counts as another directory up the tree.

So now within PowerShell when I cd down into a deep folder structure, I can now use cd ....... to go back up N folders.

NOICE!

Happy CD'ing!

(Comments)

Oops - how a simple bit of automation put NuGet services on edge...

(Comments)

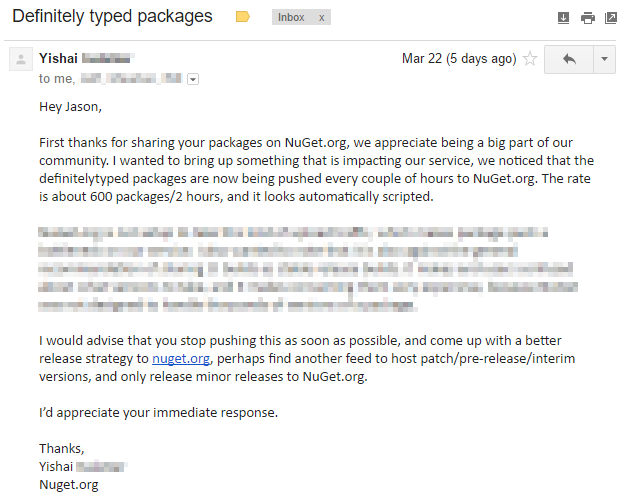
This past week I received an email from Microsoft's NuGet team asking if I could look into a bit of an issue with DefinitelyTyped's NuGet package publishing.

Some Background

A really long time ago, I wanted to access DefinitelyTyped packages within Visual Studio via the NuGet package manager. So I quickly wrote up a powershell script to accomplish this. This script has run almost continuously ever since, and primarily without issue.

There's been a couple tweaks/issues along the way - as to be expected, but it's been primarily hands-off.

As of today, these NuGet packages have been downloaded over 5,268,852 times - wow.

What does the automation do?

All of the NuGet packages generated for DefinitelyTyped are run through a build process on the good servers at AppVeyor (Thanks AppVeyor).

Every 2 hours the task does some git-fu to figure out what DT packages have updated (since the last run) and publishes updated NuGet packages for each updated DT package.

The initial problem report:

First let me say that thanks to Yishai and Maarten from Microsoft who brought the issue to my attention and were extremely polite and patient with the raised issue. So thank you, thank you, thank you for the support and being so friendly while working through this...

service status image of problem with nuget

Looking at status.nuget.org

It was pretty easy to see that every 2 hours a large spike in uploads to NuGet was happening.

service status image of problem with nuget

service status image of problem with nuget

While I can't say for certain this incident report on the status page was due to the NuGet automation, it was around the same time the automation was pushing extra builds (and right before I was contacted by Microsoft).

Was that my automation oops?

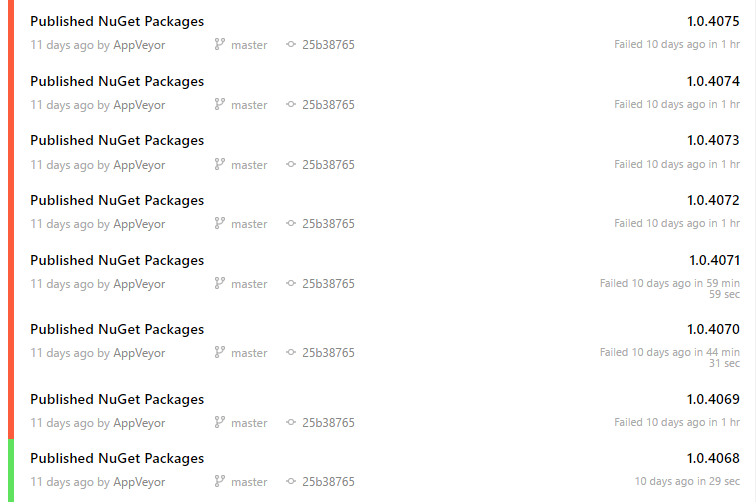
I didn't recall getting an error email from AppVeyor so I was initially suspicious. But logging in and looking at build history: hmmm. Looking back at my email, looks like I did receive the first failed build email - but must have been busy day as I didn't happen to notice that one email (when I usually do from other projects).

service status image of problem with nuget

YIKES!... so I quickly responded to Microsoft saying I'd shut down the automated portion and dig into it.

The Problem & Resolution

Turns out the problem was due to a large pull request that updated about every package in the DT repo. This meant it had to publish every single package, but for some reason (not showing in the logs) the AppVeyor job was failing at the end and not saving the fact that the packages were being updated on NuGet...

I have a way to run the NuGet publish manually on a local machine so I pulled down the project and ran the complete build. This took quite a while (almost 3 hours) and eventually I discovered the problem.

At the end of the script is a git commit -m {msg} command. This is an important step as it records what has been updated/published. The problem was due to the large number of packages published, the {msg} was so big that it was throwing an error saying the command line command was too long to execute. Causing the system to not complete the cycle and end up re-publishing all nuget packages every 2 hours.

I was able to manually commit with a shorter message and it brought the system back to normal.

And below is NuGet status after the fix.

service status image of problem with nuget

Thanks NuGet!

Turns out the NuGet team put some time into optimizing the publishing process of their service - so maybe there was a benefit to this whole fiasco, but hopefully we won't be hammering the system going forward :)

So I'd like to say thanks again to the NuGet team for your kind support email and professional way of handling the issue. This is a great example of how Microsoft is helping the OSS community and their support is really taking off and showing promise!

Also Good Point

service status image of problem with nuget

Happy NuGetting!

(Comments)

Developer Friendly React Component Errors

(Comments)

One of the biggest pain points I've run into while building an application with Facebook's React is when you goof something up and you get an error in one of the React component lifecycle methods such as render, componentWillMount, componentDidUpdate, etc. The biggest problem is the lack of a feedback loop because React is swallowing exceptions, so you don't see the reported error in your developer console or any global error handlers called. There's even a chance you don't know something is going wrong (yet).

If I google for react try catch the first search result hit landed me on this GitHub issue on error boundaries (status: open as of this writing). There is a pull-request with what looks to be a potential work around, but until this lands and it provides enough of a solution I hope the below can help you.

If you read the comments of this post you'll see this helpful comment where Skiano links to a github repo with a pretty good wrapper that re-writes React components so the lifecycle methods get a useful try/catch and can properly log errors.

I liked the approach provided above but since I'm working on a project that is using BabelJS and ES6/7, I wanted to see if I could try using the new ES7 Decorators which Babel supports to allow tagging certain ES6 React classes with this try/catch wrapper.

Below is what it looks like if you end up using it.

Usage with an es7 @decorator

import React from 'react';
import wrapReactLifecycleMethodsWithTryCatch from 'react-component-errors'

@wrapReactLifecycleMethodsWithTryCatch
class MyComponent : React.Component {
  componentDidMount(){
    throw new Error("Test error");
  }
  render(){
    return <div>Hello</div>;
  }
}

But you can also use this without the decorator pattern just by passing the class through the wrapper function.

Usage without a decorator

import wrapReactComponentMethodsWithTryCatch from `react-log-errors.js`

var MyComponent = React.createClass({
  componentDidMount: function () {
      throw new Error("Test error");
  },
  render: function() {
    return <div>Hello</div>;
  }
});

wrapReactComponentMethodsWithTryCatch(MyComponent);

How to get it?

NOT tested for performance...

FYI: this is primarily built as a development tool and has not been performance tested. While I haven't noticed any performance issues - I wouldn't recommend sending to production as is without a deeper impact analysis.

Happy React Debugging!

(Comments)

Habit of a Solid Developer - Part 9 - Rapid Feedback

(Comments)

This article is Part 9 of 11 in a series about Habit of a Solid Developer.

Find your feedback loop and then try to find ways to increase it's it's ability to report feedback sooner.

Feedback can come in many ways, and no matter what that feedback loop is, finding ways to increase it's ability to get you feedback sooner is generally going to help you in the long run.

If you think of a typical software development lifecycle, you can find ways to improve feedback loops in nearly all levels of the process. In a aesign phase, reviewing designs with the client/steakholder is one way to get feedback. During development you can get feedback from your unit tests or compiler or even your editors, when you manually review changes made in the application, or especially code reviews with other developers. QA's main purpose is to create a solid feedback loop about quality and while it's generally a slower feedback loop than other forms feedback it is extremly important and should generally not be overlooked or ignored. Once the app is in the wild, customers give feedback and your applications can report various types of feedback such as crashes or customer sign-up numbers.

You've likely heard of the idea of Failing Fast (if not, you should). In the end, failing fast is a great a type of feedback.

Try pair programming, having a partner watch for and point out silly mistakes, or propose alternative approaches. The instant feedback is hugely beneficial. Leverage the feedback of other tools such as a compiler, unit tests, or manual testing.

When working with a new code library or dependency, don't make assumptions about how something works, even though the principle of least astonishment is nice to follow, don't assume that's how it works. Prove it, test it, fail fast or gather feedback on the exercise.

Test assumptions and prove to yourself that the assumptions are either right or wrong. This could come down to how you expect a library function to behave for certain inputs, or this could apply to how you think the customer wanted you to implement a feature.

Don't wait till the product is shipped to learn that's not what your customer asked for, try and find out ways to get that feedback sooner. Send it to some early adopters or beta users.

No matter what area of the process you work in or with, take a step back and look at your current feedback loops, how can you inject new feedback loops or improve the speed at which existing feedback loops can reach you. Can you turn a nightly build into an hourly build or check-in build (or auto-build on file save)? Of course too much feedback can get overwhelming, so take the ones that provide the most value to you and your process and find ways to optimize them.

Happy Feedback!

(Comments)

Habit of a Solid Developer - Part 8 - Podcasts

(Comments)

This article is Part 8 of 11 in a series about Habit of a Solid Developer.

One of the best investments I made into my own education in the software development field was when I convinced my boss to purchase an mp3 player (It was a Zune back in the day and was perfect for the job).

My company didn't seem to mind spending several thousand once a year to send me to a developer conference, but in comparison, a cheap purchase of a music player that I could sync Podcasts to was the best investment my employer could have made. With almost 1.5 hours commuting in the car round-trip, I was able to soak up a large amount of technology related information each and every day. My co-workers were always wondering where and how I would come up with the knowledge about frameworks, tools, designs and other ideas.

Equipment Needed

You can likely go fancy with equipment, but I keep it pretty simple. Player and earbud headphones.

A podcast player

Since everyone is different and how they want to consume podcast often varies, I'm not going to spend time recommending hardware/apps. If you have a smartphone, you already have a great podcast player in your pocket. Just take some time and look at 3rd party podcast player apps that are in your phone's app store. If you don't have a smartphone, there are lots of options from just about anywhere. I use my iPhone since it's always with me and I can use the Downcast app which has some great features that don't come with the standard iTunes podcast player.

Side note: I'm currently building a podcast player with the intent of launching on Xbox One. If you have any interest, come check it out...

Some earbud headphones

Be sure to pick a pair of earbud headphones that have the mic button control. There is a button on there that can be used to control the play/pause of what you're listening to. This is handy because I can setup a podcast to play, place the phone in my pocket, stick an earbud in an ear and go about my task while listening to a podcast. With the mic button if my wife wants to talk to me it's a simple click to pause the show. If you haven't given this a try, I recommend it.

Choosing Podcasts

There are lots of ways to decide what podcasts to listen to, but here are some approaches I find useful.

When I don't know what's out there on a subject, I like to browse iTunes for a search term, select a few in the area of interest, download a couple shows and give them a listen.

While listening to podcasts, I pay attention to other shows that are mentioned or recommended. If I like the one I'm currently listening to and they suggest I check out another podcast, there's a good chance I'll like it as well.

Don't feel like you have to commit to the podcast, if you listen to a few shows and you don't like the format or topics discussed, unsubscribe from the ones that don't add value to either your education or entertainment setting. I find it is also a good idea to delete episodes on topics you have no interest in, or skip ones if they're not keeping your attention.

There is so much good content out there that you should never feel you need to listen to something that isn't going to keep your interest.

When to listen.

I no longer commute 1.X hours a day since I started working remotely, but that doesn't mean I don't have time to listen to podcasts. In fact, the number of podcasts that I subscribe to (and listen to) has actually gone up since my commuter days.

Time/places to consume the content.

  1. Obviously commuting to work is a great place to listen to podcasts. Put down the crappy celebrity gossip ridden talk radio (unless you're into that sort of thing) and soak up some higher quality informative podcasts.
  2. Household chores is a great time to listen. Distention got podcasts while folding laundry or putting away dishes really helps with the mundane tasks.
  3. Driving to pick up kids or after dropping them off. This was funny to me, on an episode of Startups for the rest of us Rob said:

And the one other thing I do is, let’s say I’m going to go travel, from the time that I step in my car and leave my house, I have an earbud in. So I drive to the airport with an earbud in. I get out, I check in, I go through security, all with an earbud in. I wait and I get on the plane, and on the plane, maybe I’ll watch a movie, but if I’m going to try to sleep, typically I’ll listen to podcast. So there is like hours on both ends of a flight as an example. I can churn through 30 podcast episodes as long as I delete some, I’ll skip a few or I’ll skip around, that kind of stuff. I also have an earbud in when I’m making breakfast in the morning. I have one when I’m making dinner in the evening, when I’m doing dishes, when I’m out doing yard work, when I’m taking out the trash. Like most of my off time, when I’m not with my kids and when I’m kind of doing manual tasks. Even if it’s like five minutes of manual tasks, I can crank through stuff. So that’s kind of my process. How about you? - See more at: http://www.startupsfortherestofus.com/episodes/episode-240-podcasts-for-startup-founders#sthash.RMZtrseu.dpuf

Ramp up the playback speed

Most good podcast players have the ability to adjust the rate of playback while listening to the audio. Don't remember my old Zune having 1.5X playback speed, but oh man, once I discovered 1.5x playback speed on my Downcast app it's crazy how much content I can zip through (and still enjoy) at the faster rate.

It may take some getting used to the higher speeds but for me, 1.5X is just about right. I'd like to try more 1.75x but Downcast doesn't support it - it jumps up to 2X. When I try listening to 2x speed I find it requires more focus to understand what's going on and is much less of a enjoyable listening experience. I'm thinking I can get there if I train my brain to listen to it...

Listening to developer related podcasts

Keeping up on developer focused podcasts was where I got my start with podcasts and are still the core of my listening genre. Hearing about certain technologies multiple times on different podcasts may be just enough for me to start digging into the technology myself.

While I mentioned above about deleting podcasts that I have no interest in, I do enjoy the surprise episode of some technology I didn't think I'd be interested in that opens my eyes to something I hadn't known before. Even though it may turn out I never use sed technology, at least knowing a little about it can be beneficial if I have to apply it to a problem set in the future. This way, I at least been introduced to the idea and can research it further should I feel the need.

Subscribe to other subjects

If you start to become an oversumer of podcasts like myself, that's OK. Just make sure you're not consuming the same style of podcasts (in my case only development related). Try to diversify your subscriptions. While I really enjoy all my developer related podcasts and they are still core to much of my listening habits, some of my favorite podcast have nothing to do with software development. Give a look at some that I follow, ask what others are listening to, and have fun exploring all the great content that is out there.

Happy Listening & Learning!

(Comments)

Testing Asynchronous Code with MochaJS and ES7 async/await

(Comments)

A JavaScript project I'm working on recently underwent a pretty good refactor. Many of the modules/methods in the application worked in a synchronous fashion which meant their unit tests were also generally synchronous. This was great because synchronous code is pretty much always easier to test since they're simpler and easier to reason about.

However, even though I new early on that I would likely have to turn a good number of my synchronous methods into asynchronous ones I tried holding off on that as long as absolutely necessary. I was in a mode of prototyping as much of the application out as possible before I wanted to be worried/thinking about asynchronous aspects of the code base.

Part of why I held of on this was because I was pretty confident using the new proposed ES7 async/await syntax to turn the sync code into async code relatively easily. While there were a few bumps along the refactor actually went extremely well.

An example of one bump I ran into included replacing items.forEach(item => item.doSomethingNowThatWillBecomeAsyncSoon()) with something that worked asynchronously and I found this blog post immensely helpful. Basically, don't try to await a forEach instead build a list of promises you can await.

Another one I ran into was dealing with async mocha tests, which is what the rest of this post is about.

MochaJS is great because the asynchronous testing has been there from the beginning. If you've done (see what I did there?) any asynchronous testing with MochaJS then you already know that you can signal to Mocha an asynchronous test is done by calling the test's async callback method.

Before we look at how to test asynchronous Mocha tests leveraging the new ES 7 async/await syntax, let's first take a little journey through some of the various asynchronous testing options with Mocha.

Note: you will see example unit tests that use the expect(...).to.equal(...) style assertions from ChaiJS.

How to create an asynchronous MochaJS test?

If you look at a normal synchronous test:

it("should work", function(){
    console.log("Synchronous test");
});

all we have to do to turn it into an asynchronous test is to add a callback function as the first parameter in the mocha test function (I like to call it done) like this

it("should work", function(done){
    console.log("Synchronous test");
});

But that's an invalid asynchronous test.

Invalid basic async mocha test

This first async example test we show is invalid because the done callback is never called. Here's another example using setTimeout to simulate proper asynchronicity. This will show up in Mocha as a timeout error because we never signal back to mocha by calling our done method.

it("where we forget the done() callback!", function(done){
    setTimeout(function() {
        console.log("Test");
    }, 200);
});

Valid basic async mocha test

When we call the done method it tells Mocha the asynchronous work/test is complete.

it("Using setTimeout to simulate asynchronous code!", function(done){
    setTimeout(function() {
        done();
    }, 200);
});

Valid basic async mocha test (that fails)

With asynchronous tests, the way we tell Mocha the test failed is by passing an Error or string to the done(...) callback

it("Using setTimeout to simulate asynchronous code!", function(done){
    setTimeout(function() {
        done(new Error("This is a sample failing async test"));
    }, 200);
});

Invalid async with Promise mocha test

If you were to run the below test it would fail with a timeout error.

it("Using a Promise that resolves successfully!", function(done) {
    var testPromise = new Promise(function(resolve, reject) {
        setTimeout(function() {
            resolve("Hello!");
        }, 200);
    });

    testPromise.then(function(result) {
        expect(result).to.equal("Hello World!");
        done();
    }, done);
});

If you were to open up your developer tools you may notice an error printed to the console:

    Uncaught (in promise) i {message: "expected 'Hello!' to equal 'Hello World!'", showDiff: true, actual: "Hello!", expected: "Hello World!"}

The problem here is the expect(result).to.equal("Hello World!"); above will fail before we can signal to Mocha via the done() of either an error or a completion which causes a timeout.

We can update the above test with a try/catch around our expectations that could throw exceptions so that we can report any errors to Mocha if they happened.

it("Using a Promise that resolves successfully with wrong expectation!", function(done) {
    var testPromise = new Promise(function(resolve, reject) {
        setTimeout(function() {
            resolve("Hello World!");
        }, 200);
    });

    testPromise.then(function(result){
        try {
            expect(result).to.equal("Hello!");
            done();
        } catch(err) {
            done(err);
        }
    }, done);
});

This will correctly report the error in the test.

But there is a better way with promises. (mostly)

Mocha has built-in support for async tests that return a Promise. However, run into troubles with async and promises in the hook functions like before/beforEach/etc.... So if you keep reading you'll see a helper function that I've not had any issues with (besides it's a bit more work...).

Thanks to a comment from @syrnick below, I've extended this write-up...

Async tests can be accomplished in two ways. The first is the already shown done callback. The second is if you returned a Promise object from the test. This a great building block. The above example test has become a little verbose with all the usages of done and the try/catch - it just gets a little cumbersome to write.

If we wanted to re-write the above test we can simplify it to return just promise.

IMPORTANT: if you want to return a promise, you have to remove the done callback or mocha will assume you'll be using that first and not look for a promise return. Although I've seen comments in Mocha's github issues list where some people depend on it working with both a callback and a promise - your mileage may vary.

Here's an example of returning a Promise that correctly fails the test with the readable error message from Chaijs.

it("Using a Promise that resolves successfully with wrong expectation!", function() {
    var testPromise = new Promise(function(resolve, reject) {
        setTimeout(function() {
            resolve("Hello World!");
        }, 200);
    });

    return testPromise.then(function(result){
        expect(result).to.equal("Hello!");
    });
});

The great thing here is we can remove the second error promise callback (where we passed in done) as Mocha should catch any Promise rejections and fail the test for us.

Running the above test will result in the following easy to understand error message:

AssertionError: expected 'Hello!' to equal 'Hello World!'

Turn what we know above into async/await.

Now that we know there are some special things we need to do in our async mocha tests (done callbacks and try/catch or Promises) let's see what happens if we start to use the new ES7 async/await syntax in the language and if it can enable more readable asynchronous unit tests.

The beauty of the async/await syntax is we get to reduce the .then(callback, done)... mumbo jumbo and turn that into code that reads like it were happening synchronously. The downside of this approach is that it's not happening synchronously and we can't forget that when we're looking at code and starting to use it this way. But overall it is generally easier to reason about in this style.

The big changes from the above Promise style test and the transformed async test below are:

  1. Place the async word in front of the async function(done){.... This tells the system that inside of this function there may (or may not be) the use of the await keyword and in the end the function is turned into a Promise under the hood. a Promise to simplify our unit tests.
  2. We replace the .then(function(result){ promise work and in place use the await keyword to have it return the promise value assign it to result so after that we can run our expectations against it.
  3. Remove the done callback. If you aren't aware, async/await is a fancy compiler trick that under-the-hood turns the code into simple Promise chaining and callbacks. So we can use what we learned above about Mocha using 5. return the Promise.

If we apply the 5 notes listed above, we see that we can greatly improve the test readability.

it("Using a Promise with async/await that resolves successfully with wrong expectation!", async function() {
    var testPromise = new Promise(function(resolve, reject) {
        setTimeout(function() {
            resolve("Hello World!");
        }, 200);
    });

    var result = await testPromise;

    expect(result).to.equal("Hello!");
});

Notice the async function(){ part above turns this into a function that will (under-the-hood) return a promise that should correclty report errors when the expect(...) fails.

Handling errors with async/await

One interesting implementation detail around async await is that exceptions and errors are handled just like you were to handle them in synchronous code using a try/catch. While under-the-hood the errors turn into rejected Promises.

NOTE: You're mileage may vary with the async/await and mocha tests with promises. I tried playing around with async in mocha hooks like before/beforeEach but ran into some troubles.

Since there may or may-not be issues with mocha hook methods, one work-around is to leverage a try/catch and the done callback to manually handle exceptions. You may run into this so I'll show examples of how to avoid relying on Mocha to trap errors.

Below shows the (failing) but alternative way (not using a return Promsie) but using the done callback instead.

it("Using a Promise with async/await that resolves successfully with wrong expectation!", async function(done) {
    var testPromise = new Promise(function(resolve, reject) {
        setTimeout(function() {
            resolve("Hello World!");
        }, 200);
    });

    try {
        var result = await testPromise;

        expect(result).to.equal("Hello!");

        done();
    } catch(err) {
        done(err);
    }
});

Removing the test boilerplate

One I started seeing the pattern and use of try/catch boilerplate showing up in my async tests, it became apparent that there had to be a more terse approach that could help me avoid forgetting the try/catch needed in each async test. This was because I would often remember the async/await syntax changes for my async tests but would often forget the try/catch which often resulted in timeout errors instead of proper failures.

another example below with the async/await and try/catch

it("Using an async method with async/await!", async function(done) {
    try {
        var result = await somethingAsync();

        expect(result).to.equal(something);

        done();
    } catch(err) {
        done(err);
    }
});

So I refactored that to reduce the friction.

And the mochaAsync higher order function was born

This simple little guy takes an async function which looks like async () => {...}. It then returns a higher order function which is also asynchronous but has wrapped your test function in a try/catch and also takes care of calling the mocha done in the proper place (either after your test is asynchronously completed, or errors out).

var mochaAsync = (fn) => {
    return async (done) => {
        try {
            await fn();
            done();
        } catch (err) {
            done(err);
        }
    };
};

You can use it like this:

it("Sample async/await mocha test using wrapper", mochaAsync(async () => {
    var x = await someAsyncMethodToTest();
    expect(x).to.equal(true);
}));

It can also be used with the mocha before, beforeEach, after, afterEach setup/teardown methods.

beforeEach(mochaAsync(async () => {
    await someLongSetupCode();
}));

In closing.

This post may have seemed like quite a journey to get to the little poorly named mochaAsync or learn to use Mocha's Promise support but I hope it was helpful and I can't wait for the async/await syntax to become mainstream in JavaScript, but until then I'm thankful we have transpiling tools like Babel so we can take advantage of these features now. ESNext-pecially in our tests...

Happy Testing!

(Comments)

Habit of a Solid Developer - Part 7 - Changes Should be Taken with Baby Steps

(Comments)

This article is Part 7 of 11 in a series about Habit of a Solid Developer.

Have you ever made some code changes and while in the process of making those changes realize you need to change something else, which leads to changes to that thing over there and then again up there, and down here, and over there and since we're in here and I've been meaning to tweak this well... and paused to realize you forgot the original goal of why you are even looking at this module of code? No never? (well I have). git reset --hard and start over :)

If you're one who likes to apply the ol Boy Scout rule of Always leave the campground cleaner than you found it to your code, just don't, at lest not yet. While I'm a big fan of cleaning up those legacy areas of code that just need a good sweep up, the approach taken here needs to be handled with care. I'm also referring to code that is likely covered well with automated testing.

But Why?

Before you go around making a bunch of cleanup changes, fixing formatting, changing variable names, general cleanup. Accomplish a tiny part of your overall objective and commit just that change.

If you see other things along the way, take note and come back to them later. Or if, like me you can't help yourself, just don't check all of those changes in at once. Use something like git add -p to segregate your code commits into tiny topical changes.

If the job is to rename a variable, don't also fix spelling, format code, extract method, etc.... Save those other changes for different commits.

But what if you don't know what you're planning to change?

Sometimes, it's good to go off and spike a big swath of changes just to get an idea how much impact a refactor could have on the architecture or project as a whole. Prototype something to get a good picture of whether a change is possible or not or to see how many coupled items need to be adjusted along the way.

However, you go into it knowing you will likely just undo all of your changes all together with the goal to surface more knowledgeable and either:

A) determine that it is a do-able change and should or should not even be attempted in a proper fashion B) or you've uncovered some challenges that are not easily overcome and require more thought or prior preparatory refactorings.

Use TDD as a forcing mechanism to small changes

TDD (Test Driven Development) is a great way to take as tiny a step as possible. With this approach, you can write a test, make it pass (consider that a change) and possibly check it in to source control. One test at a time ensures that you're taking baby steps along the way to solving the bigger problem(s).

Baby Steps also when Debugging

Taking baby steps is also important when debugging. Running around the codebase changing X, Y, and Z just to see if you can fix a bug will often times get you in a bigger mess than the original bug you tried to fix. Making one change at a time, verifying the bug, then the next change is quite often a better approach. So consider going slow and taking baby steps.

It doesn't matter if you're making project-wide architectural changes or surgical bug fixes, if you can, try to take baby steps, commit the changes and verify each change along the way. It may feel like you're going slower, but in the long haul you may actually save time.

Happy Baby Steps!

(Comments)

How to Base64 and save a binary audio file to local storage and play it back in the browser

(Comments)

I wanted to see if it was possible to save a small audio file into localStorage, read it back out and play the file. In this post I'll show you short example on how to download an audio file, save it to localStorage, read it back and set it up for playback.

Disclaimers

works on my machine
  • This was tested in IE 10 (Win 8), Chrome 46 (Mac), and Firefox 41 (Mac); however, some of the api's and techniques used in this demo are not supported in all browsers, such as the FileReader, Blob, Promise, and fetch api's. The Promise and fetch api's can be polyfilled. There may be polyfills for the other api's, but I haven't researched those.
  • This post isn't going to go into much of the "should I do this", as I'm sure you can come up with many reasons why you shouldn't. But I couldn't find any examples that demonstrated these steps in one place. So I prototyped the idea and am putting it here in case I do want to use this in the future sometime (or maybe you do too).
  • My tests in Chrome didn't go great if I tried to re-run the experiment multiple times. Sometimes it would work, other times it seemed to get into a bad state and always raised a MediaError event. Refreshing the page would get it working again.

First we need an audio file

I don't want to point to any specific audio example since I'd feel bad if some poor soul's hosted mp3 file gets hammered (not likely) because of this example. But you just need a link to a simple, short mp3 (or whatever audio type you're trying to test). If you look at the sample below replace <<SampleAudioUrlHere>> with the link to your test audio file.

Won't fit in localStorage?

If you're trying to save an audio file that's too large as a Base64 encoded audio file will be larger than it's original size and we don't get very much space in localStorage then, ya you're using a file that's too large... Get something smaller or don't to this. Just sayin :P

How does it work?

  1. Use fetch api we can easily get at the blob()
  2. Run the Blob through the FileReader
  3. Which also handily turned it into a data url for us
  4. The data url is just a base64 encoded string which is easy to save to localStorage
  5. Read the string back out of localStorage
  6. Set the audio's src attribute to the audio data url
  7. Profit!

While I was prototyping this I was borrowing someone else short mp3 file and to work around CORS (cross origin http request) I used the handy https://crossorigin.me/<<SampleAudioUrlHere>> service. This may be ok to do for a prototype, but you should't typically run your requests through this service. It's insecure and against pretty much all the different web religions.

Show me the code

This was just a quick get-er-done example. Lots of not-great-practices, but it demonstrates the possibility. Enjoy!

<!DOCTYPE html>
<html>

  <head>
    <script>

      // Code goes here
      var audioFileUrl = '<<SampleAudioUrlHere>>';

      window.onload = function() {

        var downloadButton = document.getElementById('download');
        var audioControl = document.getElementById('audio');

        audioControl.onerror = function(){
          console.log(audioControl.error);
        };

        downloadButton.addEventListener('click', function() {

          audioControl.src = null;

          fetch(audioFileUrl)
            .then(function(res) {
              res.blob().then(function(blob) {
                var size = blob.size;
                var type = blob.type;

                var reader = new FileReader();
                reader.addEventListener("loadend", function() {

                  // console.log('reader.result:', reader.result);

                  // 1: play the base64 encoded data directly works
                  // audioControl.src = reader.result;

                  // 2: Serialize the data to localStorage and read it back then play...
                  var base64FileData = reader.result.toString();

                  var mediaFile = {
                    fileUrl: audioFileUrl,
                    size: blob.size,
                    type: blob.type,
                    src: base64FileData
                  };

                  // save the file info to localStorage
                  localStorage.setItem('myTest', JSON.stringify(mediaFile));

                  // read out the file info from localStorage again
                  var reReadItem = JSON.parse(localStorage.getItem('myTest'));

                  audioControl.src = reReadItem.src;

                });

                reader.readAsDataURL(blob);

              });
            });

        });

      };

    </script>
  </head>

  <body>
    <button id="download">Run Example</button>
    <br />
    <audio controls="true" id="audio" src=""></audio>
  </body>

</html>

I hope you found this quick tutorial useful. Would love to hear any feedback or thoughts on the approach.

As earways, Happy Listening!

(Comments)